Author: admin

  • Vegan Chickpea Burgers | Kara Lydon

    Vegan Chickpea Burgers | Kara Lydon

    These vegan chickpea burgers are nourishing and packed with bold flavor. They’re perfect baked or grilled in a cast iron pan and are delicious when smothered with my smoked paprika vegan aioli.vegan chickpea burger with tomato, lettuce and vegan aioli on hamburger bun

    Why You’ll Love this Recipe

    Hearty, nourishing, and delicious. What more could you want out of a vegan burger?!

    Packed with protein and fiber-rich ingredients like chickpeas, quinoa, rolled oats, and hemp seeds, this burger is sure to satisfy.

    It boasts bold flavor thanks to spices like paprika, cumin and coriander, and to the miso umami-bomb.

    These are quick to grill in a cast iron pan, only taking a few minutes per side. If you want a crispier vegan burger, then take the extra time to bake them! These burgers bake perfectly in the oven in 25 minutes.

    These burgers are perfect for your next summer cookout or BBQ and are sure to wow all your vegan guests!

    Ingredients You’ll Need

    graphic of ingredients for vegan chickpea burgers on marble surface with black text overlay

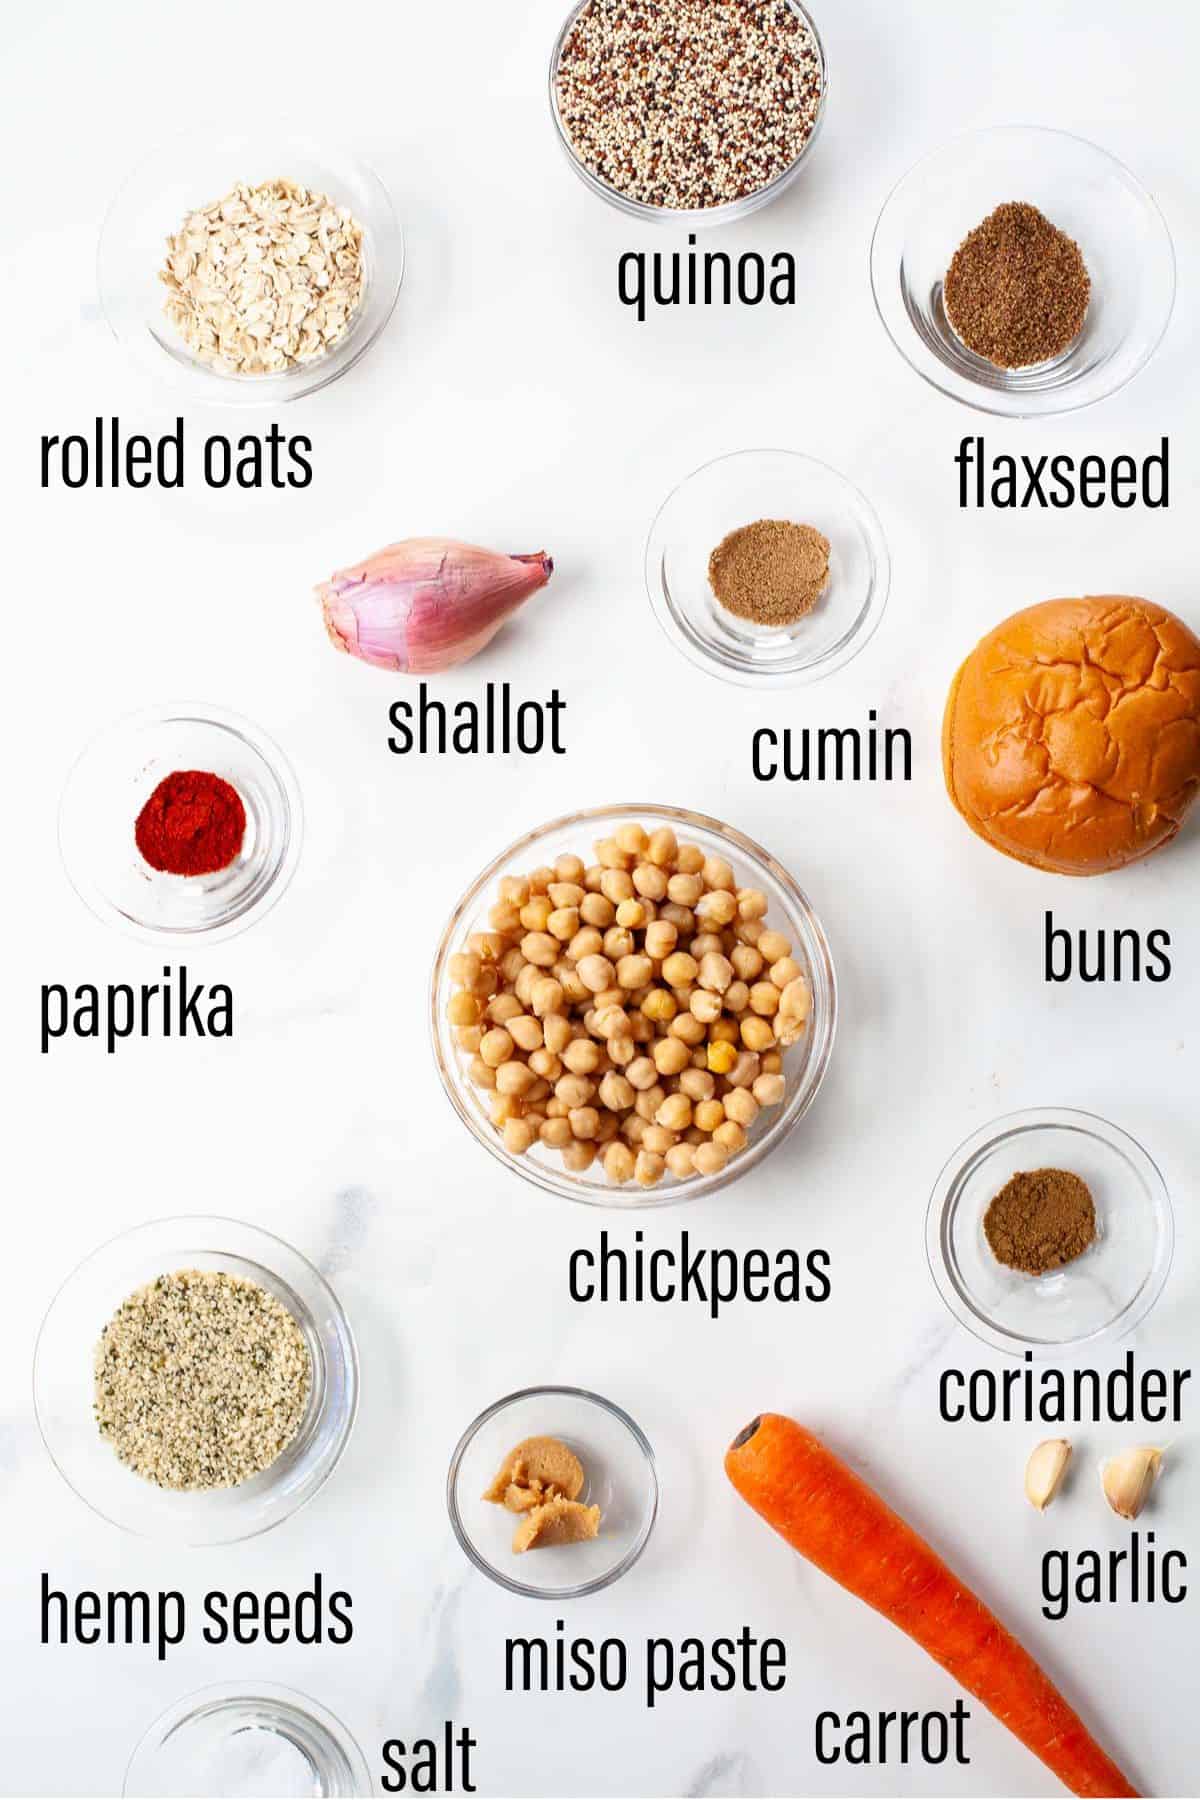
    Notes on Ingredients

    chickpeas: I use canned – be sure to rinse and drain to remove excess sodium 

    flaxseed: mixed with water to create a flax “egg” to help bind the ingredients. Make sure you use ground flaxseed.

    garlic: adds flavor to burgers. you could use garlic powder if you don’t have fresh garlic

    shallot: adds a mild onion-like flavor

    carrot: adds a subtle sweetness, some veggies, and color to the burgers

    quinoa: adds more protein, fiber and bulk to the burgers

    rolled oats: helps to bind burgers – you could also use breadcrumbs or quinoa flakes if you have them on hand

    hemp seeds: adds protein, fiber and omega-3s!

    miso paste: adds an umami savory flavor punch. can use tomato paste as a substitute.

    paprika: mildly sweet and subtly smoky, this adds flavor to the burgers

    cumin: adds a rich, nutty, earthy flavor

    coriander: adds warm, sweet and citrusy flavor

    salt: helps to enhance and meld the flavors of the burger

    olive oil: used for grilling in the cast iron pan

    hamburger buns: for serving – you can use gluten-free buns if you are gluten-free

    Equipment You’ll Need (affiliate links – if you make a purchase I receive a small commission)

    Cast iron pan

    How to Make Vegan Chickpea Burgers

    graphic how to make vegan chickpea burgers step by step

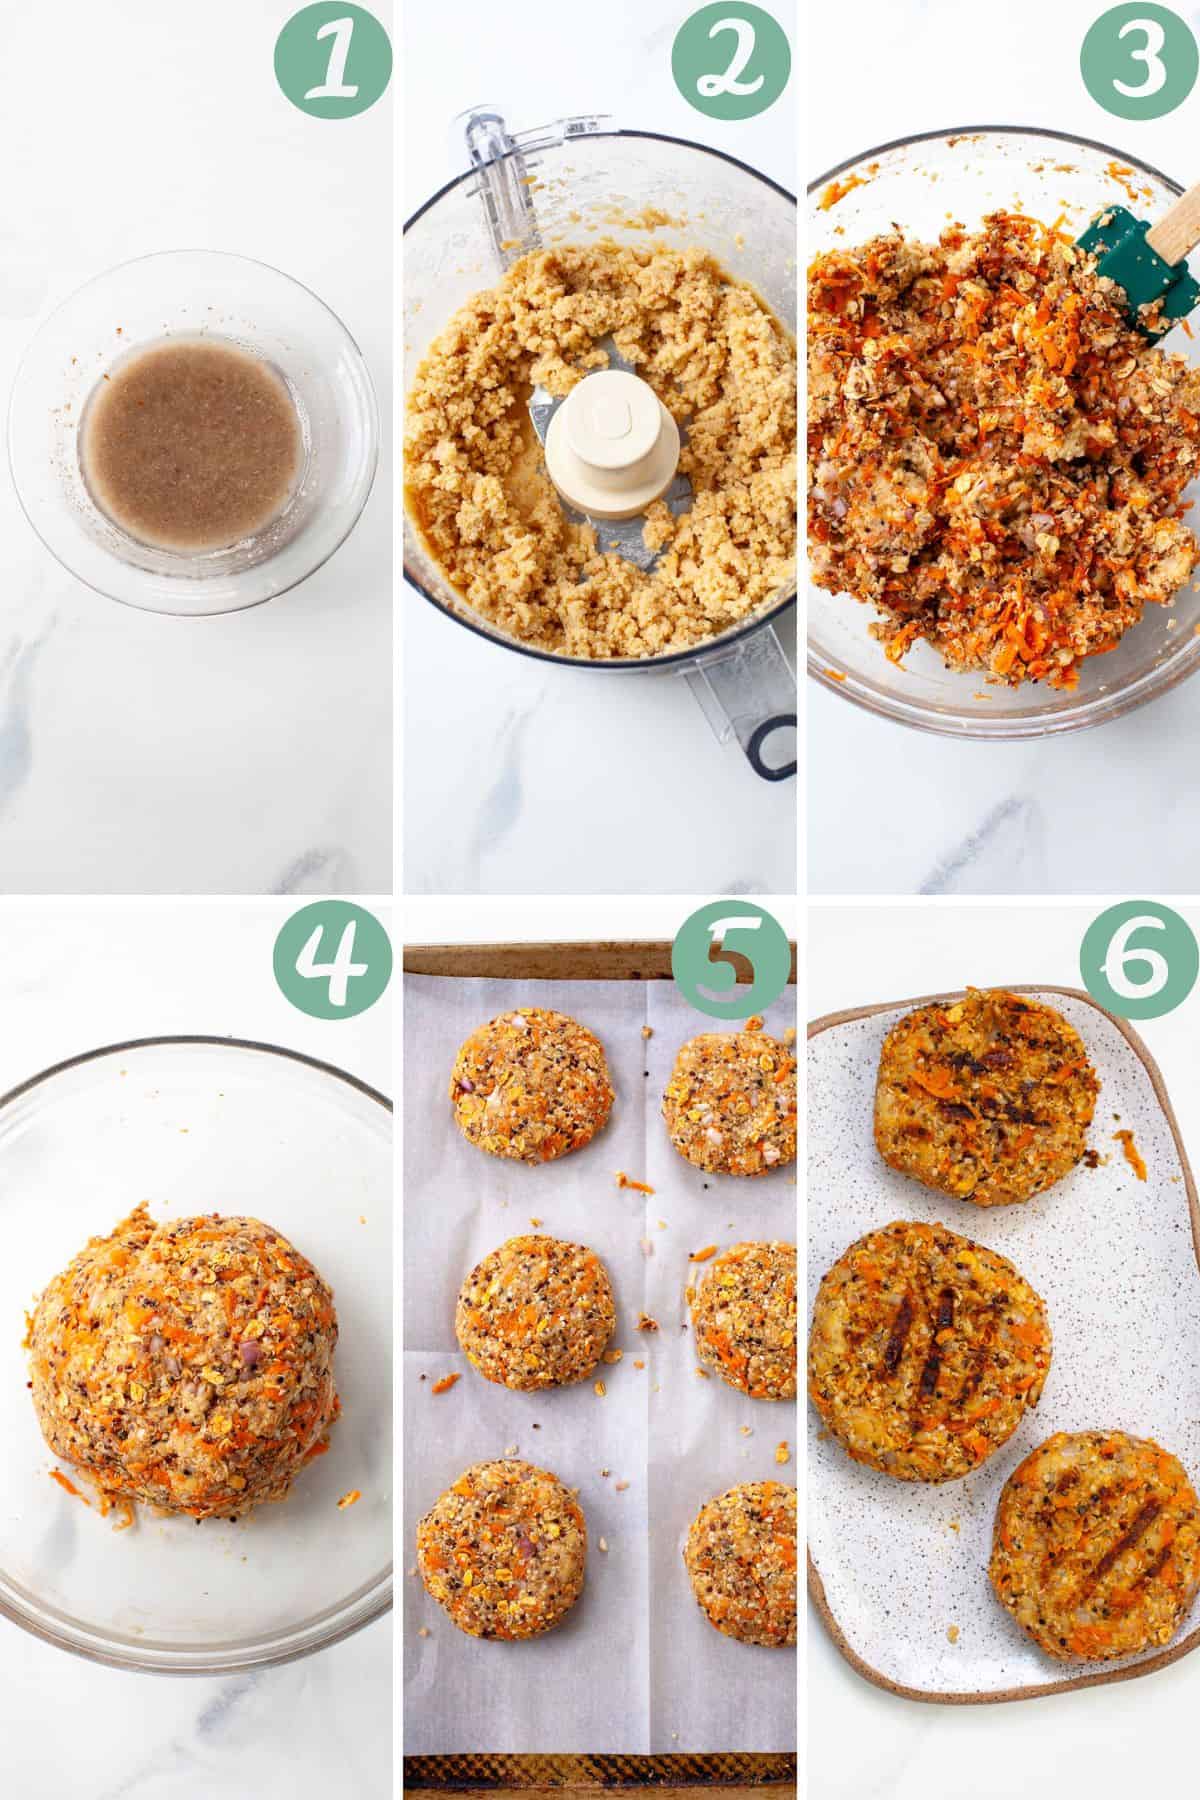
    Make the flax “egg”.  Stir flaxseed with 3 tablespoons water and let sit until thickens, at least 5 minutes.
    Mash the chickpeas. In a large bowl, add chickpeas and use a potato masher or back of a fork to mash chickpeas. Or, use a food processor (my preferred method) add chickpeas and pulse until chickpeas are ground.
    Combine all ingredients. Add garlic, shallot, carrot, quinoa. oats, hemp, miso, paprika, cumin, coriander, salt, and pepper, and mix together until combined.
    Refrigerate ingredients. Press burger mixture together to form into a round. Cover and refrigerate for 30 minutes. 
    Form patties. Form mixture into six burger patties.
    Grill burgers. Add olive oil to a cast iron grill pan (or any nonstick skillet) over medium heat. Add burgers and cook until browned, about 3-4 minutes per side. If you’re baking the burgers, bake at 400 degrees F for 15 minutes, flip, and bake for another 10-15 minutes, or until browned and crispy to the touch.
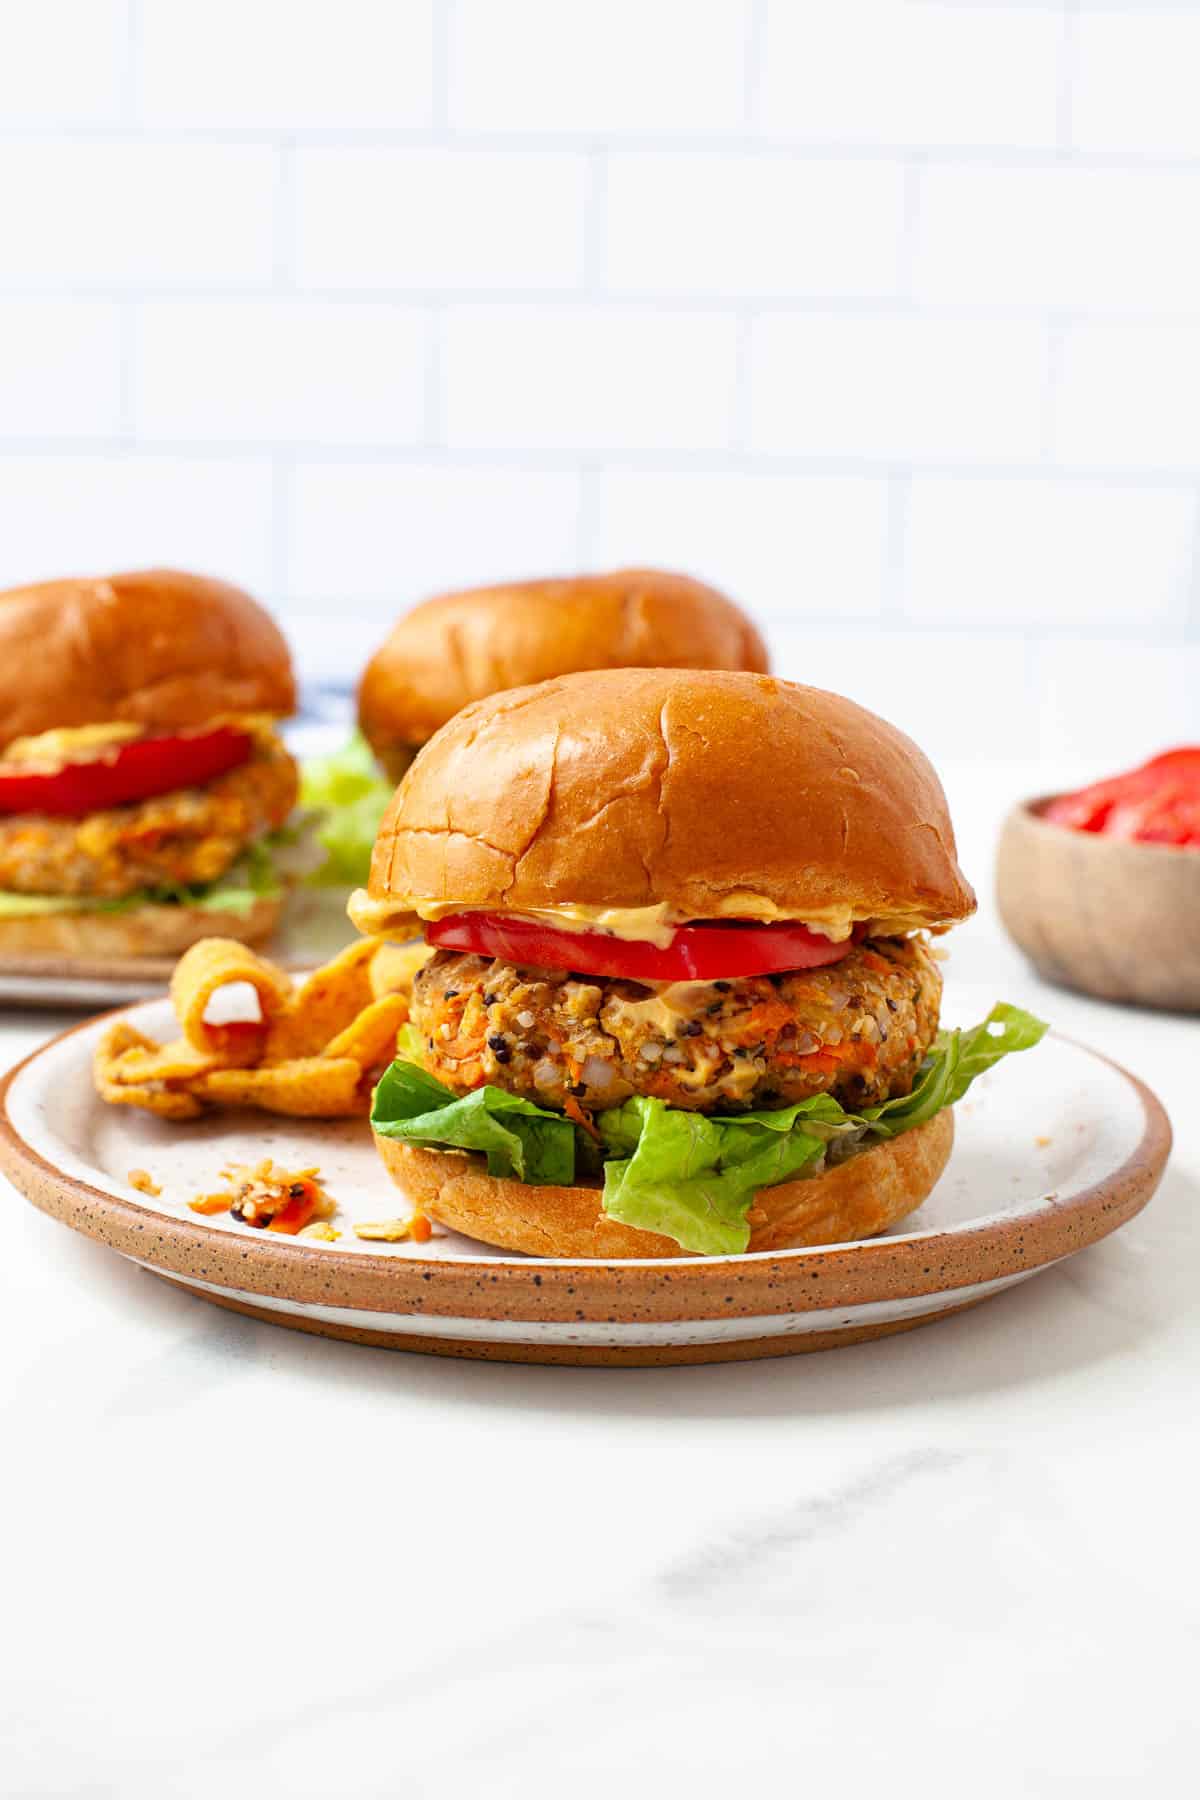
    Assemble your burgers! Serve with buns, vegan aioli, and desired toppings like tomatoes, lettuce, onion, and avocado.

    Expert Tips

    If you like your vegan burgers crispier, take the time to bake them in the oven. Grilling the burgers in the cast iron or skillet is great if you’re strapped for time or you enjoy a mushier consistency. 
    Customize this recipe based on your flavor preferences – experiment with different spices and sauces. If you like buffalo sauce, be sure to try my buffalo chickpea burgers!

    Recipe FAQs

    How do you keep chickpea burgers from falling apart?

    To keep chickpea burgers from falling apart, you need to make sure you have enough binding agents to soak up the moisture from the chickpeas. Binding agents include breadcrumbs, oats, or quinoa flakes. You also need to use an egg or egg alternative like a flax egg to keep burgers from falling apart.

    Are chickpea burgers healthy?

    These chickpea burgers are packed with plant-based protein, fiber, and omega-3 fatty acids. Chickpeas are also packed with vitamins and minerals like iron, copper, manganese, folate, zinc, phosphorous, magnesium, thiamin, B6, selenium, and potassium.

    What makes vegan patties stick together?

    Using an egg or egg replacement like a flax egg helps vegan patties stick together. You also want to have enough binders like breadcrumbs or oats to soak up moisture.

    How do you add flavor to a veggie burger?

    There are lots of ways to add flavor to a veggie burger – onion, shallot, and garlic go a long way. Using spices or herbs like basil, cilantro, paprika, cumin help add flavor. You could also use a hot sauce like Frank’s to make a buffalo flavored veggie burger.

    three vegan chickpea burgers with lettuce, tomato, vegan aioli on white and brown plate

    Storage and Preparation

    Chickpea burger leftovers can be stored in an airtight container in the refrigerator for up to 3-4 days or in the freezer for up to 3 months.

    To reheat chickpea burgers, heat in the oven at 350 degrees F for 15-20 minutes or until heated through. You could also air fry the burgers at 325 degrees F for 10 minutes or until heated through. To reheat frozen burgers, let defrost first in the refrigerator overnight before reheating.

    These burgers can be made ahead of time and stored in the refrigerator for up to 3 days before cooking.

    Recipes That Pair Well

    Instant Pot Baked Beans 

    Air Fryer Frozen French Fries

    Kohlrabi Fries

    Caprese Pasta Salad with Pesto

    No Mayo Coleslaw

    vegan chickpea burger on bun with lettuce, tomato, vegan aioli with two burgers behind

    For more veggie burger inspiration, check out my other recipes below!

    Mushroom Black Bean Burger

    Spicy Hummus Black Bean Veggie Burger

    Buffalo Chickpea Veggie Burgers

    If you like this recipe, please be sure to comment and give it a 5 star rating below. If you make it, share it on Instagram and tag me @karalydonrd and I’ll re-share it with my followers! If you want to save this recipe for later, be sure to pin it on Pinterest!

    Don’t ever miss a recipe! Sign up to receive my monthly newsletter with a round-up of recipes from the previous month and get my FREE guide when you sign up: Rediscover the Joy in Eating: 5 Simple Steps to Stop Stressing Over Food + Enjoy Every Bite

    Print

    clock clock iconcutlery cutlery iconflag flag iconfolder folder iconinstagram instagram iconpinterest pinterest iconfacebook facebook iconprint print iconsquares squares iconheart heart iconheart solid heart solid icon

    Description

    These vegan chickpea burgers are nourishing and packed with bold flavor. They’re perfect baked or grilled in a cast iron pan and are delicious when smothered with my smoked paprika vegan aioli.

    For the burgers:

    1 tablespoon ground flaxseed
    1 15.5 ounce can chickpeas, drained and rinsed (about 1.5 cups) *
    2 cloves garlic, minced
    1 shallot, minced (about 1/4 cup)
    1 large carrot, peeled and grated
    1 cup cooked quinoa *
    1/3 cup rolled oats
    1/3 cup hemp seeds
    2 teaspoons white miso paste
    1 teaspoon paprika
    1 teaspoon cumin
    1 teaspoon coriander
    1 teaspoon salt
    Pepper, to taste
    1 tablespoon olive oil
    6 hamburger buns
    Optional, for serving: lettuce, tomato, onion, avocado

    For the vegan garlic aioli:

    2 tablespoons aquafaba (from can of chickpeas)
    1 clove garlic, grated or minced
    1/2 tablespoon lemon juice
    1/4 teaspoon salt
    1/4 teaspoon smoked paprika
    1/2 cup olive oil

    For the burgers:

    In a small bowl, stir together flaxseed and 3 tablespoons water and let sit for at least 5 minutes or until thickens.
    In a food processor, add chickpeas and pulse until chickpeas are ground or use a potato masher or the back of a fork to mash chickpeas.
    In a large bowl add ground chickpeas, garlic, shallot, carrot, quinoa, rolled oats, hemp seeds, miso, paprika, cumin, coriander, salt and flax egg. Mix ingredients together until combined. Season with pepper, to taste.
    Using your (clean) hands, press burger mixture together to form a round. Cover and refrigerate for 30 minutes.
    Form mixture into six burger patties.
    Add olive oil to a cast iron grill pan (or any non-stick skillet) over medium heat. Add burgers and cook until browned, about 3-4 minutes per side. *
    Serve burgers on buns with desired toppings (lettuce, tomato, onion, avocado) and vegan aioli.

    For the vegan garlic aioli (makes 1/2 cup): 

    Add aquafaba, garlic, lemon juice, salt, and smoked paprika to a blender (or tall measuring cup if using an immersion blender).
    With the blender or immersion blender running, slowly drizzle in olive oil until thick and creamy.
    Serve with vegan chickpea burgers.

    Notes

    Save the leftover chickpea juice (aquafaba) from the can for the aioli.
    Cook quinoa according to package instructions. 1/3 cup dry quinoa yields 1 cup cooked quinoa.
    To bake burgers, preheat oven to 400 degrees F and line baking sheet with parchment paper. Bake burgers for 15 minutes, flip, and bake for another 10-15 minutes, or until burgers are browned and crispy to the touch.

    Prep Time: 40 minutesCook Time: 7 minutesCategory: DinnerMethod: Cast IronCuisine: Vegan

    Keywords: vegan chickpea burgers, vegan burgers, chickpea burgers, vegetarian chickpea burgers, veggie chickpea burgers

  • The Best Grilled Pork Loin (With Easy Rub)

    The Best Grilled Pork Loin (With Easy Rub)

    The Best Grilled Pork Loin (With Easy Rub) – The Real Food Dietitians


    Privacy & Cookies Policy


  • Summer Skin Care: How To Prep Your Skin For Summer

    Summer Skin Care: How To Prep Your Skin For Summer

    We wait all year for the warm summer months. Long nights by the campfire, days at the beach, weekend getaways, hiking, biking and barbecues. And making the most of this special time of year usually means spending lots of time outdoors. 

    At Eminence Organics, we want you to enjoy being outside and stay protected with a proper summer skin care routine. We asked our esthetics experts to hand-pick a few favorite summer skin care essentials to help you prep and protect your skin as we move into the summer months. 

    Summer Skin Care For The Daytime

    Exfoliate To Prevent Ingrown Hairs

    For many of us, one of the major bumps in the road to getting summer ready involves hair removal – and specifically ingrown hairs. These little spots can develop after shaving or waxing when the hair grows back into the skin instead of straight out. They usually show up as tiny bumps that can be painful and even end up swollen and infected.

    Because cell turnover is much slower on your legs and underarms, dead skin cells can build up quickly, hiding stubborn ingrown hairs, clogging your razor and causing uncomfortable razor burn. Exfoliating your skin allows any hair that may be tucked under dead skin to be lifted and more easily removed. A scrub can help release ingrown hairs that are starting to form and prevent future ingrown hairs from developing. A couple of days before shaving or waxing, try the Coconut Sugar Scrub to slough off dead skin cells or use a swipe of the lactic acid-packed Bright Skin Licorice Root Exfoliating Peel to create a smooth and primed canvas.

    Protect Skin With A Sunscreen Designed For Exercise

    A sun-kissed glow might be a summer beauty goal, but proper sun protection is a non-negotiable part of any summer skin care routine. According to the Skin Cancer Foundation, more people are diagnosed with skin cancer each year in the U.S. than all other cancers combined.

    And while we’re on the subject: Did you know that your risk of melanoma doubles if you have had more than five sunburns in your lifetime? If you’re planning to spend time in the sun, protecting your skin from sun damage should be priority number one.  

    Shield your skin from the sun’s harmful rays with Lilikoi Mineral Defense Sport Sunscreen SPF 30, which is formulated with zinc oxide. Whether you’re swimming or playing sports outside, this sweat and water-resistant sunscreen offers broad-spectrum protection from UV rays throughout those hot days. Resistant through water activities and perspiration for up to 40 minutes, this sport formulation should be a permanent fixture in your beach bag to prevent sun damage. Just remember to apply it at least 15 minutes before you head outside and re-apply every two hours. More is more when it comes to protecting your skin. 

    Use A Replenishing Mask To Hydrate Parched Skin

    Chlorine (and salt water, if you’re a beach bunny) can strip away oil from the skin, leaving your summer complexion parched and dry. Consider treating your skin with a replenishing mask to rehydrate your complexion. If you’re suffering from too much sun and dry skin, our Strawberry Rhubarb Masque uses shea butter to provide the deep moisture you need for a plump and refreshed appearance. 

    To help the look of drying environmental damage, try a boost of vitamins and a smoothie’s worth of citrus, leafy greens and avocado oil. Not only does the Citrus & Kale Potent C+E Masque improve the appearance of dry, red skin, it leaves you looking bright, firm and plumped.

    To rejuvenate your skin after masking, rehydrate your whole body with plenty of water. Down those eight glasses a day and keep your moisture levels topped up, inside and out.

    Switch To A Moisturizer With SPF

    Who doesn’t love the ease of a moisturizer that doubles as sun protection? Our Lilikoi Daily Defense Moisturizer SPF 40 is the multitasker you need this summer. This moisturizer uses natural minerals zinc oxide and titanium oxide to block UV rays. Lilikoi seed oil helps with the visible signs of aging, so the Lilikoi Mineral Defense Moisturizer not only protects the skin from the elements, it also leaves you lightly hydrated and looking fresh and natural. 

    And since we’re really into SPF around here, it can’t hurt to mention another all mineral SPF moisturizer that is silicone-free and formulated specifically for the face and neck. The Tropical Vanilla Day Cream SPF 40 has shea butter and a light scent of vanilla – you’ll feel as though you’ve been transported to a tropical oasis.

    Apply Makeup That Doubles As Sun Care

    If you’re looking for another multi-purpose product, our mineral powders pull double duty as skin care and makeup. For a more natural look this summer, swap out your traditional finishing powder for our Sun Defense Minerals. With five versatile shades plus one translucent powder to choose from, you’ll find just the right option for you. And don’t forget to protect your lips, which are highly susceptible to sunburn. Rosehip & Lemongrass Lip Balm SPF 15 is infused with rosehip oil, lavender and zinc oxide to keep your pucker perfectly moisturized and protected.

    At Night: Repair Your Skin For An Ongoing Glow

    Nighttime Skin Care Starts With Cleansing 

    You’re doing everything right during the day, but even the most protected skin can use some overnight care. Whether it’s chlorine, salt water or a bit too much time with a bit too little sunscreen, your skin will always benefit from some TLC. To help keep the skin clear this summer, make sure that you never go to bed without washing your face. Skipping the occasional wash might not seem like a big deal, but between sweat, oil, sand and SPF, your face sees a lot on a summer day and needs a good cleanse to get rid of all the surface buildup and impurities. Try the Mangosteen Daily Resurfacing Cleanser and head to bed with a fresh face.

    The sun’s harmful impact on the body doesn’t stop once you’ve sought out shade; the effects of UV exposure, including dry and itchy skin, can take from two to four hours to fully develop. Because of this, it’s always a good idea to follow time spent in the sun with the replenishing moisture from these Eminence Organics after-sun essentials.

    Replenish Moisture

    If your skin is suffering from sun exposure, hydrate and gently resurface dry skin with our Mangosteen Body Lotion. Infused with antioxidant-rich mangosteen and our Lactic Acid Complex, this lightweight lotion will leave your skin soft and moisturized.

    Give dry, dull, itchy skin across your body some relief with Yuzu Solid Body Oil. This transformative solid body oil infuses dry, dull skin with dreamy yuzu and vitamin-rich camu camu for radiant skin. Refining PHA and lush tropical oils enhance hydration for all skin types to leave even the most sun-parched skin supple and glowing. Plus this body oil has a light yet irresistible citrus scent that feels as bright and uplifting as the summer sun.

    How do you protect your skin from the sun? Browse our full list of summer essentials and find even more summer skin care tips and recommendations at an Eminence Organics Spa Partner near you.

  • Dill Pickle Chicken Salad (Easy Make-Ahead Lunch)

    Dill Pickle Chicken Salad (Easy Make-Ahead Lunch)

    Dill Pickle Chicken Salad (Easy Make-Ahead Lunch) – The Real Food Dietitians


    Privacy & Cookies Policy


  • Lymphatic Massage For Face And Body

    Lymphatic Massage For Face And Body

    While you may not be familiar with lymphatic massage, you have probably read about one of the most popular ways it’s done: with a gua sha tool. This, and other forms of lymphatic drainage massage, are getting a lot of play these days — and for good reason! These specialized drainage massages focus on the lymphatic system, a part of the immune system responsible for removing waste and toxins from tissues in the body. Since it serves an important role in overall health, it’s important to keep it moving. A targeted drainage massage can help keep the lymphatic system operating as it should. Let’s do a deep dive and then explore different lymphatic massages you can do at home to get your own lymphatic system flowing.

    What Is The Lymphatic System? 

    The lymphatic system is a network of vessels, nodes and ducts that pass through almost all bodily tissues. Its main function is to speed up the process of removing certain toxins and waste from the body. It does this by draining excess fluid that builds up in tissue, filtering out foreign bodies and transporting the fluid back into the bloodstream. As fluid moves through lymphatic vessels, it passes through lymph nodes that contain high concentrations of lymphocytes (types of white blood cells), which attack pathogens like bacteria, viruses and fungi.

    The system allows the circulation of a fluid called lymph through the body in a similar way to blood. It plays a key role in fighting disease and in overall health. An excess in fluid buildup can lead to issues that can make us feel uncomfortable, run down and even sick. The lymph system also helps absorb dietary fat and fat-soluble vitamins. With so many functions, it’s clear that a functioning lymphatic system is important to our overall health! 

    Why Do We Need Lymphatic Massage?

    As mentioned, lymphatic fluid passes through the body like blood. However, unlike blood, which is circulated through the body with the help of a pump (the heart), the lymphatic system has no “pump.” It relies on pressure, muscle contractions, and one-way valves to squeeze fluid through a network of vessels. As mindbodygreen explains, “muscle contraction [plus] diet, exercise and physical manipulation are all required for the system to function normally.” That’s where lymphatic massage comes in.

    Since the body often needs a little help to get the system moving, massage is a gentle way to alleviate some of the uncomfortable buildup and even dangerous issues that are associated with a slow or malfunctioning lymphatic system. Stagnant lymph flow leads to waste and toxin buildup, weakening immunity and leading to a wide variety of health issues including fluid retention, respiratory issues, sinus infections, swollen glands, eczema and colds. 

    To find out more, follow along as we explore simple techniques known to help stimulate the lymph system, which can be performed at home with a few simple tools. 

    Do I Need Lymphatic Drainage?

    Because a slow lymph system can cause fluid retention, a telltale sign that there is an issue is puffiness in the face. Whether it’s fuller cheeks or undereye bags, the extra fluid can affect the way you look and feel. Giving yourself a gentle massage at home is a relaxing way to address the symptoms and may provide benefits beyond just reducing swelling in the face. “A stagnant lymphatic system can cause acne, breakouts, even full dry skin,” celebrity facialist Joanna Vargas says. “As the lymphatic system accumulates more and more waste, it can result in inflammation (and all acne stems from inflammation of some kind). So by flushing out that waste and encouraging flow, you can keep the skin from becoming congested.” With these potential benefits in mind, let’s get started:

    Massage For Facial Lymphatic Drainage

    Step 1

    Apply 3-4 drops of facial oil to add slip to the area. This will prevent the fingers from tugging. Two oils that work well for this type of massage are the Facial Recovery Oil and the Camellia Glow Solid Face Oil.  If you choose to use a gua sha tool for lymphatic drainage, follow the instructions here or here.

    Product Picks

    Award Winning

    Luxurious facial oil – All skin…

    Award Winning

    With luxurious botanical oils

    Step 2

    Begin by placing two fingers (pointer and middle) about an inch out from the center of your neck and apply gentle pressure. Lift the chin to help with the draining. Draw 5-10 tiny circles in the area with fingers moving forward. Next, move the fingers up towards the top of the jaw where it meets the ear and repeat 5-10 tiny circles or downward strokes in that little nook. Then move the two fingers on each side down to the top of the collarbones and repeat small circles. These are the areas where the lymph fluid flows, so stimulating them will help the drainage. 

    Step 3

    Bring your two fingers to the top of the cheeks and repeat 5-10 circles. Move up to the cheekbones (under the eyes) and repeat 5-10 circles. Next, go just underneath the eyebrows, 5-10 circles. Finally, place three fingers (pointer, middle and ring) vertically on each side of the middle of the forehead and gently complete small circles every inch across the forehead until you reach your temples. 

    Step 4

    The most important last step is to swipe your fingers down towards your neck and collarbones 5-10 times to get the fluid to flow down to where it can be drained, as lymph fluid empties into the bloodstream via the subclavian veins at the base of the neck.

    When you’re done, leave the oil on for maximum benefits and drink plenty of fluids! Well-hydrated tissue helps move out waste. 

    Watch as our Lead Skin Care Trainer, Natalie Pergar, walks you through this routine. 


    Body Massage For Lymphatic Drainage With Dry Brush

    Much like the face, the body can show signs of a sluggish lymphatic system through water retention, puffiness and even worsened cellulite. Different types of massages can help get the system going. One of the main techniques uses light rhythmic movements to stimulate the lymphatic system without pressing on any vessels. This movement allows lymph fluid to flow through nodes and tissues beneath the skin surface. It prevents fluid retention by gently stretching the skin in the direction of lymph flow.

    While this type of massage is best left to a professional, dry brushing is a simple, quick and effective way to perform a type of lymphatic massage at home.

    What Is Dry Brushing? 

    Dry brushing is another body care technique that gets the lymphatic system flowing. Derived from Ayurvedic medicine, this technique has been around for centuries. It is a natural detoxification practice that gently flushes out toxins without disturbing the body’s balance and can help you feel energetic and revitalized. Most dry brushes are made of a wood base with natural fiber bristles. They can have long handles or just a strap that wraps over the hand for easy gripping. The bristles are generally quite firm but because you’ll only be applying gentle pressure, they shouldn’t feel rough against your skin. However, they will perform a gentle skin exfoliation, which is a nice bonus. 

    For best lymphatic drainage results, dry brushing should be done on bare skin. Also, consider dry brushing in the shower (without any water running) to effortlessly eliminate sloughed-off dead skin down the drain.

    Step 1

    As the name suggests, dry brushing is done dry – meaning a dry brush (without any oil or lotion) placed directly on clean, dry skin. 

    Open up the neck area first. It helps to stimulate the sympathetic area of your lymphatic system – moving the fluids that run naturally through your body. When dry brushing, use wide, circular, clockwise motions. Always move towards the heart. Strokes at the neck will move down the body. Do 10 strokes on the right side and then repeat on the left. Remember, the goal is to gently stimulate the lymphatic pathways right under the skin. 

    Step 2

    There are lymph nodes in the armpits, so that is an area that shouldn’t be missed. Begin by brushing under the arm and down the back of it (from armpit to elbow), again moving across the chest towards the heart. Complete about 10 light strokes in each area. 

    Step 3

    Next up, your hands and lower your arms. Start at the ends of the fingers and lightly brush up the arm towards the heart. Repeat 10 times on each surface of the arm, including the inside of the wrist up to the elbow.

    Step 4

    Lightly brush the abdomen area. Draw circles both clockwise and counter-clockwise around the belly button and then brush from the lower stomach up towards the chest in light, vertical strokes. 

    Step 5 

    Now on to legs. If possible, place the leg you’re working on up on a bench or stool so that you can easily reach down without hunching over. Start with the top of the foot and gently brush 10 strokes up. Follow this with 10 strokes on the calf, both front and back, spending extra time right behind the knee, to stimulate those lymph nodes. Also brush around the knee cap where fluid can get stuck. Repeat on the other leg. And then do the same for the thigh area and the buttocks. 

    When you’re done, your skin will be smooth and exfoliated, but may feel slightly dry. The best way to end the dry brushing session is with a quick shower (bonus points if you can tolerate 30 seconds of cold water at the end, as the shock of cold causes your lymph vessels to contract, forcing your lymphatic system to pump lymph fluids throughout your body). After the shower, dry off and apply Stone Crop Contouring Body Cream to help hydrate the skin post dry brushing session. 

    Watch our Lead Skin Care Trainer, Natalie Pergar, demonstrate the dry brushing technique that you can do at home. 


    Now that you know the benefits of lymphatic drainage, try some of these techniques at home! 

  • The Best Ingredients For Oily Skin—Start Using These Now!

    The Best Ingredients For Oily Skin—Start Using These Now!

    Do you struggle with constantly shiny skin? Are you having to reapply your makeup every few hours? Is accidentally leaving your blotting sheets at home a cause for panic? Chances are you have oily skin (Skin Type 1-4), generally characterized by excess oil production and visibly larger pores (most commonly in the T-zone). This type of skin is also more prone to clogged pores and blemishes. While your skin type boils down to a few unchangeable factors, such as genetics and age, a thoughtful skincare routine and the right ingredients can do wonders for managing oily skin and preventing breakouts.

    How To Tell If You Have Oily Skin

    Yes, all people produce oil, also known as sebum, as it is a way for our bodies to excrete waste out of the skin. This is how your skin protects and moisturizes itself. Sebum is key to preventing moisture loss and maintaining barrier function. Dry skin types naturally produce very little sebum on their own (not to be confused with dehydrated skin, which lacks water).

    But what constitutes a true, oily skin type? I’m here to help you understand oily skin and its many facets. While we can’t always identify it by appearance– as some people experience thin, slick, and shiny sebum, and others matte, waxy sebum–there are a few other factors that we can keep in mind.

    Pore Size

    The size of your pores is generally the first place to start when determining if you have oily skin. The larger the pore, the more oil you will produce. This is because oil and sweat expand the pore walls, causing them to stretch out. The good news? You can minimize the appearance of your pores over time.

    Acne

    Not all people with oily skin will have acne, however, almost everyone with acne has oily skin. Oil laying on top of the skin breeds bacteria, leading to clogged pores and breakouts. Clogged pores ultimately result from hardened oil and dead skin cells falling into the pore instead of properly shedding.

    Age

    Sebum production can also change with age, usually decreasing in production as you get older. In general, your skin type is likely to change every seven to nine years. One study found that sebum production increases during teenage years, declining for women during menopause and rapidly decreasing for men a bit later in life. Since sebum provides natural lubrication for the skin, using hydrating serums and the right moisturizer for your skin type is important to your routine as you get older. I’ve always said that so many skin problems are a direct result of not allowing your skincare routine to grow alongside you. While certain products may have been the key to solving relentless hormonal acne in your teens, they likely won’t deliver the same results as your skin matures and develops new problems.

    Still unsure if your skin is classified as oily? I encourage you to take the Skin Type Quiz! With just a few simple questions, you can learn more about your skin, as well as receive personalized product recommendations. 

    Ingredients To Use For Oily Skin

    While we can’t change our skin type or minimize our pores (just their appearance), there are still ingredients that can help decrease oil production and minimize breakouts. So, let’s dive into the specific ingredients that you should use to care for your oily skin. 

    Salicylic Acid

    Salicylic acid is one of the golden ingredients for skin, and rightly so. Most people associate it with being an oil-soluble BHA that dives into the pores to sweep out oil and reduce the formation of acne. While this is true (and a great reason to use it as a spot treatment!) salicylic acid is useful in so many other ways.

    One of the best parts about salicylic acid is that it can provide nearly instant results. For starters, it is great for softening the outer layer of skin. This ingredient provides conditioning benefits that not only improve how the skin looks but also how it feels. It clears clogged pores and lessens visible bumps and breakouts in products like Pore + Wrinkle Perfecting Serum. Salicylic acid is also an excellent superficial exfoliant. It works to slough dead cells off the outer layers of skin, providing an instantly smoother, brighter complexion.

    While many people hold the superstition that all exfoliating acids have to be at a low pH, salicylic acid provides wonderful exfoliating effects at a neutral pH. A great example of this is the AHA/BHA Blemish Control Cleanser which uses salicylic acid as an exfoliating BHA to clean oil from the skin as well as exfoliate and remove dead skin.

    There are also a few benefits to salicylic acid that may take a few weeks to notice. For one, this ingredient has noticeable anti-inflammatory effects that are great for those that suffer from acne and signs of inflammation. It will also communicate with the cells and tell them to reduce the amount of sebum they are producing. This not only removes the oil from the pores but also helps decrease the overall amount of oil produced on the skin. Pretty incredible, right?

    Niacinamide

    Niacinamide is an ingredient that can do far more for your skin than most people know. One study published in the Journal of Cosmetic Laser Therapy found that daily application of two percent niacinamide significantly reduced the rate at which the body produced sebum as well as reduced overall sebum levels in only 4-6 weeks. Niacinamide’s sebum-reducing properties are also great for those that struggle with the occasional oil-induced breakouts.

    Sodium PCA

    Sodium PCA is another great ingredient because this one is actually an inherent part of sebum that is produced within the skin, meaning it’s a natural component already. PCA is a great material on its own, but when combined with sodium, it makes for an even better delivery system into the skin. It also serves as a humectant, which will help draw moisture up into the skin without the use of other lipids. 

    Witch Hazel

    While witch hazel has built itself an unpleasant reputation for being drying and irritating, this misunderstood ingredient is actually a great option for those with oily skin. If it still stings to think about (those ‘90s toners were no joke), I think it’s important to note that products no longer formulate with harsh concentrations of 100% witch hazel. New formulations combine a small amount of witch hazel with hydrating ingredients, allowing you to reap the ingredient’s oil-cutting benefits without drying out your skin. Witch hazel’s astringency effect is great for tightening pores, healing the skin, and reducing inflammation, making it a hero product for those with excess oil.

    While toners like Balancing Skin Tonic are the most classic method for delivering witch hazel, masks like Energizing Clay Masque and moisturizers like Daily Mattifying Solution are great alternatives with the same astringent benefits!

    Panthenol

    Lastly, Panthenol is an amazing ingredient when it comes to reducing inflammation. It is also non-comedogenic, making it a great choice for those struggling with acne. It’s great for improving skin conditions and reducing any scarring associated with acne.

    Ingredients To Avoid For Oily Skin

    Now that you know oily skin’s ingredient heroes, it’s time to discuss the equally important matter of which ingredients to avoid when caring for oily skin. Here are a few ingredients that I recommend keeping out of your routine… 

    Drying Alcohols

    You may be thinking that the goal when dealing with oily skin is to dry it out, but this is not the case. Products containing drying alcohols are only going to strip your skin entirely of sebum, causing it to go into panic mode and produce even more. After all, sebum provides that natural lubrication that keeps your skin healthy. We don’t want to eliminate it, we just want to keep it at manageable levels.

    Strong Cleansers

    Many foaming or gel cleansers are still formulated with ingredients like Sodium Lauryl Sulfate, Sodium Laureth Sulfate, or Ammonium Laureth Sulfate. While these ingredients are surfactants, meaning they are cleansing agents that cut oil from the skin, they are not in alignment with your skin’s natural pH. These ingredients will strip too much water out of your skin with every wash, leaving you with damaged, dehydrated skin.

    Mineral Oil and Petrolatum

    Oily and acne-prone skin types should steer clear of mineral oil and petrolatum due to their comedogenic properties. These ingredients are very occlusive and are likely to trap dead skin cells and sweat into your skin, leading to clogged pores. 

    Isopropyl palmitate and Isopropyl Myristate

    These are esters that are commonly used as a thickening agent in moisturizers and hair care. While they are not necessarily a no-no for oily skin, those with acne should try to avoid them due to their comedogenic properties. They may feel lighter than traditional oils, however, they are known to cause clogged pores and contribute to breakouts with repeated use. 

    The most important thing to keep an eye out for when researching products is to pay attention to where your information is coming from. A lot of skincare do’s and don’ts can be demonstrated with science, but a lot of it just comes down to experience. It’s critical to look at who you’re receiving information from and what qualifications they have. At the end of the day, you can spend a lot of money on products falsely advertised for oily skin and still end up disappointed when you’re not getting the results you wanted.

    Next, learn how to spot-treat a pimple at every stage.

  • Blog

    Blog

    7 Reasons to Book a Wellness Retreat

    by Caitlin H,

    Jun 5, 2023

    7 Reasons to Book a Wellness Retreat

    Imagine waking up feeling energized and fresh in a clean, luxurious hotel room before heading to a short yoga session with a stunning backdrop of distant mountains or a beautiful blue ocean and sandy beach. Then, consider how great it would feel to enjoy a nutritious, balanced meal and spend the rest of your day getting a massage or spa treatment, exercising with a trained fitness instructor, or working with therapists to learn how to incorporate mindfulness into your daily routine.

    Those are just a few of the extraordinary things you can expect when you take a wellness vacation, which are getaways designed to help you focus on your overall well-being.

    Tweet

    Turn Your Daily Stroll Into a Walking Meditation

    by Caitlin H,

    May 29, 2023

    Turn Your Daily Stroll Into a Walking Meditation

    One of the most accessible and perhaps enjoyable fitness activities to make a part of your daily routine is walking. That’s especially true during the late spring and summer months when the fresh air, sunshine, and beautiful scenery can elevate it to the next level.

    And while those things may improve your fitness and well-being in and of themselves, what if there were a way to make them even more beneficial?

    Enter…meditation.

    Tweet

    12 Healthy Snacks Everyone Should Have On Hand

    by Caitlin H,

    May 22, 2023

    12 Healthy Snacks Everyone Should Have On Hand

    Do you often find yourself eyeing the snack machine in the office or scanning the pantry at home between meals?

    Constantly feeling hungry can be a recipe for disaster when it comes to weight loss, especially if you’re snacking on unhealthy foods like chips or candy bars all day.  Stocking your pantry or office desk with healthy snacks packed with filling nutrients like fiber and protein is essential.

    We have 12 suggestions for filling, healthy, simple snacks that can break the hangry cycle and keep you satisfied and energized all day.

    Tweet

    10 Tips to Break a Bad Habit for Good

    by Caitlin H,

    May 15, 2023

    10 Tips to Break a Bad Habit for Good

    Many of us structure our lives around habits, such as getting up at 7 a.m., drinking a cup of morning coffee, or eating dinner at 6 p.m. These regular practices may be a critical part of ensuring your everyday life is consistent and manageable, and that’s a good thing.

    But some habits—such as smoking, overeating, drinking, consuming too much caffeine, or scanning social media right before bed—can negatively impact your overall health and well-being.

    There’s a good chance you can quickly identify your own bad habit (or habits). There’s an even better chance you are well aware of their harmful effects. So how do you go about breaking those bad habits? 

    Tweet

    7 Brain Exercise Activities to Keep Your Mind Sharp

    by Caitlin H,

    May 8, 2023

    7 Brain Exercise Activities to Keep Your Mind Sharp

    Creating a healthy lifestyle is about many things. It’s about a consistent diet with balanced nutrition. It’s about staying active and exercising. It’s about ensuring your mental well-being. And it’s about keeping your brain active and engaged.

    Need a little help keeping that mind sharp, engaged, and present in the moment?  Read on!

    Tweet

    10 Signs Your Diet is a Dud

    by Caitlin H,

    May 1, 2023

    10 Signs Your Diet is a Dud

    If you’re like many of our customers, there’s a solid chance you have tried some weight loss plans in the past—and didn’t see the long-term results you desired.

    Here’s the thing: The people who find lasting success do so by making it a lifestyle. That doesn’t mean you shouldn’t try a diet. But it means you need to find a diet that works for you and allows you to incorporate healthy eating into your everyday life.

    But how can you tell if that “diet” can become a lifestyle?

    Tweet

    Delicious Recipes For Our Favorite Spring Fruits

    by Caitlin H,

    Apr 24, 2023

    Delicious Recipes For Our Favorite Spring Fruits

    Spring is the most colorful time of year, and that’s especially true when it comes to spring fruits!

    While you can find these fruits year-round in supermarkets, using seasonal produce tends to elicit the best-tasting results. You can also visit farmers’ markets to support local growers and get the freshest stuff available.

    We love springtime and the colorful fruits that come with it. Now is the perfect time to try a new light, healthy snack or dessert that everyone will love!

    Tweet

    Financial Analyst Loses 10 Pounds in One Month with Diet-to-Go

    by Caitlin H,

    Apr 17, 2023

    Financial Analyst Loses 10 Pounds in One Month with Diet-to-Go

    Hailey’s 32nd birthday weekend in February was filled with the kinds of things most people like to do on their birthdays — dinner and drink outings, celebrations with friends, and enjoying time with her fiancé.

    But after that weekend, Hailey stepped onto the scale and quickly realized she had gained 5 pounds over those few days alone.

    Find out how Diet-to-Go helped Hailey lose 10 pounds in 30 days!

    Tweet

    10 Fun Fitness Ideas to Make Exercise Enjoyable

    by Caitlin H,

    Apr 10, 2023

    10 Fun Fitness Ideas to Make Exercise Enjoyable

    Exercising can sometimes feel intimidating, especially when you go to a gym and see what looks like elite athletes pumping weights or pounding out mile after mile on the treadmill.

    It’s okay. We get it. And you are certainly not alone. Thankfully, exercising can take place anywhere, anytime, and in all sorts of fun formats.

    Tweet

    The Benefits of Staying Hydrated and How Much Water to Drink

    by Caitlin H,

    Apr 3, 2023

    The Benefits of Staying Hydrated and How Much Water to Drink

    Water is an essential part of a healthy, well-rounded diet. In fact, studies show that hydrating often may slow the aging process and help you live longer. In addition to adding years to your life, there are also a host of other benefits of drinking water and staying well-hydrated.

    So, how much water should you drink each day? 

    Here’s the thing, it’s not a one-size-fits-all model. But, we can help you figure out what amount is right for you!

    Tweet

    5 Weight Loss Tips That Fit Into Your Hectic Schedule

    by Caitlin H,

    Mar 27, 2023

    5 Weight Loss Tips That Fit Into Your Hectic Schedule

    Remember when it was just before the new year, and you were highly motivated to lose weight and get healthy?

    Between balancing things like work, kids, social events, and everything in between, our hectic schedules often mean there’s not much time left for self-care or healthy habits, and that resolution might have fallen to the wayside.

    But here’s the thing: Taking care of yourself ensures everything, and everyone else will get the best, most productive version of yourself.

    How do you make taking care of yourself a priority again though?

    Tweet

    7 Scientific Reasons You Should Try Meatless Monday

    by Caitlin H,

    Mar 20, 2023

    7 Scientific Reasons You Should Try Meatless Monday

    Burgers, steak, lamb chops — red meat is a staple of the American diet.

    While it may be unreasonable to cut it out of your diet completely, going vegetarian at least one day a week can go a long way toward improving your health. That’s why we outlined seven scientific reasons why you should try Meatless Monday and reap all the benefits of reducing your meat consumption.

    Tweet

    Reverse Your Prediabetes With These 5 Tips

    by Caitlin H,

    Mar 13, 2023

    Reverse Your Prediabetes With These 5 Tips

    Prediabetes means your blood sugar levels are higher than normal, but not high enough to be diagnosed as diabetes. It could be considered a blessing in disguise. Knowing that you have it allows you to make new, healthier choices to reverse the condition and hopefully help you avoid developing Type 2 Diabetes.

    Tweet

    Simple Ways to Tell if Your Food is Nutritious

    by Caitlin H,

    Mar 6, 2023

    Simple Ways to Tell if Your Food is Nutritious

    Proper nutrition is one of the most important ways to ensure you lead a healthy, happy, long life. In fact, studies show that eating a balanced diet plays a role in all sorts of things. 

    It can be challenging to know whether your food is nutritious. Labels can be confusing if you’re not a nutrition expert, and honestly, how many of us are? But don’t stress! Check out our easy to follow beginner’s guide to deciphering food labels.

    Tweet

    8 Essential Elements for a Healthier Heart

    by Caitlin H,

    Feb 27, 2023

    8 Essential Elements for a Healthier Heart

    February is American Heart Month, an annual observance of the importance of cardiovascular health. The American Heart Association and all health providers use the month to remind us to engage in healthy habits that reduce our heart disease risk.

    That’s why the American Heart Association (AHA) identifies these eight essential elements to better heart health. Read on to learn more!

    Tweet

    Break That Snacking Habit with These Expert Tips

    by Caitlin H,

    Feb 20, 2023

    Break That Snacking Habit with These Expert Tips

    It’s 8 p.m., and you’re enjoying your favorite TV show or cozied up on the couch with a good book. Then, you get up and find yourself standing in the kitchen, reaching for a handful of chips or a couple of cookies.

    If this sounds all-too-familiar, you’re not alone. Mindless snacking is a habit many of us deal with daily, whether sitting at the office (or home office), perusing social media, or even snuggling up in bed.

    Thankfully, there are ways you can cut back on snacking.

    Tweet

    10 Delicious, Healthy Dinners to Wow Your Sweetheart

    by Caitlin H,

    Feb 14, 2023

    10 Delicious, Healthy Dinners to Wow Your Sweetheart

    Did you remember Valentine’s Day? If you or your sweetie are trying to eat healthily, why not keep the momentum going by whipping up a delicious dinner?

    Want to try a new recipe to surprise your sweetie for Valentine’s Day (or any day)? We’ve got your covered with some tasty choices! Bon appétit!

    Tweet

    7 Ways to Make the Most of Your First Day at the Gym

    by Caitlin H,

    Feb 6, 2023

    7 Ways to Make the Most of Your First Day at the Gym

    You did it. You committed to your health and fitness and signed up for a gym membership. And now, it’s time to step into that world of weights and cardio machines for the first time. It can feel pretty darn intimidating. That’s more than okay. It’s a brand new situation, and doing anything for the first time can be nerve-wracking.

    Thankfully, the gym is actually a place you can have fun and spend time — you just have to set yourself up for success before showing up for the first time.

    Tweet

    These 5 Simple Dietary Swaps Could Lengthen Your Life

    by Caitlin H,

    Jan 30, 2023

    These 5 Simple Dietary Swaps Could Lengthen Your Life

    If the potential of adding years to your life by making small changes appeals to you, listen up.

    Improving the quality of foods you eat daily — even just a little — can extend your life, no matter how old you are.  Making some simple swaps to your overall diet can improve your nutritional intake — and maybe even add years to your life!

    Tweet

    Step Outside Your Comfort Zone This Year

    by Caitlin H,

    Jan 23, 2023

    Step Outside Your Comfort Zone This Year

    The new year is often when we think about hitting the reset button on some (or several!) aspects of our lives. We consider our intentions, set goals, and start doing what we can to achieve them.

    This year, consider the following: How often do you set a goal to do something extraordinary that will give you a sense of true exhilaration?

    Maybe it’s time to step outside your comfort zone and live life to the fullest!

    Tweet

  • 6 Ways to Find More Enjoyment in Eating

    Food is meant to be pleasurable and enjoying your food is good for your health! Leave behind the guilt and shame and follow these six tips to find more enjoyment in eating.

    What if I told you that eating is meant to be enjoyable? That food is meant to be pleasurable. That eating for satisfaction is actually beneficial for our overall health.

    Does this line up with how you’re currently experiencing food and eating? Or does eating for you evoke feelings of guilt, shame, or anxiety?

    For many of the folks I work with 1:1, they are not experiencing enjoyment in eating because they are worried about eating the “wrong” things or eating “too much.” And this distress has profound impacts on their mental health. Does this sound familiar to you?

    Our culture has conditioned you to believe that food is fuel and nothing more.

    But we are meant to enjoy food.

    It’s a survival adaptation – if food wasn’t pleasurable, we wouldn’t be incentivized to eat. And we need to eat to survive!

    Benefits of Enjoying Eating

    Yes, there are benefits to actually enjoying your food! 

    1. Less likely to “overeat” or eat past fullness. If you choose foods that you think you “should” be eating but aren’t what you’re truly craving, you likely won’t feel satisfied after a meal.

    I think of satisfaction like emotional fullness. You can eat a large volume of food and feel physically full but not satisfied or emotionally full. When you’re not satisfied, you’re more likely to keep thinking about food, and keep grabbing for other foods in hopes of satisfying that urge.

    This might look like eating a big salad with lots of veggies and chicken when what you really wanted was a caprese sandwich. So you finish your salad feeling physically full but not satisfied so you grab an apple hoping that will help. 20 minutes later you’re still thinking about food so you get some rice cakes and hummus.

    Another 20 minutes go by and you wind up eating a whole block of mozzarella cheese because you deprived yourself of what you really wanted and then winded up overdoing it and feeling painfully full. This pendulum swing of restricting and binging is all too common.

    2. Improved mental health

    When you’re choosing foods you actually enjoy eating and give yourself permission to enjoy them, you’ll decrease feelings of guilt, shame, and anxiety that lead to mental distress. When you look at eating through the lens of joy and pleasure, you’re inviting in more feelings of joy and pleasure!

    Research supports this – several studies on Intuitive Eating, a self-care framework which includes a focus on eating for satisfaction, show improvements in depression, self-esteem, negative affect, quality of life, ineffectiveness, anxiety, interpersonal sensitivity, and general wellbeing. To learn more about Intuitive Eating, check out our free beginner’s guide to Intuitive Eating.

    3. Improved digestion

    Maybe you’ve been told to cut out a bunch of foods to improve your digestion. Or to eat a few select foods to support GI health. But what about the science that shows that enjoying the food you’re eating actually helps support digestion?

    When you’re in a state of enjoyment, your parasympathetic nervous system is activated, eliciting a relaxation response. As a result, blood flow and energy goes straight to your GI tract, helping you digest food.

    It also tells your pancreas to make and release insulin, helping your body break down sugars into a form your cells can use. This effect on the GI system is why the relaxation response is often referred to as “rest and digest.”

    In contrast, if you’re stressed out while eating because you chose something you don’t actually enjoy, this will activate the sympathetic nervous system, which sends blood flow away from the GI tract and to the extremities, often resulting in GI distress.

    4. Better nutrient absorption

    It makes sense that if digestion improves with enjoying your food that nutrient absorption would improve as well. A research study from the 70’s showed that the more you enjoy the taste of your food, the more nutrients you’ll absorb.

    The researchers gave a Southeast Asian dish to both Thai women and Swedish women and measured iron absorption and the Thai women absorbed significantly more iron, which makes sense since they would have enjoyed the meal more! They then gave the Thai women the same dish but pureed into a brown goo and they absorbed 70% less iron than they did previously! Same food. Less enjoyment.

    How to Find More Enjoyment in Eating

    You are deserving of finding pleasure in eating – try on some of these tips and see if you notice any shifts in how you feel around food!

    1. Identify foods that taste good to you.

    Write down a list! Many of my clients aren’t even sure what their true food preferences are after years of dieting and eating based on external rules. Start writing down a list of the foods you truly enjoy the taste of, even if they elicit fear or judgment.

    Begin to prioritize foods that taste good and choose more foods off of this list!

    2. Choose foods that actually sound good to you in the moment.

    Are you in the mood for something sweet, salty, or savory?

    Crunchy or smooth?

    Cold, hot, warm, or room temperature?

    Light or heavy?

    Ask yourself these questions before eating to help guide you in choosing what sounds good to your body and mind in the moment.

    3. Bring more joy to your eating environment.

    So often we eat in front of the computer or phone or during a meeting. Or we eat while we’re rushing out the door or in the car while we’re stuck in traffic. How joyless is that?

    Now of course eating in these environments is much better than not eating at all! And you can start to slowly prioritize bringing more joy to your eating environment, even if it’s for one meal a day.

    Maybe you start with dinner. You light a couple candles. You put out a vase of fresh flowers. You use the nice dishes and glassware. Perhaps you play some calming music while you eat.

    All of these small changes can add a lot more enjoyment to your eating experience. 

    4. Start viewing food as morally neutral.

    If you currently label foods as good or bad, healthy or unhealthy, clean or dirty, you’re viewing food through a dichotomous or black-and-white lens. It’s really hard to enjoy food when you think you’re bad or unhealthy for eating it.

    Start to challenge your black-and-white thinking around food and name foods as they are – apple is an apple or cookie is a cookie – without labeling them (or yourself for eating them!) as good or bad.

    5. Practice mindful eating.

    It’s difficult to enjoy food when you’re rushing through it, not really tasting it, or being present for the experience. 

    Again, you can’t expect to eat perfectly mindful all the time. That’s unrealistic in today’s world. And maybe you can start to tune in just a little more to your eating experience.

    Before you begin eating, pause to notice the food in front of you, taking in the colors, textures, and the aroma. While you’re eating, take the time to chew your food thoroughly, noticing the taste sensations that arise. Slow down your eating by checking-in with your body. How is the food tasting? Are you still hungry? Are you getting full? 

    Engaging your senses while eating can bring more pleasure to the meal.

    6. Give yourself permission to experience joy in eating.

    We do not live in a culture that values pleasure. In fact, historically, pleasure has been viewed as sinful, indulgent, and gluttonous. 

    No wonder so many of us (especially women) struggle with embracing and seeking out pleasure in our lives.

    I believe that pleasure is our birthright.

    But first, we have to believe we our worthy of pleasure. 

    Write yourself a permission slip – giving yourself permission to experience pleasure in different areas of your life that feel relevant, and be sure to include eating on there.

    I give myself permission to experience joy and pleasure in eating and to choose foods that bring me enjoyment.

    What would you add to this list? How do you find enjoyment in eating? Is this something you struggle with? Tell me in the comments below!

  • 3 Dietitians Try It For 3 Years

    3 Dietitians Try It For 3 Years

    2023 Daily Harvest Review: 3 Dietitians Try It For 3 Years


    Privacy & Cookies Policy


  • How To Prep Your Skin For Summer Hair Removal

    How To Prep Your Skin For Summer Hair Removal

    Swimsuit season is coming, which means it’s a great time to consider how you want to deal with unwanted body hair. It’s also a perfect occasion to give your legs, underarms and bikini line the thought and attention they deserve. Whether your removal method is a DIY shaving session at home, a new gadget you saw on Instagram or a spa visit for waxing or laser hair removal, there are a few things to keep in mind that will make the experience run smoothly.

    How To Prep For Hair Removal

    When it comes to body hair in general, one of the most common issues that can make for a bumpy ride is ingrown hairs. These pesky little spots show up when a growing hair starts to curve or loop into the skin instead of straight out. Ingrown hairs can cause tiny, swollen bumps that look like blisters or acne – pus and all. They can also form cysts (sacs of fluid beneath the skin) and can range from small and painless to large, swollen and infected. Sometimes they will burn, itch or sting. All in all, an unpleasant scenario – especially in some of the more sensitive areas of your body. This can happen at any point in the hair growth cycle. However, shaving, tweezing and waxing are known to trigger this response, so doing a little “leg work” before hitting the blade or your waxing appointment can pay off big time.

    How To Prevent Ingrown Hairs

    Cell turnover is much slower on your legs and underarms, meaning dead skin cells can build up quickly, hiding stubborn ingrown hairs or clogging your razor and causing uncomfortable razor burn. So the goal when trying to prevent ingrowns is to lift any hair that may be tucked under the dead skin so that it can be removed more easily. Gently exfoliating a day or two before your hair removal session – and every other day after – will help minimize the risk of a rogue hair curving back into the skin. A simple way to do this is with your favorite Eminence Organics body scrub to slough away the dead skin and reveal a razor or wax-ready surface.

    You can also try salicylic acid or glycolic acid a couple of days before a hair removal session. These exfoliators use acids (not as scary as they sound) to encourage faster cell turnover and, in doing so, get rid of any dead skin cells that might otherwise cling on longer than you’d like. A swipe of the Clear Skin Willow Bark Exfoliating Peel should do the trick. 

    With the dead skin gone, you’re ready to move on to your shaving or waxing. Let’s cut to the chase!

    Shaving Best Practices

    Shave In The Evening

    While it may be more convenient to shave during your morning shower, you’ll actually get a closer shave at night. According to Allure, “As you sleep, legs swell slightly, which can hide a portion of the hairs.” For a closer shave, wait until evening to pull out your razor and tackle hairs that will go into hiding overnight. Expert tip: Shave towards the end of your shower when your hair follicles have warmed up and are the softest.

    Ditch Your Shaving Foam For An oil

    Swapping your shaving foam for an oil provides a barrier between your skin and the blade, resulting in a closer, smoother shave. Using an ultra-hydrating oil like the Apricot Body Oil replenishes your skin’s moisture (thanks to jojoba and grapeseed oils) and improves your shave, leaving your limbs soft and silky.

    And even with the most thorough prep, sometimes skin can get a little irritated. A few sprays of Soothing Chamomile Tonique post wax or shave can help. With ingredients like aloe vera, lavender and chamomile, it has a soothing, calming and hydrating effect on the skin.

    Some Other Important Shaving Tips

    Make sure your razor is sharp: If it’s tugging more than gliding or looking less than fresh, toss it. It could be harboring bacteria, and a dull blade can cause nicks, cuts and razor burn if not something even worse, like infection.

    Rinse your blade between strokes: Seems simple but sometimes you just want to speed through the shaving process. A razor covered in hair, dead skin cells and too much oil or foam isn’t doing you or your skin any favors.

    Don’t try dry: We’ve all been in a rush or needed a quick touch up outside of the shower, but this is a recipe for disaster. Razor burn, nicks and irritation are among the very likely scenarios when you try to cut corners like this. Even a splash of water is better than nothing!

    Another At-Home Option 

    What is the crystal hair eraser? We can’t talk about hair removal without mentioning the tool that went viral on social media recently. The crystal hair eraser, also known as the magic hair eraser or hair removal stone, is a hair removal device that fits in your hand (think: computer mouse or bar of soap in size and shape). The top is smooth and the bottom is a “crystalline” surface – which is basically a less scary way of saying it’s made of etched glass. 

    Now for the how-to: The crystal hair eraser is pretty easy to use. Lightly rub it on dry skin in a circular motion, the hair will clump together and slough off. The result is similar to shaving, as you’re removing the hair at the follicle opening, not the root (like you do with waxing). 

    Like shaving, it’s easy to do at home and is a good last-minute fix when you want to throw on shorts or a swimsuit. Unlike shaving, it’s done on dry skin – meaning that it can be done anywhere and with no foam or oil. Just wet the crystalline surface with water and you’re good to go. 

    It can be used on most parts of the body, including legs, arms, bikini line and back or chest. One area to avoid is the armpits, as the skin in that area can bunch up, making it hard to get to the hairs. 

    Much like shaving, the prep is minimal. A body scrub to coax out any hairs that might otherwise get stuck under dead skin couldn’t hurt. But because crystal hair remover exfoliates the skin as you go, you can get away with zero prep. You’ll need to moisturize after though. Slather on some Mangosteen Body Lotion or Yuzu Solid Body Oil (and then your SPF) to help with the dryness. 

    So is it worth the hype? Yes and no. It’s an easy and convenient alternative to shaving, but it’s not without its downsides. First of all, because it is a super exfoliator (the dead skin gets sloughed off with the hair) it can be messy – dead skin flakes and discarded hair everywhere! And according to board-certified dermatologist Dr. Mona Gohara, some skepticism is warranted. She tells Allure that even the basic mechanism by which crystal hair erasers work is unclear, saying “I’ve read a lot of articles and ads about this and I’m still dubious on the mechanism of action. Most claim that an etched crystalline surface makes the hair clump and fall off. When etched glass hits the skin, I think ‘cutting’ instead of ‘clumping’ is the more accurate verb.” 

    Bottom line? It’s another option to try at home, but it’s not groundbreaking and probably won’t change your hair removal game too much. But because of the price point and potentially saving lots of disposable razors from the landfill, it can’t hurt to try it out!

    How To Prep For Waxing

    While waxing has many benefits (hello weeks of smooth skin with little maintenance), it’s not always the best option when spontaneous beach trips pop up. According to Healthline, for the most precise wax: “Hair has to be at least 1/4-inch long before you wax. This helps ensure that hair is completely removed from the root.” To get to that point, it’s best to let hair grow for at least two weeks before your appointment. And shaving between waxing appointments is not recommended. With proper planning, waxing can be a great option, but it’s not for everyone.  

    Keep Your Skin Hydrated

    Like with shaving, keeping your skin hydrated is essential for preventing uncomfortable ingrown hairs and other irritations. Cosmopolitan says, “your legs have almost no oil or sweat glands, which means zero natural moisture.” In the days leading up to your appointment, keep your skin moisturized with your favorite Eminence Organics body lotion. Try our Stone Crop Body Lotion, which includes hydrating stone crop, to soothe skin after waxing.

    Time It Right 

    Ease the pain of waxing by booking an early morning appointment when your body is under the least amount of stress. Whether you’re a seasoned waxer or first-timer, picking appointments at the time of the day when your skin and muscles are the most relaxed is ideal for minimizing pain and discomfort. And the days leading up to your period can be extra sensitive. Try to avoid booking then if possible.

    Don’t Feel The Burn 

    It’s not always practical in the summer, but try to avoid steam rooms, saunas, swimming pools and ocean swims for at least 24 hours after your treatment, as they can irritate the skin.

    How To Prep For Laser Hair Removal

    Laser hair removal is becoming more and more popular and for good reason. As well as getting rid of unwanted body hair forever (after a few treatments), you can (and should) shave in between appointments. And while this option makes beach season even more carefree, it’s actually better to zap those hairs in the winter. 

    Since laser hair removal targets the pigment of your hair follicle, it works best when your hair is darker than your skin tone. According to Mayo Clinic, “A tan increases the risk of side effects, such as skin lightening … Some doctors recommend staying out of the sun for up to six weeks before laser hair removal.” If you have a summer appointment, make sure you shield your skin with SPF protection like the Lilikoi Daily Defense Moisturizer SPF 40 before heading outdoors. 

    Don’t Pluck Or Wax

    For laser hair removal to work, the hair follicle has to be present. Hair removal methods that disturb the hair follicle and interfere with the laser’s target (like plucking and waxing) should be avoided. To maintain smooth skin between appointments, steer clear of tweezers and wax strips and opt for a method that preserves the hair shaft and follicle, like shaving.

    Shave The Night Before Your Appointment

    Unlike waxing, you want the targeted area to be clean-shaven before your appointment. This way, “the laser can penetrate into the root of the hair — not target or singe any hair on or outside the skin,” according to Good Housekeeping. After shaving, skip your moisturizer, as lotions, sunscreen and makeup can “react with the laser and cause discoloration,” so it’s best to leave your skin bare before your appointment. (Reader’s Digest).

    Skip The Exfoliation 

    Since ingrown hairs are not an issue with this type of treatment, there is no need to exfoliate beforehand. In fact, it is best to keep all chemical exfoliants and acids away from the area – especially important for facial hair, like the upper lip, so that the laser doesn’t do any damage.

    Are you ready for a smooth transition into summer? Visit an Eminence Organics Spa Partner for your next hair removal appointment and tell us how you keep your skin smooth in the comments below.

Betnano Giriş
Padişahbet Giriş
Padişahbet
Padişahbet Güncel Giriş
new online casino
Crypto Casino
Padişahbet Giriş