Author: admin

  • Am I hungry? Signs of hunger to watch for

    Am I hungry? Signs of hunger to watch for

    Ever wonder if you’re actually hungry? This blog post takes a deep dive into hunger cues: the 4 types of hunger, 8 signs of hunger to watch for, a scale to help determine your degree of hunger, and background on how you’ve been conditioned to mistrust your hunger cues.

    Do you ever question whether or not you’re actually hungry? 

    Do you ever second-guess your hunger? Wondering if it’s something else? Doubting that you could actually be hungry?

    Do you ever find yourself ravenous by the time you sit down to eat? Do you struggle to notice hunger until it’s too late?

    If you answered yes to any of the above questions, this post about signs of hunger is for you!

    We’ve been conditioned to mistrust hunger

    Hunger is a natural physiological cue that alerts us when it’s time to eat. When your stomach is empty, it produces ghrelin, a hormone that travels through the bloodstream to the part of the brain (hypothalamus) that regulates hunger (among other physical functions).

    When you were young (before you were conditioned by diet culture), you probably noticed hunger signals and you responded to them by eating. It wasn’t all that complicated.

    But somewhere along the way, you were taught to override your hunger signals. That if you were hungry all the time, it meant you had willpower.

    You were taught that hunger could easily be mistaken for thirst and that you should just drink a lot of water instead of eating.

    You were taught that you probably weren’t physically hungry, it was just all in your head.

    You started to mistrust your hunger. You started to fear your hunger. And maybe one day you stopped noticing hunger.

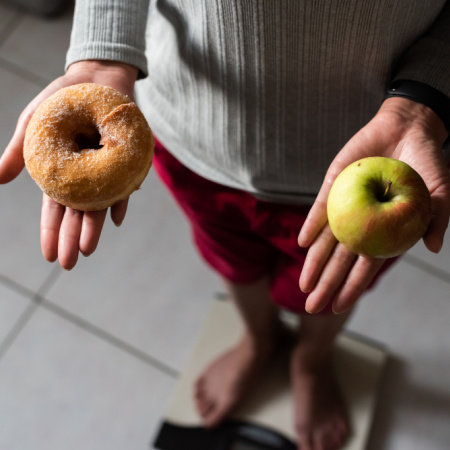
    Diet culture does a wonderful job at convincing you that hunger is a bad thing. That you need to override what your body is telling you in an attempt to lose weight. It tells you that you are “doing it right” if you’re hungry all the time.

    Diet culture is an effing liar. It disconnects you from your body’s wisdom. It makes you believe that your body cannot be trusted.

    Let me ask you this to put things into perspective: Have you ever been taught to second guess your body’s cue to go pee? Have you ever been told that you have so much willpower if you fight the urge to go pee? Have you ever been conditioned to fear the urge to pee?

    No, of course you haven’t! That would be ridiculous. Because relieving yourself is morally neutral. Whereas hunger is a loaded cue.

    But hunger and the urge to pee are both inherently neutral physiological signals – it’s just that our culture has attached meaning to one and not to the other.

    4 Types of Hunger: Physical, Emotional, Taste, and Practical

    Physical Hunger

    Physical Hunger starts out gradual and builds over time. This is a type of hunger you would feel via bodily sensations like a grumbling stomach, inability to focus, salivating, and it’s generally satisfied by eating enough.

    Emotional Hunger

    Emotional hunger gets a bad rep. We’ve been taught that emotional eating is “bad” but emotional eating is a very normal part of being a human being. Food is meant to be pleasurable and comforting – if it wasn’t, we wouldn’t be as inclined to eat (see more in this article I wrote for SHAPE.com on emotional eating)

    Emotional eating comes on faster than physical hunger and you might have a taste for something specific (i.e. a comfort food). Emotional eating only becomes problematic if it’s the only tool you have in your tool belt for coping with emotions.

    Taste Hunger

    Taste hunger is when you have a taste for something very specific. This could also be referred to as a craving. Taste hunger can overlap with emotional hunger but it doesn’t have to. You might be having an emotionally neutral day but still have a taste for something specific.

    Taste hunger can also overlap with physical hunger but it doesn’t have to. Let’s say you’re noticing physical hunger and you are craving a turkey sandwich – that’s both taste and physical hunger. Let’s say you just finished dinner and you have a craving for some chocolate – that’s taste hunger.

    Practical Hunger

    This is also referred to in the Intuitive Eating book as eating as an act of self-care. Practical hunger is when you’re not physically hungry – yet – but you know you need to eat something because of when you likely will get hungry and food might not be accessible at that time.

    A perfect example is you have class at 9am and you’re not allowed to eat during class. You wake up at 8am and you’re not hungry yet but you know that by 9am you will be hungry. As an act of self-care, you eat at 8:30am before heading out the door so that you’re not starving by the end of class.

    8 Signs of Physical Hunger

    Most people think of hunger as residing in the stomach and struggle to notice other subtle (or not-so-subtle) signs and symptoms of hunger. Here are some other signs that might mean you’re hungry! Some of these signs overlap with signs you may not be eating enough.

    1. Stomach gnawing, grumbling, feeling empty

    Many people recognize feeling hunger in their stomach – you might hear some growling or sense some grumbling. Maybe you feel an ache or gnawing in your stomach or you have a sense that your stomach feels empty.

    2. Headache

    When you are hungry, typically your blood sugar is low because you haven’t eaten in a while – low blood sugar levels can result in headaches.

    3. Inability to focus / concentrate

    When your brain isn’t well nourished, it can feel challenging to concentrate on work or focus on the task at hand. You also might find yourself thinking about food, which makes it hard to concentrate.

    4. Feeling Irritable

    Hanger is for reallllll. If you’ve ever snapped at your partner or friend when you were hungry, you’re not alone. Been there, done that. When blood sugar levels are low, it’s common to experience some irritability or anger (hanger!).

    5. Anxious

    For others, low blood sugar can manifest as anxiety. Maybe you start to get shaky or sweaty or your heart starts to race or you begin to ruminate – these could all be signs of hunger.

    6. Dizzy or lightheaded

    This is usually a hunger sign that means you’re past the point of gentle hunger (see hunger scale below). If you’re feeling dizzy or lightheaded, you probably missed a more subtle hunger cue along the way.

    7. Fatigue

    Maybe you didn’t sleep well the night before…or maybe you’re just hungry? You’ve probably heard of folks reaching for that second (or third) cup of coffee (or maybe that’s you!) to combat the mid-afternoon slump. But what if your body is actually hungry mid-afternoon and it needs nourishment, not just caffeine? Not having enough fuel in the tank in terms of energy from calories can cause you to feel tired and sluggish.

    8. Salivating

    Our body produces extra saliva in response to hunger. Ever notice how you might have more saliva when you smell a batch of freshly baked cookies coming out of the oven? That’s your body’s way of preparing to eat!  

    So how do you know if all of these symptoms are a result of hunger or something else? You start to pay attention with curiosity and begin to notice patterns over time.

    If you notice any of these symptoms, try asking yourself “is it possible that I could be experiencing physical hunger right now?” “When is the last time I had something to eat?”
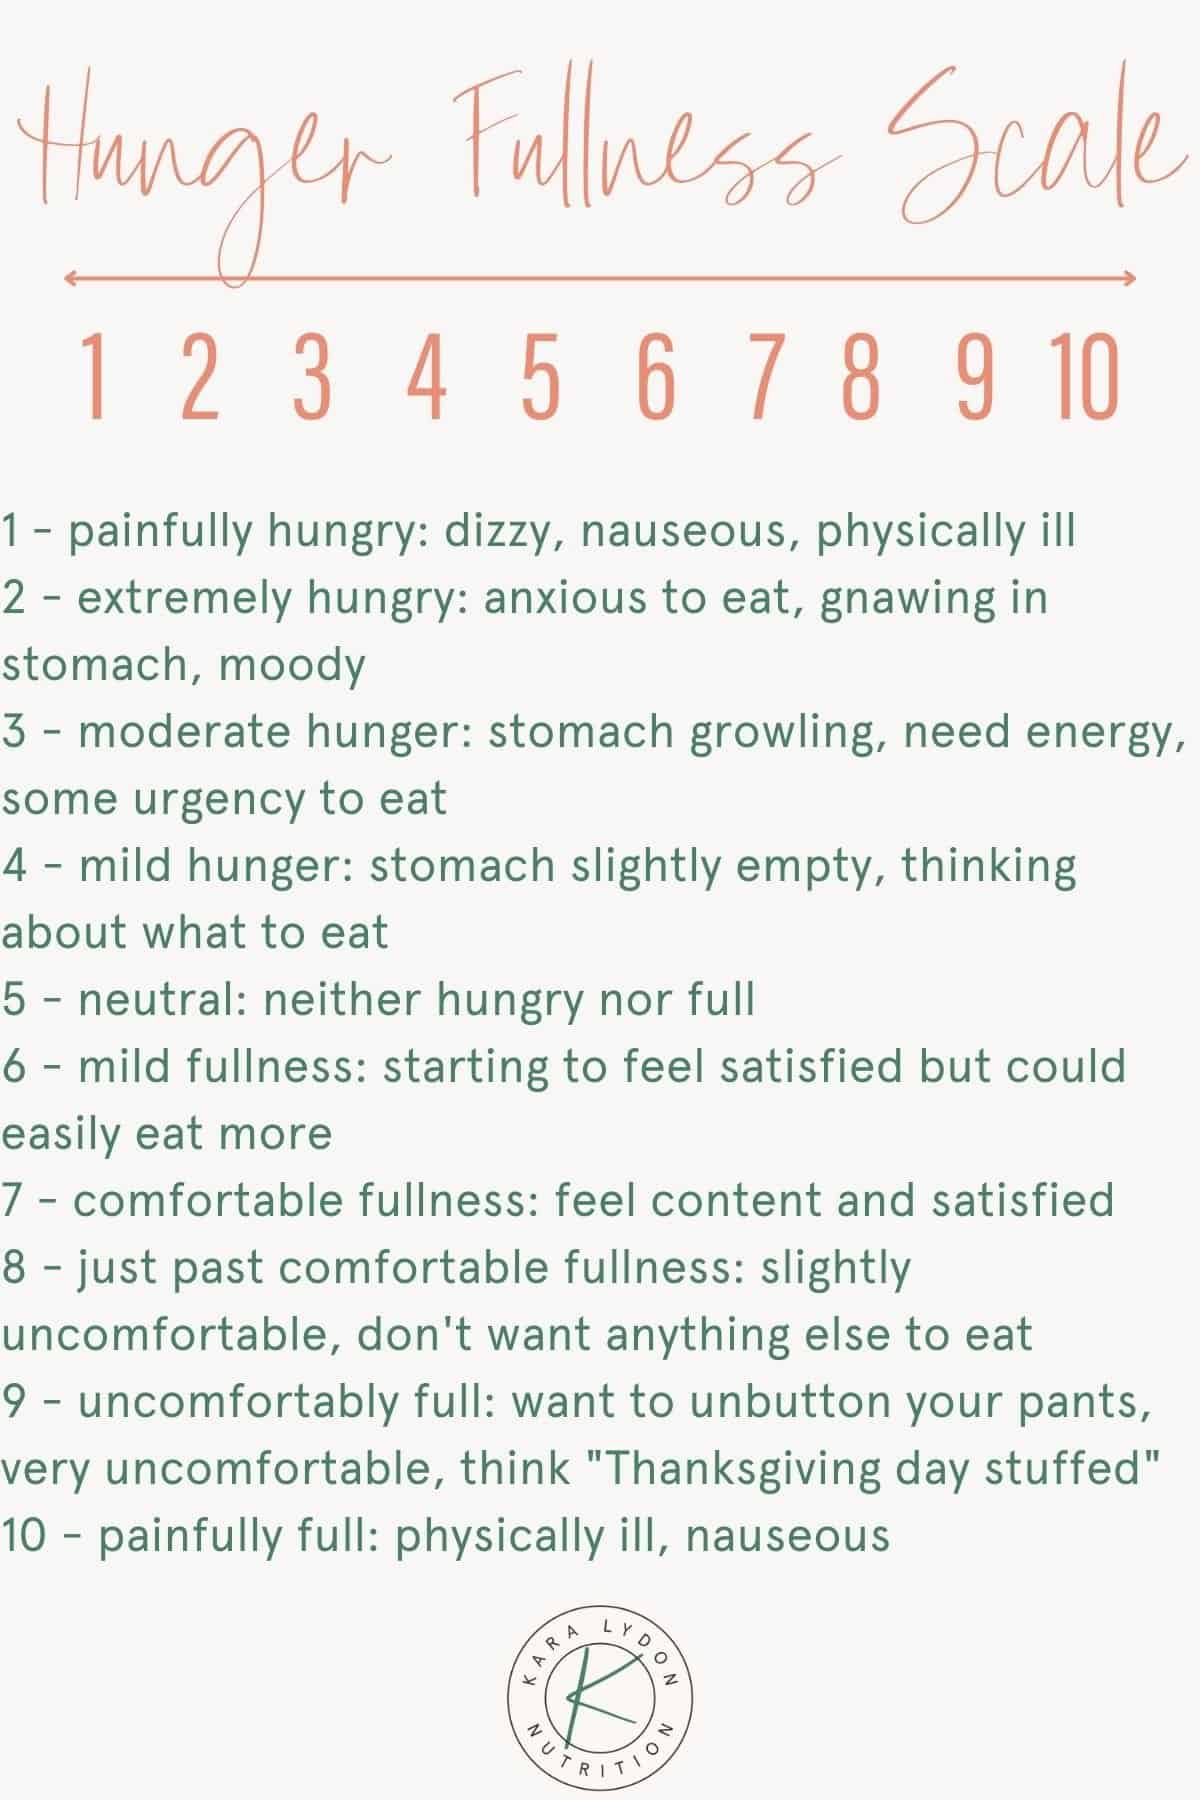
    How hungry are you?

    Have you ever seen a hunger / fullness scale? This can be a helpful tool to clue you into just how hungry you are.

    Ideally you want to be eating around a 3-4 on the hunger scale. If you’re eating at a 1 or a 2, you’re overly hungry, and you might be more likely to eat past comfortable fullness, and likely won’t be able to actually enjoy what you’re eating.

    Other Reasons Hunger Might Not Be Accessible

    Diet culture interferes with our ability to honor our hunger but for others it might not be just about cultural conditioning.

    Folks who are neurodivergent and folks with histories of trauma that make it difficult to connect with the body may have a harder time noticing hunger cues. For these folks, practical hunger and eating according to the clock or as an act of self-care may be the most nourishing choice. 

    I hope you found this post helpful! If you did, please leave a comment below. I’d love to hear from you! 

    If you liked this post, check out some of my other related Intuitive Eating blog posts:

    Are you on the hunger fullness diet?

    Am I eating enough? 8 signs you may be undereating

    The beginner’s guide to Intuitive Eating

    Top 10 Intuitive Eating books to help you heal your relationship with food

  • Greek Chicken Meatballs (Greek-Style Bowls With Tzatziki)

    Greek Chicken Meatballs (Greek-Style Bowls With Tzatziki)

    Greek Chicken Meatballs (Greek-Style Bowls With Tzatziki) – The Real Food Dietitians


    Privacy & Cookies Policy


  • Mindful Eating for Emotional Wellness: How to Use Mindfulness to Cope with Stress, Anxiety, and Other Emotions

    Mindful Eating for Emotional Wellness: How to Use Mindfulness to Cope with Stress, Anxiety, and Other Emotions

    As a mindfulness-based registered dietitian with a decade of experience, I have seen the transformative power of mindful eating in improving emotional wellness.

    Stress, anxiety, and other emotions can often lead to unhealthy eating habits that may exacerbate mental health issues. In this article, I will discuss how mindful eating can help you cope with stress, anxiety, and other emotions. Additionally, I will share specific practices and mental health resources to help you navigate these challenges and find balance in your life.

    Mindful Eating for Emotional Wellness

    The Connection Between Emotions and Eating Habits

    It is not uncommon for individuals to use food as a coping mechanism during times of stress, anxiety, or emotional turmoil (1). Emotional eating, or eating in response to feelings rather than physical hunger, can lead to overeating, weight gain, weight loss, and negative emotions such as guilt or shame (2). This cycle can perpetuate itself, making it difficult to break free from the grasp of emotional eating.

    I often get asked questions about if emotional eating is bad by new Mindful Nutrition Method students in my program, and my answer is always the same! Experiencing emotional eating of any kind is not “bad”, it’s part of our human experience! The goal is to build our mindfulness muscle so we’re better able to understand, observe, and take more aligned action based on the awareness of our emotional eating habits over time.

    Mindful Eating: A Path to Emotional Wellness

    Mindful eating is an approach that encourages individuals to pay attention to their internal cues, such as hunger and satiety, while also being aware of the emotional and environmental triggers that may influence their eating behaviors (3). By practicing mindfulness, individuals can develop a more compassionate and non-judgmental relationship with food, which can ultimately lead to improved emotional wellness.

    Research has shown that practicing mindful eating can result in numerous mental health benefits, including reduced anxiety, depression, and emotional eating (4). In one study, participants who received a mindfulness-based intervention experienced significant improvements in emotional eating behaviors and reported increased feelings of self-compassion (5).

    Embracing Mindfulness During Emotional Eating Episodes

    While the ultimate goal is to reduce emotional eating, it’s important to recognize that challenges may occur. During these moments, practicing mindfulness can still be beneficial in mitigating the impact of emotional eating. Instead of judging yourself or feeling guilty, try to observe your thoughts and emotions without judgment, and acknowledge the situations or “triggers” that led to emotional eating.

    By doing so, you can gain valuable insights into the underlying causes and develop more effective coping strategies for the future (14). Moreover, incorporating mindfulness during emotional eating episodes can help you remain present, potentially preventing overindulgence and promoting greater self-compassion. Remember that progress is a gradual process, and developing a non-judgmental and compassionate approach towards yourself is crucial for long-term success in achieving emotional wellness.

    The Role of Self-Compassion in Emotional Wellness

    Developing self-compassion is an essential aspect of mindfulness and can have a profound impact on emotional wellness. Self-compassion involves treating yourself with kindness, understanding, and acceptance, particularly during challenging moments (8). Research has shown that individuals with higher levels of self-compassion tend to have lower levels of anxiety, depression, and emotional eating (9).

    To cultivate self-compassion, consider the following strategies:

    Practice self-kindness: Instead of judging yourself harshly or engaging in negative self-talk, try to treat yourself with the same kindness and understanding you would offer to a friend. This can help break the cycle of negative emotions and promote emotional wellness (10).
    Embrace your imperfections: Recognize that everyone makes mistakes and experiences setbacks. By accepting your imperfections, you can develop a healthier relationship with yourself and better cope with stress, anxiety, and other emotions (11).
    Offer yourself loving kind wishes such as “May I feel at peace with food, may I be at ease around food, may I experience my emotions fully with care, and may I not judge my experiences with food” and many more to explore.

    Mental Health Resources for Coping with Stress and Anxiety

    In addition to practicing mindful eating and cultivating self-compassion, it’s important to seek additional support when managing stress, anxiety, and other emotions. Consider exploring the following mental health resources:

    Professional therapy: A licensed therapist or counselor can provide valuable guidance and support as you navigate emotional challenges. Cognitive-behavioral therapy (CBT) and dialectical behavior therapy (DBT) are two evidence-based approaches that have been shown to be effective in treating stress and anxiety (12).
    Mindfulness-based stress reduction (MBSR): This is an eight-week program designed to help individuals develop mindfulness skills and coping strategies for stress, anxiety, and other emotions. Research has shown that MBSR can lead to significant improvements in mental health and emotional wellness (13).
    Support groups: Connecting with others who are experiencing similar challenges can provide a sense of community and support. Many organizations offer support groups for stress, anxiety, and emotional eating, both in-person and online.

    Takeaway

    Mindful eating, self-compassion, and accessing mental health resources can play a significant role in improving emotional wellness and helping individuals cope with stress, anxiety, and other emotions. By adopting these strategies and seeking support, you can cultivate a healthier relationship with food, yourself, and your emotions.

    Find Freedom & Balanced Nourishment.

    Embrace a Balanced & Peaceful Relationship with Food.

    If you’re looking to develop a healthier relationship with food and transform your eating habits, consider joining our online group coaching program, the Mindful Nutrition Method. Our program is designed to help you cultivate a mindful approach to eating and develop a healthier relationship with food and your body.

    Get the 3-part system that will help you discover your balance, enjoy food fully, and nourish your relationship with food to feel confident, balanced, and at peace. You’ll learn the skills and strategies you need to make lasting changes to your health and well-being. Don’t wait to start your journey towards a healthier, happier you.

    References:

    Van Strien, T. (2018). Causes of emotional eating and matched treatment of obesity. Current Diabetes Reports, 18(2), 11.
    Ricca, V., Castellini, G., Lo Sauro, C., Ravaldi, C., Lapi, F., Mannucci, E., … & Faravelli, C. (2012). Correlations between binge eating and emotional eating in a sample of overweight subjects. Appetite, 59(2), 418-421.
    Framson, C., Kristal, A. R., Schenk, J. M., Littman, A. J., Zeliadt, S., & Benitez, D. (2009). Development and validation of the mindful eating questionnaire. Journal of the American Dietetic Association, 109(8), 1439-1444.
    Katterman, S. N., Kleinman, B. M., Hood, M. M., Nackers, L. M., & Corsica, J. A. (2014). Mindfulness meditation as an intervention for binge eating, emotional eating, and weight loss: A systematic review. Eating Behaviors, 15(2), 197-204.
    Alberts, H. J., Thewissen, R., & Raes, L. (2012). Dealing with problematic eating behavior. The effects of a mindfulness-based intervention on eating behavior, food cravings, dichotomous thinking and body image concern. Appetite, 58(3), 847-851.
    Jordan, C. H., Wang, W., Donatoni, L., & Meier, B. P. (2014). Mindful eating: Trait and state mindfulness predict healthier eating behavior. Personality and Individual Differences, 68, 107-111.
    Tribole, E., & Resch, E. (2012). Intuitive Eating: A Revolutionary Program That Works. St. Martin’s Griffin.
    Neff, K. D. (2003). Self-compassion: An alternative conceptualization of a healthy attitude toward oneself. Self and Identity, 2(2), 85-101.
    Mantzios, M., & Wilson, J. C. (2015). Mindfulness, eating behaviors, and obesity: A review and reflection on current findings. Current Obesity Reports, 4(1), 141-146.
    Neff, K. D., & Germer, C. K. (2013). A pilot study and randomized controlled trial of the mindful self‐compassion program. Journal of Clinical Psychology, 69(1), 28-44.
    Breines, J. G., & Chen, S. (2012). Self-compassion increases self-improvement motivation. Personality and Social Psychology Bulletin, 38(9), 1133-1143.
    Hofmann, S. G., Asnaani, A., Vonk, I. J., Sawyer, A. T., & Fang, A. (2012). The efficacy of cognitive behavioral therapy: A review of meta-analyses. Cognitive Therapy and Research, 36(5), 427-440.
    Kabat-Zinn, J. (2003). Mindfulness-based interventions in context: past, present, and future. Clinical Psychology: Science and Practice, 10(2), 144-156.
    Katterman, S. N., Mindful Eating for Emotional Wellness.

  • The Tula Eye Balm That Fades Wrinkles Fast Is on Sale

    The Tula Eye Balm That Fades Wrinkles Fast Is on Sale

    If you purchase an independently reviewed product or service through a link on our website, STYLECASTER may receive an affiliate commission.

    A former coworker once told me I should be regularly using an eye cream, even though I was still in college at the time. I really thought routine applications were a sham, but part of me was curious about what it’d feel like to give my under-eyes some newfound T.L.C. Long story short, I did invest in a drugstore eye cream and, admittedly, now see why people love dabbing product on this delicate, often overlooked area. Creams, gels and balms can not only make your eyes feel wide-awake, but they can also provide much-needed hydration and even rewind the clock on your fine lines and wrinkles.

    Now that I know the importance of a quality eye cream, it’s safe to say Tula’s 24-7 Power Swipe Eye Balm deserves a place in everyone’s morning and nighttime skincare routine. The newest addition to the brand’s 24-7 technology line-up, it firms, depuffs, protects, hydrates and lessens the appearance of fine lines and wrinkles all in one go.

    It also happens to be 20 percent off during Tula’s Friends & Family sale, so grab yours (and other bestsellers) for less right now. That’s a pretty significant difference that you should absolutely shop ASAP.

    What’s more, the eye balm comes in an easy-to-use stick that’s also quicker and more hygienic than using your fingers straight from a jar. Use it day or night and even under makeup to combat puffy, dry, dull under-eyes.

    “No more dry under-eye skin. I also feel like it overall brightens my eye area. I’m addicted to this stuff and highly recommend,” raved one five-star shopper. 

    Tired, swollen eyes from binging every episode of Love Island? Swipe on Tula’s eye balm. Dry skin from wearing a full day of glam? Apply Tula’s eye balm. Essentially, this product is the answer to all of your under-eye skin concerns and TG!

    RELATED: This Hydrating Moisturizer Is So Effective, Shoppers Call It The ‘Fountain Of Youth’—Grab It For 30% Off

    Tula 24-7 Power Swipe Eye Balm

    Photo: Tula.

    Here’s an ingredient breakdown to explain why this eye balm works so well. It has a proprietary blend of six prebiotics and probiotic extracts that smooth the skin and retain moisture for a plump, youthful-looking appearance. Alongside this complex, peptides and collagen combat visible signs of aging, while hyaluronic acid and squalane provide plenty of hydration.

    So far, this sounds like an all-star lineup of ingredients, but that’s not all Tula went ham with on this product. Caffeine, apple and watermelon also help firm your under-eyes and reduce puffiness. And last but not least, cocoa seed extract shields this sensitive area from blue light damage that can cause premature aging.

    To get the best results, keep the stick on the skin under your eyes for a few seconds to allow the balm to warm up and soften a bit. Next, glide the product across the eye area and revel in its magical calming, nourishing, wrinkle-fighting powers.

    We’re not the only ones in awe of this balm’s impressive resume. So many shoppers can attest to its benefits and results. 

    “Love, love this product. It made my under-eye area feel so soft. It never felt heavy or oily,” wrote one shopper. “After about a week of everyday use, I noticed my skin was becoming more smooth and less [dark] under my eyes.”

    “Not one single irritation or reaction, super hydrating and after about two weeks of consistent use, my under eyes are moisturized, less puffy and the wrinkles are faded a bit,” wrote another reviewer.

    It’s high time you ditch the eye cream that’s not giving you any positive results and swap it for Tula’s 24-7 Power Swipe Eye Balm.

    STYLECASTER | Ashley Benson Interview

  • How to: Skin Flooding 101

    How to: Skin Flooding 101

    Skin flooding is yet another top skincare trend that it  said to enhance and visibly improve the look of skin and it’s one you’ve likely seen all over your TikTok, so you’re likely wondering how do you even do it and what are the benefits of skin flooding?

    What is Skin Flooding?

    Skin flooding is a skincare technique which involves saturating or “flooding” your skin with a face mist like a toner or face mist until it’s completely soaked. By dousing the skin with moisture and hydrating ingredients can help to enhance the humectant and occlusive properties of your skin products. flooding is sometimes called “skin drenching,” “skin soaking,” or “skin saturation”.

    What skin types is Skin Flooding suitable for?

    Skin flooding can be done by any skin type – but it is especially great for those with dry and very dry skin types as it can help to boost hydration and draw in moisture to the skin. It’s also a great technique for those looking to create the look of dewy skin and create a glowing effect.

    How to Enhance the Effects of Skin Flooding

    Use Hyaluronic Acid: The ingredients in your skincare can have a direct effect on how well skin flooding works for you. For example, skincare that includes the ingredient Hyaluronic Acid are likely to work particularly well with the skin flooding skincare technique. Hyaluronic Acid is a humectant ingredient meaning it draws in moisture and pulls it from an external environment. Using a face mist on top of a Hyaluronic Acid product may help to boost its moisturizing properties as it draws in the moisture from the face mist so as to hydrate skin.

    Use multiple mists: Consider playing around with different facial mists between each layer to get the benefits of multiple mists.

    Use an occlusive: After going through the steps of misting your face – consider locking all the moisture in with a thick and occlusive cream or moisturizing balm. Finishing everything off with a thick cream or moisturizer allows you to lock in all of the hydrating products which can help leave your skin glowing and dewy.

    Occlusive style ingredients create a barrier like system over the skin which locks in moisture to help prevent the evaporation of water and moisture. Typical occlusive ingredients include beeswax, lanolin – Niacinamide is also an ingredient with occlusive properties.

    Best Face Mists for Skin Flooding

    If you’re looking for the best face mists to flood your skin with a dose of hydration – Mario Badescu has a number of different face mists which can be used to hydrate skin. Each face mist is enriched with different ingredients which cam help to enhance the effects of skin flooding.

    Facial Spray with Aloe, Chamomile, and Lavender:

    ● Soothes and calms irritated skin● Provides a relaxing and calming effect● Contains Vitamin C● Suitable for sensitive skin

    Facial Spray with Aloe, Sage, and Orange Blossom:

    ● Refreshes and hydrates the skin● Helps clarify blemish-prone skin● Rebalances oily and combination skin● Suitable for acne-prone skin

    Facial Spray with Aloe, Herbs, and Rosewater:

    ● Hydrating face mist● Soothes and hydrates dry, dull skin● Leaves skin with a dewy glow● Suitable for all skin types, especially dry or sensitive skin

    Facial Spray with Aloe, Adaptogens, and Coconut Water:

    ● Contains Niacinamide and Hyaluronic Acid● Helps skin maintain moisture levels● Revitalizes and hydrates-tired skin● Rich in adaptogens to nourish skin

    How to Flood Your Skin

    It’s best to perform skin flooding during the evening when skin enters its regeneration process and all the moisture is able to sink in.

    Step 1: Cleanse and tone skin with your favorite Mario Badescu Skin Cleanser

    Step 2: Mist skin with your preferred mist (try using our Chamomile and Lavender Mist to balance and soothe skin after cleansing.

    Step 3: Apply a facial serum to your skin – to enhance the effect of skin flooding try using a hyaluronic acid serum.

    Step 4: Mist skin again with another facial mist try our facial spray with aloe, adaptogens, and coconut water which contains Niacinamide and Hyaluronic Acid to help further boost skin moisture.

    Step 5: Apply your eye cream and moisturizer. Try using a rich cream to help further lock in moisture.

    Step 6: Do one final spritz of face mist for a last boost of moisture and dewy glow.

    Step 7: Finish with our Hydrating Overnight Mask with Peptides.

    Shop Face Mists.

    Read More About Skin Flooding Here

    Categories: Skin Care |
    Permalink

  • The Benefits of Scalp Massage

    The Benefits of Scalp Massage

    When it comes to skin care, there’s an area that is often overlooked – the scalp. And while the skin on your scalp might not be top of mind, a regular massage can do wonders for circulation, relaxation and overall scalp health. Whatever your goal, the simple art of head massage is gaining popularity because of its many benefits. Read on to find out the benefits of scalp massage and how you can incorporate this technique into your self care routine.

    Scalp Massage: What Is It and What are the benefits?

    Have you ever noticed how relaxing it is to have a gentle head rub when you have your hair washed at the salon? There’s a reason for that: Stimulating the scalp has an effect on the parasympathetic nervous system. This is a part of the nervous system that goes into energy-saving mode when your body is quietly resting and digesting (as opposed to “fight or flight” mode). Massaging the scalp brings down the level of the stress hormone cortisol.

    Besides eliminating stress, there are more scalp massage benefits, which may explain why scalp massagers and the ancient Chinese scalp massage technique of gua sha are getting so much play on social media right now. Scalp massage causes the blood vessels nearest the surface, which map across the front and top of your head and temples, to open up. This amplifies blood flow and oxygenation in the soft, connective tissues right under the skin where your hair follicles are.

    Not only does it bring down your tension level, scientific studies show that regular scalp massage creates a healthy, nourishing environment for hair to grow thicker and more fully.  Massaging is believed to stretch out the cells of hair follicles, which causes them to produce more robust strands.

    Which Tools Are Good For Scalp Massage? 

    The Gua Sha tool

    Gua sha is a centuries-old massage technique that stimulates the lymphatic vessels under the skin and promotes blood circulation. “Gua” means “scrape” or “scratch” and “sha” is the word for the reddishness that results from the treatment. 

    Gua sha massage stones for the face tend to be carved out of semi-precious gemstones like jade, aventurine, rose quartz, tiger’s eye or black obsidian, and they are flat with some rounded edges that are used to “scrape” the skin. For the scalp, gua sha can be done with specially designed combs that generally curve to naturally fit your hand. Gua sha combs have fewer and thicker teeth than ordinary combs. Like the gua sha face massage stones, the scalp massagers are often carved out of jade, rose quartz or agate or out of smooth, lustrous woods like neem or sandalwood. The important factor in choosing a gua sha comb is that it feels good in your hand and against your scalp.

    To reap the most benefits from gua sha scalp massages, a daily treatment is ideal, but performing one a few times a week can be beneficial as well. Timing it before each hair wash is a great place to start, especially when using oil that needs to be washed out. Of the 361 classic acupuncture points on the body, which are what traditional Chinese medicine describes as access points to the body’s flow of  “qi” or “life force,” about 60 are located on the scalp. 

    The point you should pay the most attention to in your gua sha ritual is what is viewed as the most powerful acupoint on your scalp: It is roughly at the crown of your head where the imaginary straight line running between the tops of both ears intersects with the straight line running from the center of your forehead to the back of your head. 

    How To Use A Gua Sha For Scalp Massage 

    Step 1

    Start by running your usual hairbrush through your hair to untangle any knots.

    Step 2

    Beginning with your natural part closest to the center of your hair, apply a few drops of the Facial Recovery Oil or Rosehip Triple C+E Firming Oil to your scalp.

    Step 3

    Applying gentle pressure, slowly run your gua sha comb from the front and middle of where your hairline starts along this central part and through to the back of your head, continuing down your neck.

    Step 4

    Section off your hair about an inch to the right of the central part that you just combed through and apply a few drops of oil to the scalp. Push your gua sha comb gently and firmly from the starting point of this section, just right of center, all the way to the back of your head and down your neck.

    Step 5

    Now, section your hair one inch to the left of your central part, apply a few drops of oil and repeat the process.

    Step 6

    On the right side of your head, section off your hair about an inch above your ear, apply a few drops of oil, and follow the same procedure from the hairline to the back of your head and neck.

    Step 7

    Finally, do the same on the left side of your head, an inch above your ear, arcing your gua sha comb widely around the ear to the nape of your neck.

    The Scalp massaging Brush

    Another popular scalp massage tool is the scalp massaging brush. Available in different shapes and sizes, it is generally round with silicone bristles (that look like little spikes) and an ergonomic handle to make it easy to grip and move around. 

    How To Use A Scalp Massaging Brush On The Scalp 

    Step 1

    Start with dry hair, using the scalp massager to gently comb it out (if you brush out your hair hanging your head upside down, that boosts blood flow even more).

    Step 2

    Sit up, put a towel around your shoulders, and apply a few drops of Facial Recovery Oil or Rosehip Triple C+E Firming Oil to your scalp.

    Step 3

    Work the oil all over your scalp with your scalp massager, using circular movements and medium pressure.

    Step 4

    Now, shower time! Wet your hair, apply shampoo and gently scrub your scalp with the massager using circular movements. A wet scalp massage is particularly effective at removing dead skin cells, but be careful not to overdo it: Three times a week is more than enough. 

    Eminence Organic Skin Care Products For Scalp Massage

    Facial Recovery Oil: Enhance your gua sha scalp massage with the fragrant blend of clary sage oil and ylang ylang, which can help you feel calm and relaxed.

    Rosehip Triple C+E Firming Oil: If your scalp tends to be dry, the sea buckthorn oil and rosemary leaf extract hydrate while jojoba oil helps restore your skin’s natural moisture.

    Both products can be left on for 30 minutes (or overnight) and should be shampooed out after application and before styling hair. Scalp massage can be performed up to three times a week, however we recommend only using Facial Recovery Oil or Rosehip Triple C+E Firming Oil on the scalp one to two times per week.

    In addition to your home care routine, why not incorporate a scalp massage into your next spa treatment? Visit our Spa Locator and find out more from an Eminence Organics Spa Partner near you.

  • What’s the Best Cleanser For You Skin?

    What’s the Best Cleanser For You Skin?

    You already know that properly cleansing your skin is the foundation of any good skincare routine. Twice-daily cleansing keeps our skin healthy in a number of ways. It helps prevent clogged pores and breakouts by removing excess oil; it slows down visible signs of aging by rinsing away pollution and debris; finally, it helps maintain balanced, hydrated skin by gently sloughing off dead cell build-up. 

    Seems straightforward enough, but with so many different types of cleansers available, how do you choose the right one for your skin type? While all cleansers generally serve the same basic purpose—to remove dirt, oil, makeup, and other debris—different formulas have different benefits. Knowing which one to use (and when to use it!) can make all the difference in your skin.

    Gel Cleansers

    Of the cleansers mentioned in this post, gel cleansers are the most straightforward. When the average person thinks of a face cleanser, this is probably what they’re imagining. The reason I say gel cleansers are the most straightforward is that they all have the same two, basic components—water and surfactants. 

    Surfactants (an abbreviation for “surface active agent”) are molecules with a water-loving head and an oil-loving tail. This characteristic allows them to form little spheres that break up and grab oil and dirt that’s sitting on the surface of your skin so that it can be easily rinsed away. 

    Who Should Use Gel Cleansers

    Anyone can use a gel cleanser, but how often you use it depends on your skin type. 

    I recommend that almost everyone use a gel cleanser to wash their face in the morning. (And yes, you should definitely be washing your face in the morning.) At this point in the day, you’re not really trying to remove sunscreen or makeup from the skin. You just want to get rid of any oil or sweat that accumulated while you were sleeping. This will give you a clean canvas so your morning skincare routine is more effective (especially your sunscreen). 

    Sometimes, people with dry skin types (like Skin Types 7-9) claim that washing their face in the morning dries out their skin. The key is using a cleanser free of drying sulfates, such as sodium lauryl sulfate. It also helps to use a cleanser that includes hydrating ingredients. For instance, Moisture Protecting Cleanser has glycerin to maintain moisture levels in the skin. 

    If you consistently struggle with excess oil production, like Skin Types 1-4, you can use a gel cleanser both morning and night. The key is looking for a cleanser with active ingredients that support your skin’s specific needs. For instance, both AHA/BHA Blemish Control Cleanser and Purifying Face Wash contain acne-fighting or pore-purifying ingredients. 

    How to Use Gel Cleansers

    Since gel cleansers cleanse the skin strictly through the use of surfactants, they have to be applied to wet skin in order to work. This gives the water-loving ends of the surfactants something to attach to and essentially activates the cleanser.

    Dispense a nickel-sized amount of gel cleanser into your hand and apply it to wet skin. Massage the cleanser onto your skin for 30 seconds, and don’t forget all those hard-to-reach nooks and crannies! Rinse the cleanser off your skin with lukewarm water, then move on to your next skincare step.

    Btw, this is how much of each skincare product you should be using.

    Lotion Cleansers

    As the name suggests, lotion cleansers are cleansers with a lotion-like consistency. They’re structurally very similar to regular moisturizing lotions but with the addition of surfactants for added cleansing ability. 

    One key difference between lotion and gel cleansers is that lotion cleansers are formulated using emulsifiers. Since these cleansers contain both oil and water-based ingredients, emulsifiers are needed in order for these otherwise incompatible ingredients to be effectively combined in the same formula. Emulsifiers are, in and of themselves, a type of surfactant. Even though they’re not necessarily classified as a “cleansing surfactant,” they do provide some additional cleansing abilities. So, cleansing lotions clean your skin with a combination of both classic surfactants and emulsifiers. 

    Who Should Use Lotion Cleansers

    Lotion cleansers are a great nighttime cleansing option for combination or dry skin types, like Skin Types 5-9. Because they contain oils (unlike gel cleansers), they’re good for taking off your daily sunscreen and light makeup, like a tinted moisturizer. They also deposit a little more moisture onto the skin than gel cleansers, which is why they’re so suitable for drier skin types. 

    If your skin is on the dry side and in need of some nourishment, check out the Vitamin-Infused Cleansing Emulsion.

    How to Use Lotion Cleansers

    Begin by dispensing about a quarter-sized dollop of cleanser onto your fingertips, then massage the cleanser onto dry skin. This will allow the oils in the formula to work on dissolving the oils in your sunscreen or makeup. After 30 seconds, add a little water and massage again to activate the surfactants in the cleanser. Rinse your face with lukewarm water, then finish by gently wiping the skin with a damp, soft cloth to lift away every last trace of makeup and sunscreen. 

    “Cold” Cream Cleansers

    Cream cleansers, sometimes referred to as cold creams, are strictly an emulsion of water and very heavy oil-based ingredients like lanolin, beeswax, or mineral oil. Basically, they’re a lotion cleanser on steroids, except they don’t contain any surfactants so they don’t rinse off as easily. This means they rely entirely on their emulsifiers to break down oils on your skin. 

    Who Should Use Cream Cleansers

    Because cream cleansers use heavy, oil-based ingredients, they’re great at removing silicones often found in heavier makeup (think long-wear foundation). That said, they’re not as good at removing dirt and debris from the skin since they’re typically not rinsed off at the end. 

    Truth be told, I’m not a big fan of cream cleansers because they can deposit a fair amount of oil onto the skin. If you apply the rest of your skincare products on top of this oil, they’ll have a hard time penetrating and won’t be very effective. I know it can be tempting to use such a rich product if your skin is dry, but I prefer to let cleansers do the cleansing and to let nourishing moisturizers, like Phytolipid Comfort Creme, do the moisturizing. 

    I would only recommend using a cold cream if you have very dry skin and aren’t prone to clogged pores, or if you’re trying to remove heavy makeup. Keep reading for my tips on how to minimize the amount of oil deposited on your skin.

    How to Use Cream Cleansers

    Instructions for how to use a cold cream can vary slightly depending on the brand, but they all start with a thin layer being applied to dry skin. Massage thoroughly for 30 to 60 seconds to break down makeup, sunscreen, and oil. 

    This is where the instructions start to vary. Traditionally, you were meant to use a tissue to simply dab off the excess product. I don’t love this method, because it doesn’t really lift off any of the makeup or oil you just dissolved. Instead, you’ve basically just loosened it and then smeared it all over your skin. As I mentioned, it also leaves a fair amount of oil behind on your face, which will make your other skincare products a lot less effective.

    Instead, I recommend using the same method you would use with a cleansing lotion. Using a soft, damp cloth will help lift off loosened makeup and debris, plus it will reduce the amount of oil left behind on your skin. If you’re prone to clogged pores, I recommend double-cleansing. Once you’ve removed your makeup with a cold cream, use a gel cleanser to cut through any lingering oil. 

    Cleansing Balms

    Cleansing balms are a popular method of makeup removal these days. The concept is similar to that of a cold cream, but there are two key differences. First, cleansing balms usually do contain some type of surfactant to (theoretically) help them wash off. Second, in addition to being made up of oils, they often included waxes, which is what gives them a solid consistency. 

    Here’s the catch. The ratio of surfactant to oils and waxes usually isn’t high enough for balms to easily emulsify and rinse off the skin. In fact, these waxes can leave behind a film or residue—even when you double cleanse.  I was never been a fan of traditional cleansing balms for the same reason I don’t like cold creams. That residue can result in clogged pores, and it impedes the rest of your skincare products, like serums, from properly penetrating. 

    With that said, balms are still a really effective way to remove heavy makeup or waterproof sunscreen (and if you wear these things, it’s important to properly remove them!). The good news is that, more recently, a newer generation of cleansing balms has started to emerge. I formulated Better Than Balm with lightweight oils and a higher amount of surfactants to reap all the benefits of a cleansing balm without any of the drawbacks.  

    Who Should Use Cleansing Balms

    I recommend using a cleansing balm if you’re someone who regularly wears foundation makeup or other heavy makeup products. Even if you only wear a full face on special occasions, it can be handy to have a balm around to take it all off. If you’re prone to clogged pores and blemishes, tread carefully. It’s important to choose a cleansing balm like Better Than Balm that’s well-formulated and doesn’t use too many heavy waxes.

    I only recommend using a cleansing balm at night since you don’t have makeup or sunscreen to remove in the mornings. 

    How to Use Cleansing Balms

    To start, apply the cleanser to dry skin and gently massage over the face for a full 30 seconds. This will start to dissolve makeup, sunscreen, and sebum. For heavier makeup, such as long-wear or full-coverage foundation, massage for 60 seconds.

    Using your fingertips, add water to transform the cleanser into a milky gel. Massage for another 30 seconds or, for heavier makeup, another 60 seconds. Rinse your face with lukewarm water to remove the bulk of the cleanser and makeup. Finally, finish by using a slightly damp cloth like the Reusable Cleansing Cloths, and gently wipe across your face to remove every last trace of loosened makeup and debris. 

    I hope this post helps shed some light on the different types of cleansers and gives you the information you need to make the right decision for your skin!

    Next up, 9 surprising cleansing mistakes you could be making.

  • Blog

    Blog

    7 Brain Exercise Activities to Keep Your Mind Sharp

    by Caitlin H,

    May 8, 2023

    7 Brain Exercise Activities to Keep Your Mind Sharp

    Creating a healthy lifestyle is about many things. It’s about a consistent diet with balanced nutrition. It’s about staying active and exercising. It’s about ensuring your mental well-being. And it’s about keeping your brain active and engaged.

    Need a little help keeping that mind sharp, engaged, and present in the moment?  Read on!

    Tweet

    10 Signs Your Diet is a Dud

    by Caitlin H,

    May 1, 2023

    10 Signs Your Diet is a Dud

    If you’re like many of our customers, there’s a solid chance you have tried some weight loss plans in the past—and didn’t see the long-term results you desired.

    Here’s the thing: The people who find lasting success do so by making it a lifestyle. That doesn’t mean you shouldn’t try a diet. But it means you need to find a diet that works for you and allows you to incorporate healthy eating into your everyday life.

    But how can you tell if that “diet” can become a lifestyle?

    Tweet

    Delicious Recipes For Our Favorite Spring Fruits

    by Caitlin H,

    Apr 24, 2023

    Delicious Recipes For Our Favorite Spring Fruits

    Spring is the most colorful time of year, and that’s especially true when it comes to spring fruits!

    While you can find these fruits year-round in supermarkets, using seasonal produce tends to elicit the best-tasting results. You can also visit farmers’ markets to support local growers and get the freshest stuff available.

    We love springtime and the colorful fruits that come with it. Now is the perfect time to try a new light, healthy snack or dessert that everyone will love!

    Tweet

    Financial Analyst Loses 10 Pounds in One Month with Diet-to-Go

    by Caitlin H,

    Apr 17, 2023

    Financial Analyst Loses 10 Pounds in One Month with Diet-to-Go

    Hailey’s 32nd birthday weekend in February was filled with the kinds of things most people like to do on their birthdays — dinner and drink outings, celebrations with friends, and enjoying time with her fiancé.

    But after that weekend, Hailey stepped onto the scale and quickly realized she had gained 5 pounds over those few days alone.

    Find out how Diet-to-Go helped Hailey lose 10 pounds in 30 days!

    Tweet

    10 Fun Fitness Ideas to Make Exercise Enjoyable

    by Caitlin H,

    Apr 10, 2023

    10 Fun Fitness Ideas to Make Exercise Enjoyable

    Exercising can sometimes feel intimidating, especially when you go to a gym and see what looks like elite athletes pumping weights or pounding out mile after mile on the treadmill.

    It’s okay. We get it. And you are certainly not alone. Thankfully, exercising can take place anywhere, anytime, and in all sorts of fun formats.

    Tweet

    The Benefits of Staying Hydrated and How Much Water to Drink

    by Caitlin H,

    Apr 3, 2023

    The Benefits of Staying Hydrated and How Much Water to Drink

    Water is an essential part of a healthy, well-rounded diet. In fact, studies show that hydrating often may slow the aging process and help you live longer. In addition to adding years to your life, there are also a host of other benefits of drinking water and staying well-hydrated.

    So, how much water should you drink each day? 

    Here’s the thing, it’s not a one-size-fits-all model. But, we can help you figure out what amount is right for you!

    Tweet

    5 Weight Loss Tips That Fit Into Your Hectic Schedule

    by Caitlin H,

    Mar 27, 2023

    5 Weight Loss Tips That Fit Into Your Hectic Schedule

    Remember when it was just before the new year, and you were highly motivated to lose weight and get healthy?

    Between balancing things like work, kids, social events, and everything in between, our hectic schedules often mean there’s not much time left for self-care or healthy habits, and that resolution might have fallen to the wayside.

    But here’s the thing: Taking care of yourself ensures everything, and everyone else will get the best, most productive version of yourself.

    How do you make taking care of yourself a priority again though?

    Tweet

    7 Scientific Reasons You Should Try Meatless Monday

    by Caitlin H,

    Mar 20, 2023

    7 Scientific Reasons You Should Try Meatless Monday

    Burgers, steak, lamb chops — red meat is a staple of the American diet.

    While it may be unreasonable to cut it out of your diet completely, going vegetarian at least one day a week can go a long way toward improving your health. That’s why we outlined seven scientific reasons why you should try Meatless Monday and reap all the benefits of reducing your meat consumption.

    Tweet

    Reverse Your Prediabetes With These 5 Tips

    by Caitlin H,

    Mar 13, 2023

    Reverse Your Prediabetes With These 5 Tips

    Prediabetes means your blood sugar levels are higher than normal, but not high enough to be diagnosed as diabetes. It could be considered a blessing in disguise. Knowing that you have it allows you to make new, healthier choices to reverse the condition and hopefully help you avoid developing Type 2 Diabetes.

    Tweet

    Simple Ways to Tell if Your Food is Nutritious

    by Caitlin H,

    Mar 6, 2023

    Simple Ways to Tell if Your Food is Nutritious

    Proper nutrition is one of the most important ways to ensure you lead a healthy, happy, long life. In fact, studies show that eating a balanced diet plays a role in all sorts of things. 

    It can be challenging to know whether your food is nutritious. Labels can be confusing if you’re not a nutrition expert, and honestly, how many of us are? But don’t stress! Check out our easy to follow beginner’s guide to deciphering food labels.

    Tweet

    8 Essential Elements for a Healthier Heart

    by Caitlin H,

    Feb 27, 2023

    8 Essential Elements for a Healthier Heart

    February is American Heart Month, an annual observance of the importance of cardiovascular health. The American Heart Association and all health providers use the month to remind us to engage in healthy habits that reduce our heart disease risk.

    That’s why the American Heart Association (AHA) identifies these eight essential elements to better heart health. Read on to learn more!

    Tweet

    Break That Snacking Habit with These Expert Tips

    by Caitlin H,

    Feb 20, 2023

    Break That Snacking Habit with These Expert Tips

    It’s 8 p.m., and you’re enjoying your favorite TV show or cozied up on the couch with a good book. Then, you get up and find yourself standing in the kitchen, reaching for a handful of chips or a couple of cookies.

    If this sounds all-too-familiar, you’re not alone. Mindless snacking is a habit many of us deal with daily, whether sitting at the office (or home office), perusing social media, or even snuggling up in bed.

    Thankfully, there are ways you can cut back on snacking.

    Tweet

    10 Delicious, Healthy Dinners to Wow Your Sweetheart

    by Caitlin H,

    Feb 14, 2023

    10 Delicious, Healthy Dinners to Wow Your Sweetheart

    Did you remember Valentine’s Day? If you or your sweetie are trying to eat healthily, why not keep the momentum going by whipping up a delicious dinner?

    Want to try a new recipe to surprise your sweetie for Valentine’s Day (or any day)? We’ve got your covered with some tasty choices! Bon appétit!

    Tweet

    7 Ways to Make the Most of Your First Day at the Gym

    by Caitlin H,

    Feb 6, 2023

    7 Ways to Make the Most of Your First Day at the Gym

    You did it. You committed to your health and fitness and signed up for a gym membership. And now, it’s time to step into that world of weights and cardio machines for the first time. It can feel pretty darn intimidating. That’s more than okay. It’s a brand new situation, and doing anything for the first time can be nerve-wracking.

    Thankfully, the gym is actually a place you can have fun and spend time — you just have to set yourself up for success before showing up for the first time.

    Tweet

    These 5 Simple Dietary Swaps Could Lengthen Your Life

    by Caitlin H,

    Jan 30, 2023

    These 5 Simple Dietary Swaps Could Lengthen Your Life

    If the potential of adding years to your life by making small changes appeals to you, listen up.

    Improving the quality of foods you eat daily — even just a little — can extend your life, no matter how old you are.  Making some simple swaps to your overall diet can improve your nutritional intake — and maybe even add years to your life!

    Tweet

    Step Outside Your Comfort Zone This Year

    by Caitlin H,

    Jan 23, 2023

    Step Outside Your Comfort Zone This Year

    The new year is often when we think about hitting the reset button on some (or several!) aspects of our lives. We consider our intentions, set goals, and start doing what we can to achieve them.

    This year, consider the following: How often do you set a goal to do something extraordinary that will give you a sense of true exhilaration?

    Maybe it’s time to step outside your comfort zone and live life to the fullest!

    Tweet

    8 Simple Ways Women Can Move More While At Home

    by Caitlin H,

    Jan 16, 2023

    8 Simple Ways Women Can Move More While At Home

    You’ve heard it before, and you’ll hear it again; physical activity is crucial to controlling your weight, gaining healthful benefits, and expanding your lifespan. 

    A recent study found that physical activity was associated with a lower risk of death for women. By participating in daily activity of any intensity, a woman could lengthen her expected lifetime. Fitness guru, Dr. Gabe Mirkin tells us “You do not need to have a specific exercise program to stay fit, you just need to keep on moving for a large part of each day.” That’s good news if you’re not a big fan of what we traditionally associate with exercise.

    So, what can you do to make sure you can keep your body in motion each and every day? We have 8 simple ideas for you! (Men, you can do these things, too!)

    Tweet

    Lorrie Mills Lost 15 Pounds In Just Three Months

    by Caitlin H,

    Jan 9, 2023

    Lorrie Mills Lost 15 Pounds In Just Three Months

    Lorrie Mills is a giving person. During the holiday season, he sponsors families in need by fulfilling their wishlists and providing food. But in April 2022, Lorrie learned some troubling news that meant it was time to give something to himself, too.

    When his doctor started making notes in his medical records about his chances of stroke or heart attack (or worse) Lorrie took him seriously. That same day he found Diet-to-Go, and three months later he’s happy to share what he’s learned.

    Tweet

    Clever Hacks To Help You Get a Better Night’s Sleep

    by Caitlin H,

    Dec 19, 2022

    Clever Hacks To Help You Get a Better Night’s Sleep

    A quality night’s rest is one of the best feelings. It makes it much easier to take on the day’s tasks, make time for exercise, think clearly, be productive and even make better nutrition choices.

    Unfortunately, many of us may struggle to get quality sleep. 

    If you’re one of those people, you may want to take a peek at our list of things you can try in order to up the quantity (and quality) of those zzzzs! 

    Tweet

    20 Weight Loss-Themed Gifts They’ll Love

    by Caitlin H,

    Dec 12, 2022

    20 Weight Loss-Themed Gifts They’ll Love

    Finding the perfect gift for a loved one can be challenging, especially if you want to support their weight loss goals tactfully.

    Thankfully, there are options to give them what they want (or need!) with class. Our holiday gift roundup below includes ideas for 20 thoughtful, quality weight loss-related gifts that will make them smile and help them achieve their goal!

    Tweet

  • Roasted Vegetable Pizza | Kara Lydon

    Roasted Vegetable Pizza | Kara Lydon

    This homemade roasted vegetable pizza is easy to make for a quick dinner and is topped with oven roasted vegetables like eggplant, mushrooms, onion, bell pepper and zucchini.roasted vegetable pizza slices on white speckled plate and pizza stone with other pizza slices on it

    Pizza Recipe Highlights

    Looking for an easy and delicious homemade pizza recipe?

    Look no further than this roasted vegetable pizza! Made with a variety of oven-roasted veggies, including eggplant, mushrooms, onion, bell pepper, and zucchini, this pizza is a quick and flavorful dinner option that’s perfect for any night of the week.

    With its crispy crust and savory toppings, this roasted vegetable pizza is sure to become a new family favorite. Give it a try and enjoy a tasty and nourishing meal tonight!

    As a dietitian and mama who loves to cook, I’m always on the lookout for recipes that are both delicious and easy to make. That’s why I’m a big fan of this homemade roasted vegetable pizza. Not only is it packed with flavor, thanks to the assortment of oven-roasted veggies, but it’s also incredibly simple to put together.

    Another reason I love this recipe is that it’s so customizable. You can easily swap out the veggies for whatever you have on hand, or add some extra spices or herbs to suit your taste.

    Pizza is a great vehicle for adding some extra veggies to your day too! I find that roasting the vegetables really brings out their natural sweetness and enhances their flavor. Plus, when you combine veggies with a crispy crust and some melted cheese, it’s hard to resist!

    Overall, I think this homemade roasted vegetable pizza is a winner. It’s quick, easy, nourishing, and delicious. What more could you ask for in a weeknight dinner?

    Give it a try and see for yourself! Friday pizza night, anyone?

    Ingredients to Make Roasted Vegetable Pizza

    roasted vegetable pizza ingredients on white marbled background

    Pizza dough: This is the base of the pizza – you can either make your own or use store-bought dough. Look for whole wheat or gluten-free options if you prefer.
    Onion: Provides a savory, slightly sweet flavor.
    Eggplant: Has a meaty, slightly bitter flavor that pairs well with the other vegetables.
    Red bell pepper: Adds sweetness to the pizza.
    Cremini mushrooms: Earthy and meaty in flavor, these mushrooms add savory umami depth to the pizza.
    Zucchini: Slightly sweet and mild in flavor, zucchini adds a nice contrast to the other vegetables.
    Olive oil: Adds richness and helps to cook the vegetables.
    Garlic: Adds a pungent flavor boost to the vegetables! Can use garlic powder as a substitute.
    Salt and pepper: Essential for seasoning the vegetables and enhancing the flavors.
    Pizza sauce: A classic tomato-based sauce that adds tanginess and richness to the pizza. Can also use marinara or homemade tomato sauce!
    Mozzarella cheese: Mild in flavor and easily to melt, mozzarella is a classic pizza topping that adds creaminess and richness.

    Equipment You’ll Need (affiliate links – if you make a purchase I receive a small commission)

    How to Make Roasted Vegetable Pizza 

    roasted vegetable pizza step by step instructions

    To prep: preheat the oven to 400 degrees F and let pizza dough sit out at room temperature for at least 30 minutes.
    Roast the vegetables. Toss the onion, eggplant, bell pepper, mushrooms, zucchini, and garlic with olive oil, salt, and pepper until they’re coated. Bake in the preheated oven until the vegetables are tender, about 15 minutes. Place pizza stone inside oven and increase temperature to 475 degrees F.
    Flatten out the dough. Turn out the pizza dough onto a lightly floured surface. Flatten it out into a 12-inch circle using your hands or a rolling pin. Place the dough onto a cornmeal-dusted pizza peel or the back of a baking sheet lined with parchment paper. If you’re not using a pizza stone, you can place the dough directly on a cornmeal-dusted baking sheet.
    Build your pizza! Spread the marinara sauce over the dough, leaving a 1/2-inch rim around the edges. Sprinkle mozzarella cheese over the sauce and top with the roasted vegetables.
    Bake the pizza. Using a pizza peel or the back of a baking sheet lined with parchment paper, slide the pizza onto the pizza stone or another baking sheet. Bake until the crust is golden-brown and the cheese is bubbling and starting to brown, which takes about 7-10 minutes. If you’re using parchment paper, remove it halfway through baking time and rotate the pizza. Remove pizza from the oven, cut it into slices, and serve immediately.

    Expert Tips

    Opt for seasonal vegetables: The beauty of this recipe is that you can use any vegetables you like, but choosing seasonal vegetables will give you the freshest and most flavorful results. In the summer, try using tomatoes or fresh herbs like basil for an extra burst of flavor.
    Use a pizza stone for a crispy crust: While you can certainly bake your pizza on a regular baking sheet, using a pizza stone will help to give your crust a crispy texture. Be sure to preheat your pizza stone in the oven before sliding the pizza onto it (otherwise you risk it breaking!)
    Experiment with different cheeses: While mozzarella cheese is the classic choice for pizza, don’t be afraid to mix things up and try different cheeses. Feta, goat cheese, or even a blend of cheeses can add a unique twist to this recipe. Just be sure to choose a cheese that melts well to ensure a gooey, delicious pizza.
    Make your own pizza dough: While store-bought pizza dough works perfectly fine for this recipe, if you have the time, making your own dough is a great way to take your pizza to the next level. 

    Recipe FAQs 

    1. Should you roast veggies before putting them on pizza?

    Roasting vegetables before putting them on pizza can enhance their flavor and texture by caramelizing them and removing excess moisture. Some great vegetables to roast for pizza include bell peppers, onions, mushrooms, zucchini, eggplant, and cherry tomatoes. While it’s not necessary to roast vegetables beforehand, it can add more richness to the flavor of the pizza.

    2. How do you keep vegetables from making pizza soggy?

    To keep vegetables from making pizza soggy, it’s important to remove excess moisture from them. This can be done by roasting them beforehand, or by sautéing them in a pan. It’s also a good idea to avoid using too many wet or juicy vegetables on your pizza, and to layer them on top of the cheese to create a barrier between them and the crust.

    3. Do vegetables go over or under cheese on pizza?

    To prevent vegetables from releasing too much moisture onto the crust and making the pizza soggy, it’s generally recommended to layer them on top of the cheese. This creates a barrier between the vegetables and the crust, allowing the cheese to melt and act as a moisture barrier. However, it’s up to you! 

    4. Can this pizza be made vegan or gluten-free?

    Yes! Substitute mozzarella with shredded vegan cheese alternative and use a gluten-free pizza dough!

    two roasted vegetable pizza slices on white speckled plate

    Storage and Preparation 

    This roasted vegetable pizza is best enjoyed fresh out of the oven. However, if you have leftovers, you can store them in an airtight container in the refrigerator for up to 3 days. To reheat the pizza, simply place it in a preheated oven (350°F) for 10-15 minutes, or until heated through, or air-fry it! 

    Recipes That Pair Well

    roasted vegetable pizza on pizza stone with pizza cutter and slice cut out

    For more flatbread and pizza inspiration, check out my other recipes below!

    Grilled Hemp Pesto Peach Flatbread

    Butternut Squash and Brussels Sprouts Naan Pizza

    Buffalo Cauliflower Pizza

    White Clam and Kale Pizza

    Spring Vegetable Pizza

    If you like this recipe, please be sure to comment and give it a 5 star rating below. If you make it, share it on Instagram and tag me @karalydonrd and I’ll re-share it with my followers! If you want to save this recipe for later, be sure to pin it on Pinterest!

    If you want to make sure you never miss a recipe, sign up for my email list!

    Print

    clock clock iconcutlery cutlery iconflag flag iconfolder folder iconinstagram instagram iconpinterest pinterest iconfacebook facebook iconprint print iconsquares squares iconheart heart iconheart solid heart solid icon

    Description

    This homemade roasted vegetable pizza is easy to make for a quick dinner and is topped with oven roasted vegetables like eggplant, mushrooms, onion, bell pepper and zucchini.

    1 lb store-bought pizza dough
    1/2 cup thinly sliced onion
    1/2 cup thinly sliced eggplant (and roughly chopped if large slices)
    1/2 cup thinly sliced red bell pepper
    1/2 cup sliced cremini mushrooms
    1/2 cup thinly sliced zucchini
    1 tablespoon olive oil
    1 clove garlic, minced
    salt and pepper
    1/3 cup pizza sauce
    1 cup shredded mozzarella cheese
    Optional, for topping: red pepper flakes, oregeno, parmesan cheese

    Let pizza dough sit out at room temperature for 30 minutes.
    Preheat oven to 400 degrees F. Line baking sheet with parchment paper.
    On a parchment-lined baking sheet, toss onion, eggplant, bell pepper, mushrooms, zucchini, and garlic with olive oil, salt and pepper, to coat. Bake until vegetables are tender, about 15 minutes.
    Place pizza stone in oven (if using) and increase oven temperature to 475 degrees F.
    Turn out pizza dough onto a lightly floured surface and using lightly floured hands or rolling pin, flatten out the dough into a 12-inch circle, about 1/2-inch thick.
    Place dough onto a cornmeal-dusted pizza peel or a piece of parchment paper lined on the back of a baking sheet. If you’re not using a pizza stone you can simply place the dough onto a cornmeal dusted baking sheet.
    Spread marinara sauce evenly over the dough, leaving 1/2-inch rim around the edges. Sprinkle with mozzarella cheese. Top with roasted vegetables.
    Using a pizza peel or parchment paper on the back of a baking sheet, slide your pizza onto the pizza stone or another baking sheet.
    Bake until crust is golden-brown and cheese is bubbling and just starting to brown, about 7-10 minutes. If using parchment paper, remove halfway through baking time and rotate pizza.
    Remove pizza from oven, cut into slices, and serve immediately.
    Optional: Top with red pepper flakes, oregano, and / or parmesan cheese for extra flavor.

    Notes

    This roasted vegetable pizza is best enjoyed fresh out of the oven. However, if you have leftovers, you can store them in an airtight container in the refrigerator for up to 3 days. To reheat the pizza, simply place it in a preheated oven (350°F) for 10-15 minutes, or until heated through, or air-fry it! Pizza can also be stored in the freezer in an airtight container for up to three months.
    To keep the pizza from getting soggy, layer the vegetables on top of the cheese, and be sure to roast them first.

    Prep Time: 5 minutesCook Time: 25 minutesCategory: PizzaMethod: OvenCuisine: American

    Keywords: roasted vegetable pizza, roasted veggie pizza, pizza with roasted vegetables

  • Honey Glazed Salmon (30 Minute Meal)

    Honey Glazed Salmon (30 Minute Meal)

    Honey Glazed Salmon (30 Minute Meal) – The Real Food Dietitians


    Privacy & Cookies Policy


Padişahbet
Padişahbet Güncel Giriş
new online casino
Crypto Casino
Padişahbet Giriş
Padişahbet Giriş