Author: admin

  • Instant Pot Asparagus Soup | Kara Lydon

    Instant Pot Asparagus Soup | Kara Lydon

    Ready in less than 30 minutes, this Instant Pot Asparagus Soup is super easy to make as part of a quick weeknight dinner. Made with fresh asparagus, garlic, onion, lemon and cream (or yogurt), this soup calls for only six ingredients!cream of asparagus soup in a white speckled bowl with asparagus pieces and lemons

    Spring is officially here and what better way to celebrate than with this creamy soup.

    Asparagus is a seasonal spring vegetable, which means it’s super fresh, tasty, less expensive, and full of nutrients this time of year (especially if you can find it locally grown at your nearest farmer’s market!)

    This soup is super easy to make as it only calls for six ingredients! 

    Plus all you have to do is throw everything into the Instant Pot, set it, let it pressure cook, then blend, and season!

    It’s perfect for lunch or dinner alongside a chunk of crusty bread or a grilled cheese sandwich!

    Ingredients You’ll Need 

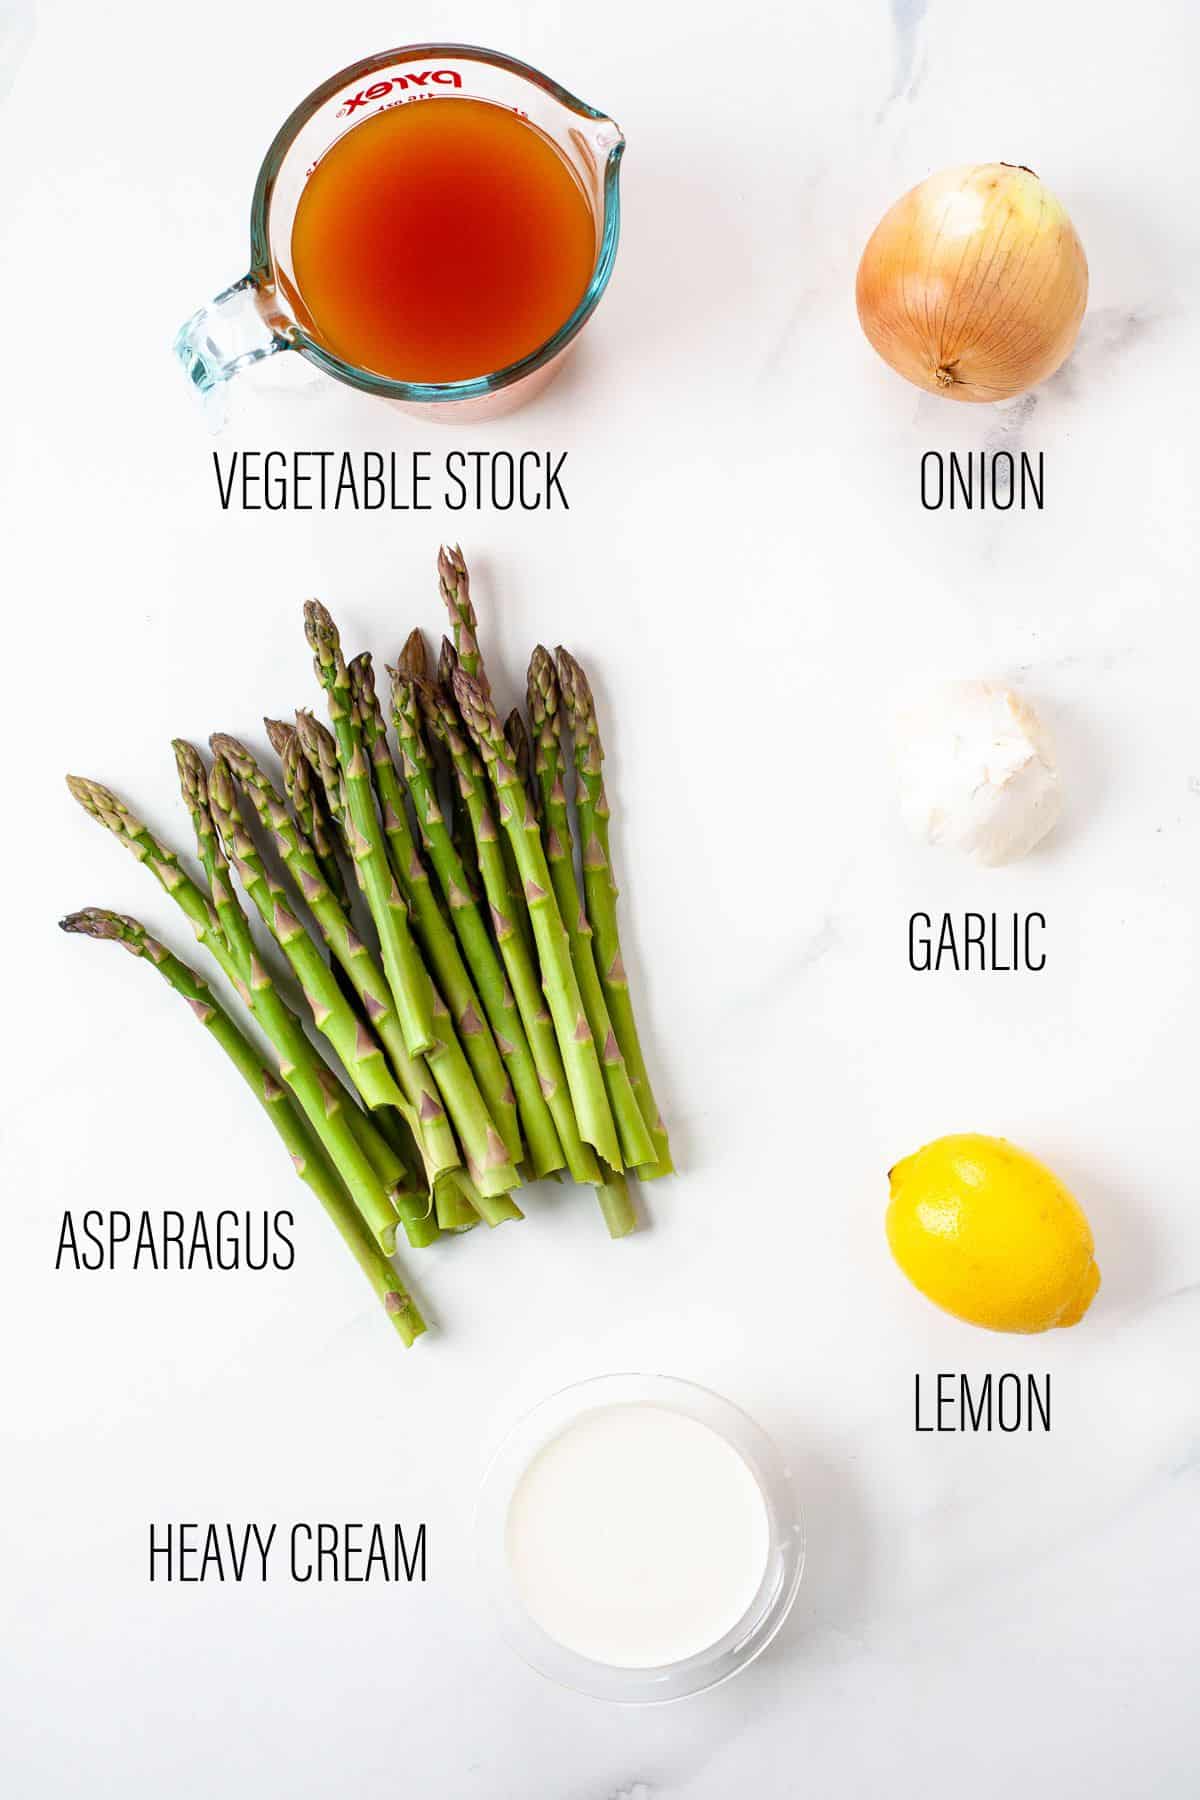
    Notes on Ingredients

    butter: for flavor and to help onions sauté, can substitute with olive oil or ghee
    onion: use a yellow onion for the best flavor, but white will work as well! 
    asparagus: fresh asparagus will lend the best flavor, but frozen could work as well
    vegetable stock: for flavor, can substitute for chicken stock or mushroom broth
    heavy cream: for creaminess and flavor, can substitute with Greek yogurt 
    lemon juice: fresh lemon juice is best, but can use bottled
    Salt and pepper: not pictured above but essential for flavor!

    Equipment You’ll Need (affiliate links – if you make a purchase I receive a small commission)

    How to Make Instant Pot Asparagus Soup 

    graphic step by step ingredients for cream of asparagus soup, 6 steps

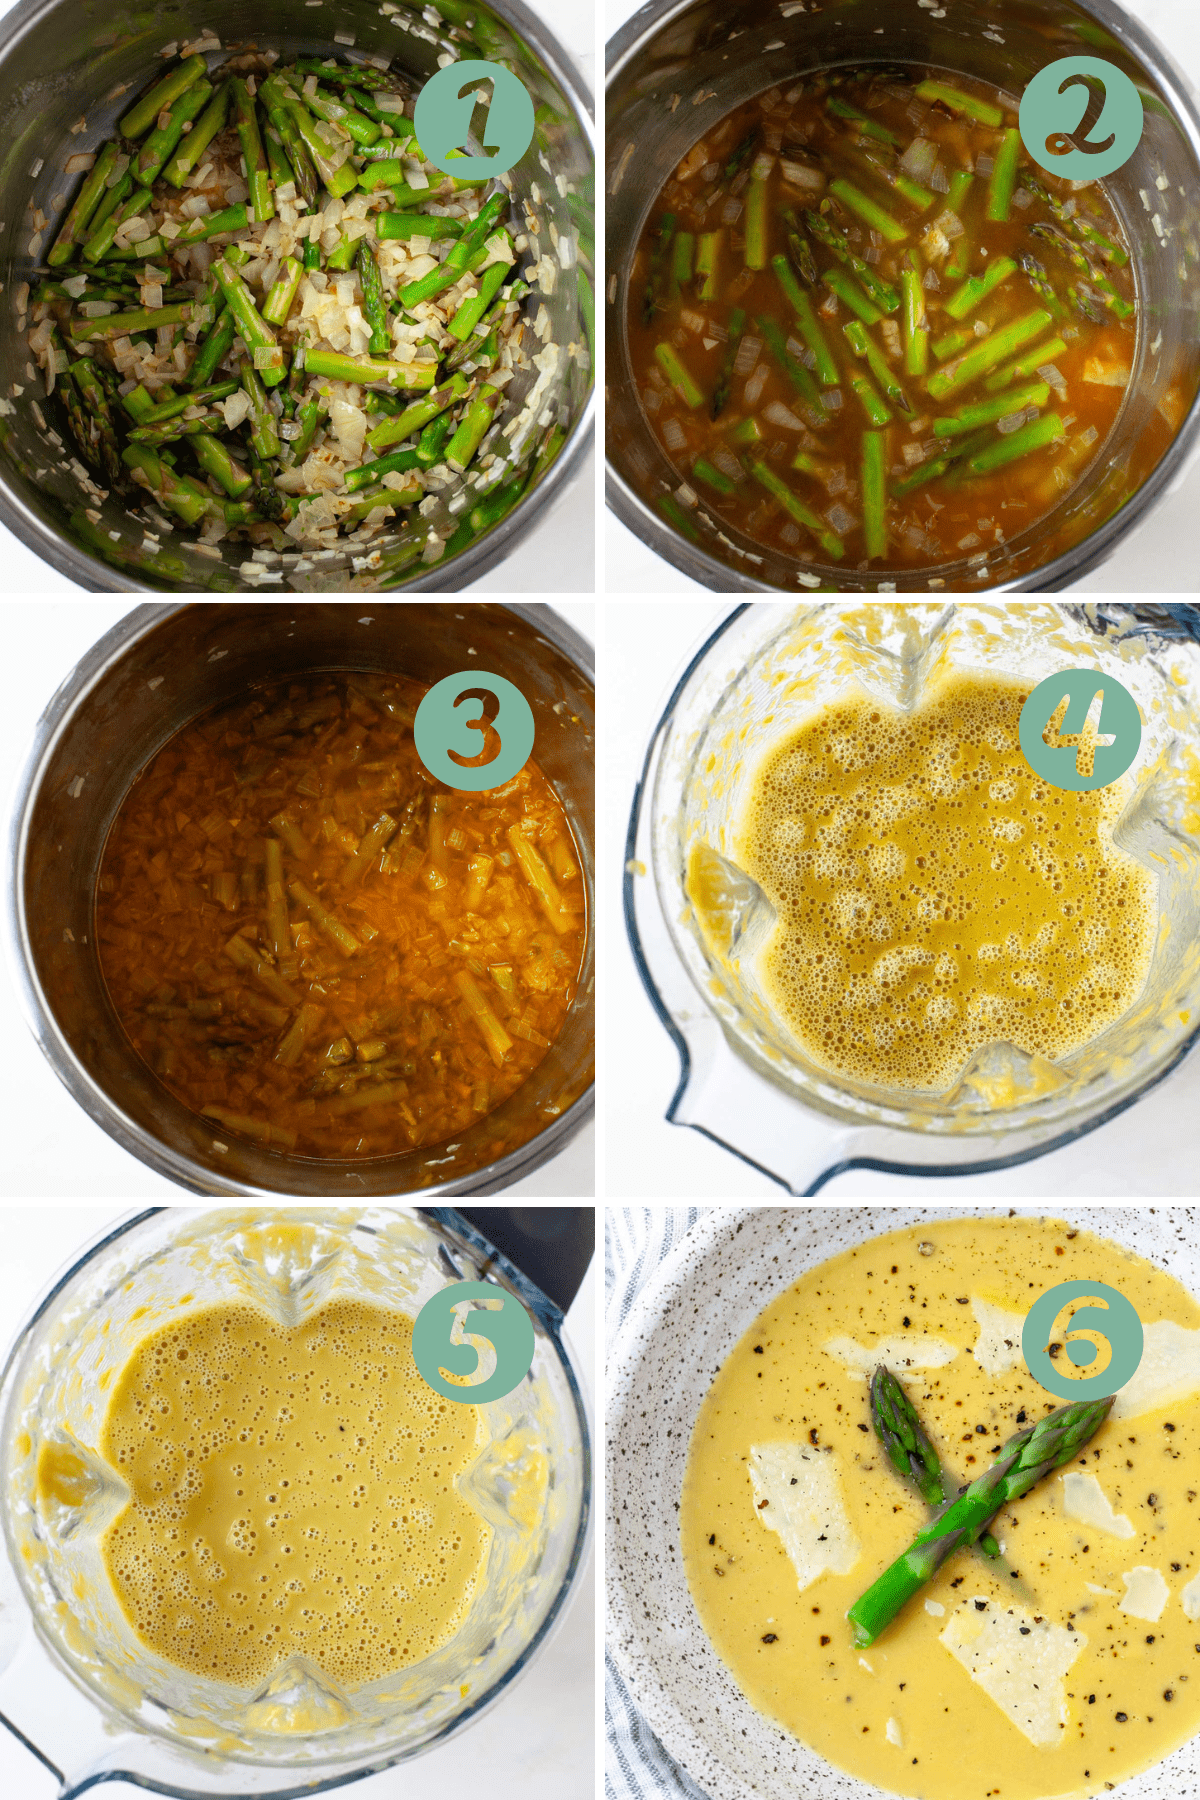
    Sauté butter, onion and garlic until softened and fragrant. Then add asparagus and sauté for 3 minutes.
    Add vegetable broth (having enough liquid is essential for pressure cooking).
    Pressure cook. Secure lid onto Instant Pot and pressure cook for five minutes. Quick release pressure.
    Transfer soup into a high speed blender (or use an immersion blender) and blend until smooth and creamy. 
    Stir in lemon juice and heavy cream (or Greek yogurt). 
    Season with salt and pepper and enjoy! 

    Expert Tips

    If you don’t have an Instant Pot, you can make this recipe in the slow cooker! Just add all ingredients (except heavy cream and lemon juice) to slow cooker and set to low for 7-8 hours or high for 3-4 hours. Once asparagus is soft, transfer to a blender (or use an immersion blender), add heavy cream and lemon juice and blend. You can get the full recipe for slow cooker asparagus soup here.
    If you can’t get fresh asparagus, frozen or canned work as well!
    If using Greek yogurt, be sure to use room temperature yogurt (let sit out for at least 1 hour but not more than 2 hours) so it doesn’t curdle. I like using plain, full fat Greek yogurt in this recipe but you can use your preferred Greek yogurt. 

    Recipe FAQs

    What if I don’t like asparagus?

    Unfortunately this is an asparagus soup, but you could sub for green peas, broccoli, bok choy, or zucchini.

    Is this soup vegan?

    As long as you use olive oil instead of butter and omit the heavy cream (or yogurt), this asparagus soup is vegan! To add some creaminess to the soup’s texture, you can use canned coconut milk, soaked cashews, or potato for thickening.

    Is this soup healthy?

    This creamy Instant Pot asparagus soup is packed with nutrition. Asparagus is an excellent source of vitamin K and B vitamins and is a good source of vitamin C. The soup is also naturally vegetarian and gluten-free.

    Why is my asparagus soup stringy?

    You may have used too thick / woody pieces of asparagus. Make sure to trim the ends of your asparagus before using. Bend the thick end of the asparagus spear until it snaps – discard, compost, or freeze the woody stems (if you freeze, you can use to make a vegetable stock later on). 

    two bowls cream of asparagus soup with pepper, asparagus pieces, and lemon slicesStorage and Preparation

    This asparagus soup will stay fresh for 3-4 days in the refrigerator when stored in an air-tight container. You can reheat the soup in your microwave or over low heat on the stove. Heat until just warmed through, and stir well to avoid hot spots.

    This creamy Instant Pot soup can also be frozen! Store in an airtight container in the freezer for up to 3 months. Defrost overnight in the refrigerator or in the microwave.

    Recipes That Pair Well

    cream of asparagus soup in white speckled bowls with a bowl of lemons and asparagus stalks

    For more asparagus inspiration, check out my other recipes below!

    If you like this recipe, please be sure to comment and give it a 5 star rating below. If you make it, share it on Instagram and tag me @karalydonrd and I’ll re-share it with my followers! If you want to save this recipe for later, be sure to pin it on Pinterest!

    Print

    clock clock iconcutlery cutlery iconflag flag iconfolder folder iconinstagram instagram iconpinterest pinterest iconfacebook facebook iconprint print iconsquares squares iconheart heart iconheart solid heart solid icon

    Description

    Ready in less than 30 minutes, this Instant Pot Asparagus Soup is super easy to make as part of a quick weeknight dinner. Made with fresh asparagus, garlic, onion, lemon and cream (or yogurt), this soup calls for only six ingredients!

    1 tablespoon butter
    1 large onion, diced (about 2 1/2 to 3 cups)
    2 garlic cloves, minced (about 2 teaspoons)
    1 lb asparagus, ends trimmed and chopped into 3-inch pieces (about 3 cups)
    3 cups vegetable stock
    1/2 cup heavy cream (or can sub Greek yogurt)
    1 tablespoon lemon juice
    1 1/4 teaspoon salt (or more, to taste)
    1/4 teaspoon freshly ground black pepper

    Set Instant Pot to Saute. Add butter and let heat until butter is melted, about 1-2 minutes.
    Add onion and saute for 3 minutes. Add garlic and saute until fragrant, about 1 minute. Add asparagus and saute for 3 minutes.
    Add vegetable broth. Secure lid onto Instant Pot and set to pressure cook for 5 minutes.
    Quick release pressure
    Carefully transfer soup to a high speed blender and blend until smooth and creamy, about 1 minute. Or, you can use an immersion blender right in the Instant Pot (be careful of any splattering – the soup will be hot).
    Stir or blend in lemon juice and and heavy cream (or yogurt, if using). Season with salt and pepper, adding more or less, to taste.

    Notes

    This asparagus soup will stay fresh for 3-4 days in the refrigerator or up to 3 months in the freezer when stored in an air-tight container.
    Make sure to trim the woody ends of the asparagus spears to avoid stringy soup!
    If using Greek yogurt, make sure to let it come to room temperature (by sitting out for 1-2 hours) before you fold / blend it in so that it doesn’t curdle.

    To make in the slow cooker:

    Add all ingredients (except heavy cream and lemon juice) to slow cooker and set to low for 7-8 hours or high for 3-4 hours.
    Once asparagus is soft, transfer to a blender (or use an immersion blender), add heavy cream and lemon juice and blend.
    You can get the full recipe for slow cooker asparagus soup here.

    Prep Time: 3 minutesCook Time: 30 minutesCategory: SoupMethod: Instant PotCuisine: American

    Keywords: instant pot asparagus soup, asparagus soup instant pot, instant pot cream of asparagus soup

  • Caraway Cookware Review – The Real Food Dietitians

    Caraway Cookware Review – The Real Food Dietitians

    Caraway Cookware Review – The Real Food Dietitians


    Privacy & Cookies Policy


  • Mario Badescu’s $22 Anti-Aging Cream Is Similar to La Mer

    Mario Badescu’s $22 Anti-Aging Cream Is Similar to La Mer

    If you purchase an independently reviewed product or service through a link on our website, STYLECASTER may receive an affiliate commission.

    If you’ve ever wondered what luxury skincare feels like, wait no more. La Mer, a top luxury beauty brand, has attracted the likes of Kim Kardashian West and Chrissy Teigen, and the source of most of this celeb attention is none other than the brand’s coveted Crème De La Mer moisturizer. However, there’s a new sheriff in town, and thanks to Amazon’s post-Cyber Monday deals, her price tag is $365 cheaper. Yes, you read that number correctly, and no, we’re not that bad at math.

    Crème De La Mer is a celeb of its own because of its ability to do just about everything good for your skin. It has an ultra-rich formula that deeply moisturizes, heals and protects. It even minimizes the appearance of fine lines and wrinkles. But all of this is no match for Mario Badescu’s way more affordable alternative, the Seaweed Night Cream. It calls on similar ingredients like seaweed extract, glycerin, collagen, elastin and hyaluronic acid to give your skin all the moisture it deserves—but at a fraction of its competitor’s price. 

    If you haven’t already, make sure you’re signed up for a Prime membership or free 30-day trial to take advantage of this stellar deal.

    If you still can’t believe that a $22 moisturizer could mimic one that’s $380, head over to the reviews section where more shoppers swear it’s as good as La Mer.

    “La Mer is my fave cream, but it’s super pricey and I can’t afford it all the time, so I use this instead,” wrote one shopper. “It works; I’m 50 and get mistaken for 30 all the time.”

    RELATED: The $10 Oil That ‘Helps With Hair Growth’ & Yields Results In ‘a Couple of Weeks’ Is on Sale

    Mario Badescu Seaweed Night Cream

    Courtesy of Mario Badescu.

    The oil-free formula is suitable for combination, oily, and sensitive skin types, which is a major bonus since you’ll wake up with a more nourished and illuminated complexion. Not only does it hydrate your skin with hyaluronic acid, but it also gives your skin a plump bounce that you’re definitely going to want this summer and beyond. Collagen and elastin, in particular, are packed with proteins that help smooth lines.

    “I use it because it’s a GREAT nighttime moisturizerfor someone with dry skin. That said, this is comparable to the La Mer face cream,” wrote another shopper. “I feel moisturized right after putting it on and when I wake up. I have been using it for over a year now. I had no reactions like pimples or rash irritation like I often get with new products.”

    Now that we’ve hopefully convinced you of this moisturizer’s irresistibly good ingredients and unbelievably effective results, it’s time to check out. Soon, you won’t even remember the name La Mer and will instead be basking in the glory of having healthy, glowing skin all thanks to this Mario Badescu moisturizer.

    STYLECASTER | Ashley Benson Interview

  • What Is A Toner & What Exactly Does It Do? Our Experts Can Tell You

    What Is A Toner & What Exactly Does It Do? Our Experts Can Tell You

    You’ve heard that using a toner is an important skin care step, but what exactly does it do? If you’re perplexed, you’ve come to the right place. We’re breaking down what a toner is, why you need to use one and which toner is right for you.

    What Is A Toner? | Pros And Cons Of Toner | Different Types Of Toners | When Should I Use A Toner? | FAQs

    Toner infographic

    What Is A Toner, Anyway?

    Toners are typically associated with drying, alcohol-based formulas that remove grease from your skin — along with every last bit of moisture. Luckily, toners have come a long way. In addition to astringent properties, the newest generation of toners and facial mists provide hydration, balance skin and treat a wide range of skin concerns and conditions. Dermatologist and MD Rebecca Kazin tells Women’s Health: “Historically toners were used as a way to balance the pH of the skin after using an alkaline soap product for cleansing.” But today, since our cleansers tend to be more pH balanced and less harsh, toners have evolved to not only balance the natural pH of the skin but also infuse it with natural vitamins and minerals.

    The Pros And Cons Of Toner: What Does It Do?

    The Pros

    Balances pH Levels

    Toner is often applied after the cleansing step to ensure that the skin’s pH levels are balanced. As Healthline states: “ … some soaps and cleansers are alkaline in nature. Using a product with a very different pH level to your skin can disrupt its usual functions, potentially leading to dryness, oiliness, or irritation.” Alternatively, if your skin is too acidic you may break out. That’s where a toner comes in as it serves to balance out your pH levels and provide equilibrium to your skin. 

    Provides An Extra Thorough Cleanse

    Even after using a cleanser, you might still need to remove any remaining sebum, makeup or dirt, and a toner can help with that. Toners complete the cleansing process by lifting away any last traces of makeup your cleanser failed to remove. These fast-absorbing liquids remove lingering impurities and replenish the skin with the necessary moisture. 

    Helps Absorb Products To Come

    By balancing your skin, removing remaining impurities and replenishing the complexion, the toner step preps your skin to absorb the products you apply afterwards. Lead Skin Care Trainer Natalie Pergar refers to toning as the “conditioning” step of your skin care routine. The right toner balances your complexion and provides a base layer of hydrating foundation to prep your skin for the steps that follow. 

    Treats Concerns

    With ingredients like chamomile, lavender and comfrey root, toners with natural formulations can also provide nutrients as an additional benefit. For example, our collection of toners and mists are blended with fresh juices and extracts that treat concerns from uneven skin tone to dryness, leaving the skin feeling revitalized.

    The Cons

    Accidentally Picking The “Wrong” Toner

    You may have a fear of picking the “wrong” toner based on the history of toners. The first toners to hit the beauty world in the 90s to late 00s were known for being too harsh on the skin due to their extremely high alcohol content. However, toners have since evolved from their drying predecessors to well-formulated tonics. Eminence Organic toners only contain beneficial antioxidants, soothing agents and hydrating ingredients. These components serve to enhance the skin’s surface, helping it look fresher, smoother, and more hydrated. Toners are a necessary step to balance your skin after a cleanse and prep your skin for the products that follow.

    You Want A Simplified Routine

    Toning may feel like yet another added step to your routine, but it plays a crucial role in a complete skin care regimen. We recommend that you include a toner in your usual routine, but you can definitely adapt to a simplified routine during busy periods. You may not be able to use a toner for every skin care session when you’re taking a pared-back approach, and that’s fine. Lead Skin Care Trainer Natalie Pergar shares a stripped-down routine for those busy days — watch and find out more.

    You’re Concerned With Sensitive Skin 

    Trying out new products is always a concern for sensitive skin types. Nevertheless, a wide variety of toners (and even exfoliating toners) exist with gentle ingredients that are kind to sensitive or reactive skins. As with any skin care product, it is always best to patch test before using a new product and to consult with a dermatologist if you have any concerns about using toners. 

    The Different Types of Toners

    There are hundreds of toners on the market and it can be intimidating to determine the right one for you. Toners serve different purposes, which can be categorized as hydrating, exfoliating, or astringent. It’s worth noting that different toners are suited to different skin types and concerns, so their classifications should be a consideration when you’re deciding which toner to use. 

    Hydrating

    It’s no surprise that hydrating toners contain humectant (water-attracting) ingredients like glycerin and hyaluronic acid. Humectant ingredients are effective at holding onto water and make it harder for moisture to evaporate. You might typically find this type of toner in the form of a refreshing mist or spray. 

    Exfoliating

    Exfoliating toners contain a small percentage of AHA, BHA or PHA ingredients to brighten the complexion and improve a dull skin tone. Typically these toners help to clear away dead cells from the skin’s surface, which leaves the skin’s appearance softer and smoother. 

    Astringent

    If you have oily skin, astringent toners can help get rid of excess oil. Astringent toners with botanicals can include natural ingredients like citrus fruits oils or juices to remove oil and help reduce the appearance of pores. For normal to oily skin types, spritzing on an astringent toner balances the skin and readies it for the day.

    When Should I Use A Toner?

    In addition to using toners as part of your daily and nightly skin care routine, Eminence Organics International Trainer Jude Herrera says toners can also be refresh the skin or set your makeup.

    If you’re wondering when to apply a toner during your skin care routine, it should be applied immediately after cleansing your skin, morning and night. In terms of application, typically, toner is applied by sweeping it on with a cotton pad. You can also apply toner with clean hands and swipe it on. Applying a toner when your skin is still slightly damp allows for its active ingredients to absorb more efficiently. This should help prep your skin for the rest of your products.

    Face Toner FAQ

    What Are The Benefits Of Using A Toner?

    Toners are essential for revealing fresh, revitalized-looking skin all year long. After cleansing, they balance the pH level of the skin and target a variety of skin care concerns.

    What Does A Balancing Toner Do For Your Face?

    Toners improve the skin after your cleansing step by balancing the skin’s pH. Balanced skin allows for better absorption of enriching ingredients from subsequent products that you use, such as serums and moisturizers.

    Is It Okay To Use A Toner Every Day?

    Yes, you can use a toner every day. Both hydrating and refreshing, face toners are the perfect complexion pick-me-up for everyday use.

    Should You Moisturize After A Toner? 

    After toning, it’s important to include a moisturizing step at some point in your skin care routine to lock in moisture and minimize dryness.

    Use our Spa Locator to find your nearest Eminence Organics spa and find the best toner for you. And, let us know in the comments below, or on social media, which product you find works best for your skin type. 

    This post was originally written in June 2019.

  • How “Better Than Balm” Double Cleanses With Just One Product

    How “Better Than Balm” Double Cleanses With Just One Product

    I’ve been working on something really special for the past three years, and today, I’m so excited to finally unveil it to the world! Meet Better Than Balm—our first-ever, oil-based cleanser. 

    I knew that if I created a cleansing balm, it needed to be different. What makes Better Than Balm unique is its dual-phase technology, which allows it to transform from an oil into a milky gel. This cleanser’s power truly lies in its transformation, and it’s that same transformation that gives you a proper double cleanse with just one product (yes, you read that right!).

    I worked hard to make a product that I felt was effective and also a joy to use, and since creating this balm, it’s quickly become my favorite way to remove makeup at night. Since it took so long to get here, I thought I’d share the journey behind this special product and break down what makes it different—and why it’s truly better than balm.

    The Inspiration—Why “Better Than Balm?”

    Cleansing balms have definitely become a mainstay in the skincare world. You know the type—it’s thick, maybe a little waxy, and when you flip the jar upside down, it doesn’t budge. And listen, I fully understand why people like using these! They feel rich and moisturizing, and they do a great job of removing makeup. But, this can come at a cost. Ultimately, my inspiration for Better Than Balm came from consistently watching people use traditional cleansing balms incorrectly, to the detriment of their skin. 

    The Problem With Traditional Cleansing Balms

    Many people like using cleansing balms because it makes their skin feel moisturized. But have you ever stopped to think about why your skin feels so moisturized after? It’s because these balms are made of heavy oils or waxes that are really difficult to rinse off. The result is that many cleansing balms end up leaving an oily film behind on your skin. This might leave you feeling soft and moisturized, but it also means the rest of your skincare products aren’t going to work as effectively. Oils are made up of large molecules, and products like serums are made with tiny molecules that are designed to go deep into the skin. If you put a small molecule on top of a large one, it won’t be able to penetrate through. (This is why I was never a fan of double cleansing with a balm in the past.) 

    While it’s important to choose a cleanser without harsh ingredients that will strip your skin, the main function of a cleanser is to, well, cleanse. You shouldn’t be relying on it for moisture—that’s where the rest of your skincare comes in. In fact, if your cleanser is leaving an oily film behind, it can actually dehydrate your skin over time. You see, all skin types need a combination of oil and water to be healthy. Water-based products tend to be made up of—you guessed it—smaller molecules. So, a layer of oil would actually prevent hydration from getting into your skin.

    When I was creating this product, I was determined to make something with all the benefits of a traditional cleansing balm, and none of the drawbacks.   

    The Formula

    From a formula standpoint, there are two things that make Better Than Balm stand out. First, the oil we use is a lot more lightweight than most oils. Second, this cleanser contains a higher amount of surfactants than traditional cleansing balms. Getting the correct ratio of oil to surfactants was definitely the trickiest part of the formulation process, and it sent me back to the drawing board more than once. We ended up with a winning combination that allowed Better Than Balm to work in two phases.

    Phase 1: Oil Phase

    Phase one of Better Than Balm is a luxurious yet lightweight oil. Oil works so well to dissolve makeup because it’s lipophilic, meaning it’s attracted to other oils. Or, put more simply, “like dissolves like.” 

    The oil component of Better Than Balm is caprylic/capric triglyceride. It’s made by purifying small, fatty molecules from coconut oil into a liquid, emollient form. The defining property of caprylic/capric triglyceride is that it has a low molecular weight. Most oils have a very high molecular weight, meaning the particles are large and end up just sitting on your skin. Since caprylic/capric triglyceride is so lightweight, it’s also more suitable for oily or acne-prone skin types, like Skin Types 1-4.

    Another drawback of heavy oils is that they have a high melting point, meaning it’s really easy for them to re-solidify or harden on your skin. Caprylic/capric triglyceride has a lower melting point, which allows it to provide continuous slip instead of hardening. It glides seamlessly, making this cleanser the perfect companion for gua sha or lymphatic drainage massage

    You can watch this fun little experiment I did to demonstrate how lightweight the oil molecules in Better Than Balm are compared to traditional balms. No greasy mess here!

    Phase 2: Gel Phase

    Once you add water to Better Than Balm, you activate phase two. What you’re really activating here is sucrose laurate, the ingredient responsible for this cleanser’s transformation. Sucrose laurate is a gentle surfactant made from a combination of sugar and lauric acid. It can emulsify the caprylic/capric triglyceride so that it can be easily rinsed away with water and doesn’t leave a film. 

    Below, you can see the cleanser immediately begins to transform when water is added, versus a traditional balm that doesn’t budge.


    Having these two phases within one cleanser mimics the double cleanse process, but with just a single product. 

    Who Is It For?

    Better Than Balm is for anyone who wants to remove stubborn makeup while maintaining healthy, balanced skin. It’s gentle and can be used nightly (or as needed) by all skin types. This cleanser was created for makeup wearers who:

    Think traditional cleansing balms are too heavy or waxy and prefer a more lightweight textureWant to save time by effectively double-cleansing with just one product Are prone to breakouts and clogged pores, which heavy oils and solid waxes aren’t recommended for Want an oil-based cleanser that doesn’t leave a barrier on their skin (remember, this can impede the penetration of serums applied after) 

    Finally, this cleanser is for anyone who loves a little aromatherapy with their nighttime self-care routine (after all, isn’t that what skincare is?). I worked closely with the lab to come up with a beautiful scent for Better Than Balm; it’s warm, inviting, and relaxing with subtle hints of soft rose. I’m fully obsessed and it’s one of the many reasons this product has become the best part of my nighttime routine!

    Worried about fragrance in skincare products? Learn why it’s not as bad as you’ve heard

    How to Use It

    One thing Better Than Balm does have in common with traditional balms is that you must use it correctly in order to get all the benefits.

    Step 1: Apply the cleanser to DRY skin and gently massage over the face for a full 30 seconds. This will start to dissolve makeup, sunscreen, and sebum. For heavier makeup, such as long-wear or full-coverage foundation, massage for 60 seconds.

    Step 2: Using your fingertips, add water to transform the cleanser into a milky gel. Massage for another 30 seconds or, for heavier makeup, another 60 seconds.

    Step 3: Rinse your face with lukewarm water to remove the bulk of the cleanser and makeup.

    Step 4: Use a slightly damp Reusable Cleansing Cloth and gently wipe across your face to remove every last trace of loosened makeup and debris. Repeat as needed for heavier makeup. 

    Step four is so important because while the cleanser dissolves your makeup, the physical wiping action of the cloth is what actually lifts that makeup off the skin. Otherwise, you’re just smearing it around.

    How Better Than Balm Fits Into My Brand Philosophy

    In the 26 years I’ve had my skincare line, I’ve always been adamant about not creating new products based purely on trends. I have to truly believe in a product’s ability to improve people’s skin. I also never want to create a product just for the sake of it. I want to make something because I see a need for it and because I think I can offer people something special.

    Throughout my career, I’ve always preached using a cleansing gel to remove sebum in the morning, and a cleansing lotion to remove makeup at night. What pushed me to finally come out with a balm cleanser was the evolution of foundation makeup. Formulas have evolved from BB and CC creams into makeup that’s designed to stay on the skin for hours and hours. Cleansing lotions can take off a lot, but for this type of complexion makeup, you just need more oil to get it all off.

    Better Than Balm embodies my skincare philosophy and I’m very proud to be putting it out into the world. I love it, and I know you will, too!

    Up next, learn why you should always wash your face in the morning.

  • 7 Ways to Make the Most of Your First Day at the Gym

    7 Ways to Make the Most of Your First Day at the Gym

    by Caitlin H,

    Feb 6, 2023

    First Day at the Gym

    You did it. You committed to your health and fitness and signed up for a gym membership. And now, it’s time to step into that world of weights and cardio machines for the first time. It can feel pretty darn intimidating. That’s more than okay. It’s a brand new situation, and doing anything for the first time can be nerve-wracking.

    Thankfully, the gym is actually a place you can have fun and spend time — you just have to set yourself up for success before showing up for the first time.

    We rounded up seven ways to make the most of your first gym day, from planning your routine to starting small — and everything in between.


    1) Write out your planned routine before going.


    Like anything worth succeeding at, planning is essential. Do some research about workouts ahead of when you go. Then, write out the exact routine you will do, including what machines you need and the duration, ahead of time. Keep it simple and include a good mix of cardio and strength training. You can use your phone’s list or notes app, so you’re not walking around with a notebook or piece of paper. Creating your routine ahead of time also helps ensure you complete a full workout.


    2) Jam out to some awesome tunes.


    Studies show that music with a high tempo can boost endurance and intensity. Before you go to the gym, create a playlist or two of your favorite tunes. Purchase some exercise-friendly earbuds to ensure they’re not slipping out while exercising. Listening to fun, high-tempo music is sure to make the workout even more enjoyable.


    3) Chat with the staff.


    A friendly face is nice no matter where you go — and that’s especially true when you walk into the gym! Getting familiar with the gym staff is an excellent way to find extra motivation when you walk in the door and receive a warm greeting. Even more importantly, staff members are the most knowledgeable about the equipment. You can use them to ask questions about gym etiquette or how a machine works and get help when something is broken or missing.


    4) Begin every workout with a 5-minute warmup.


    No matter what routine you planned for yourself, taking the time to warm up your muscles and body will go a long way toward making the workout a success. Walk around the gym briskly or hop on a treadmill. After you’re finished warming up, be sure to stretch, too. Warming up and stretching properly is vital to a good workout.


    5) Build on your routine.


    Going into the gym on day one and running 5 miles on the treadmill or lifting a heavy dumbbell may be ambitious. Instead, start small and work on building momentum with each visit. This is critical for preventing injury and avoiding muscle fatigue. Overly sore muscles or injuries quickly disrupt your consistency and make it too challenging to go to the gym 4-5 times a week. The most significant reason to build on your routine rather than going all out from the start is the psychological element. Working your way up to longer mileage, time or heavier weights gives you small wins along the way — and the pride that goes along with them.


    6) Get in tune with your body.


    Working out should be enjoyable. It does not mean pushing through pain or continuing to do something that feels excruciatingly challenging to the point you’re miserable. If you feel pain anywhere in your body, or if it feels like way too much, don’t be ashamed to back off the pace or lower the weight.


    7) Avoid anxious thoughts about what other people think about you.


    As a gym beginner, it’s easy to feel like everyone else is watching and judging you. In reality, most people there are focused on themselves and their routines. Don’t worry about what anyone else is thinking. Remember, you’re there to improve your own fitness. That’s something to be proud of.

    Ultimately, your first day at the gym (and every day after) should be fun. Following these tips will ensure you set yourself up for success, consistency, and some incredible results!


    ————————————————————————————


    Author: Caitlin H
    Diet-to-Go Community Manager

    Caitlin is the Diet-to-Go community manager and an avid runner. She is passionate about engaging with others online and maintaining a healthy, active lifestyle. She believes moderation is key, and people will have the most weight loss success if they engage in common-sense healthy eating and fitness.


    Exercise Tips

  • Healthy Sweet and Sour Chicken (Full Of Veggies, Lower In Sugar)

    Healthy Sweet and Sour Chicken (Full Of Veggies, Lower In Sugar)

    Healthy Sweet and Sour Chicken (Full Of Veggies, Lower In Sugar) – The Real Food Dietitians


    Privacy & Cookies Policy


  • Herb Tahini Dressing – Nutrition Stripped®

    Herb Tahini Dressing – Nutrition Stripped®

    This amazing Herb Tahini Dressing will add so much flavor to your next salad or grain bowl.

    Our core belief here is that balanced eating should be both nutrient-dense and delicious-dense!

    One of the unique elements in our Foundational Five system for creating balanced meals is the Flavor Factor, which is all about adding ingredients that help make your meal taste delicious and even more nutritious, including sauces, dressings, spices, and herbs.

    Made with tahini, lemon juice, cilantro, parsley, chives, and dill, this Herb Tahini Dressing will turn into a staple dressing for all of your spring and summer salads.

    Make this Flavor Factor recipe on your batch cooking day and you’ll be able to enjoy it in a variety of ways throughout the week! 

    What Is The Foundational Five Flavor Factor? 

    In case you’re new to the NS Community and the Mindful Nutrition Method, the Foundational Five system is part of how we teach you to build balanced meals. It makes it easy for you to give your body the nourishment you need while having the flexibility to enjoy the foods you love without stressing about food.

    The Foundational Five is made up of five elements of nutrition including Protein, Fat, Non-starchy Carbohydrates, starchy & Sugary Carbohydrates, and the Flavor Factor (which brings vibrancy, deliciousness, and enjoyment to your meals). 

    You can download our free guide that walks you through our Foundational Five system for creating balanced meals that you can use to meal prep or cook fresh this week!

    Tahini Nutrition Benefits

    Packed with heart-healthy unsaturated fats 
    Rich in free-radical fighting antioxidants 
    Disease fighting as a result of its anti-inflammatory properties

    Ingredients Needed To Make This Herb Tahini Dressing

    Tahini
    Lemon juice
    Cilantro
    Parsley
    Chives
    Dill
    Garlic 
    Olive oil
    Water
    Sea salt
    Pepper
    Lemon zest

    How To Make This Herb Tahini Dressing

    First, simply gather your ingredients. Next, add them to a food processor or blender and blend until you’ve reached your desired, creamy texture! 

    Tips for Making This Herb Tahini Dressing

    Here are a couple of tips you should keep in mind that will help you easily store and make the most out of this Herb Tahini Dressing. 

    Store in Air-tight Glass Swing Bottles 

    Utilizing air-tight glass swing bottles for storage will keep your dressing tasting fresh and delicious for up to a week. Plus, their pour-friendly tops make it easy to mix into any salad, grain bowl, or stir fry!  

    Double or Triple the Recipe!

    Want this dressing to last you all week long for many delicious salads and balanced meals? Then just double or triple the recipe amount to fill up a glass jar to coast you through many balanced salads.

    What To Serve With This Herb Tahini Dressing To Make It Balanced

    This dressing is a great source of flavor factors and fat, meaning it will add a boost of enjoyment and satiety to any meal!

    To help round it out and make a Foundational Five meal, be sure to add it to a bowl, dish, or plate that has your other Foundational Five components (protein, starchy or sugary carbohydrates, and non-starchy carbohydrate). 

    Salads and grain bowls are particularly easy ways to incorporate all of these ingredients! 

    FAQ About How To Make This Herb Tahini Dressing:

    How long will this recipe last?

    When stored in an air-tight glass container, you can use this dressing for up to two weeks. 

  • No7 Restore & Renew Multi Action Serum Tightens and Firms Sagging Skin

    No7 Restore & Renew Multi Action Serum Tightens and Firms Sagging Skin

    If you purchase an independently reviewed product or service through a link on our website, STYLECASTER may receive an affiliate commission.

    One of the most vital parts of any beauty routine is a consistent skincare regimen. While that may involve an exfoliating cleansing balm or glowy moisturizer, there’s another element you’re probably missing: a targeted face and neck serum that halts fine lines in their tracks.

    The No7 Beauty Restore & Renew Multi Action Face & Neck Serum is designed to tighten and firm the skin in just a couple of weeks. Its collagen-peptide complex (Matrixyl 3000 Plus), alongside a blend of hibiscus peptides and hyaluronic acid, instantly smooth the skin, bringing results that you can both see and feel rather quickly. Users may notice a reduction in the appearance of fine lines, crows feet and wrinkles, plus your face might even look lifted—a face lift at a fraction of the cost, who doesn’t want that? 

    In fact, its clinically proven to make a difference on aging skin. Per a consumer study conducted in the UK, 85 percent of subjects 85% “saw better age-defying results when adding No7 Restore & Renew serum to their skincare routine” compared to those that didn’t.

    No7 Restore & Renew Face & Neck Multi Action Serum

    Amazon

    No7 Restore & Renew Face & Neck Multi Action Serum

    Even those with sensitive skin will be able to reap the serum’s benefits without unwanted irritation. To make the most out of this dermatologist-approved serum, the brand recommends using the serum in the morning and at night before bed. Shoppers also say this face and neck serumleaves their skin feeling “dewy and fresh” and “not greasy,” so it’s perfectly fine to apply ahead of makeup. 

    RELATED: Shoppers Are Seeing New Growth on Bald Spots With This $19 Spray—& Even Their Stylists Are Intrigued

    One reviewer called it the “best serum ever,” writing “I’ve been using this serum for a few years now and I absolutely love it. I have extremely sensitive skin and I’ve never had a problem using this. I also feel like it’s helping me ‘age backwards’ as it keeps my skin soft and supple and is perfect under my day or night cream, as well as my illuminator makeup I use on top of it. It’s a fabulous product.” 

    Another five-star shopper shared how she was more than pleased with the results. “Since using this serum, I notice the skin on my neck and chest looks tighter and younger. Lines seem less visible. Skin looks more supple and hydrated. Absolutely love it.” 

    Want to try it for yourself? The No7 Beauty Restore & Renew Multi Action Face & Neck Serum is available at Amazon right now for 17 percent off. 

    StyleCaster Shopping Newsletter Sign Up

  • What Are The Benefits Of A Turmeric Face Mask?

    What Are The Benefits Of A Turmeric Face Mask?

    Are turmeric face masks worth the hype? While many of us know turmeric as a staple spice in the kitchen, it may also hold promise as a skin care ingredient. With its vibrant yellow hue, turmeric has gained a glowing reputation in the beauty world, and you’ve likely seen recommendations for turmeric face masks popping up on your social media feeds. But are they worth trying?

    If you’ve only ever imagined reaching for this spice for your culinary escapades, think again. From brightening dark undereye circles to creating an invigorated, glowing complexion, you may be surprised at how a turmeric face mask benefits your skin. 

    Benefits Of Turmeric | Turmeric Face Mask FAQs | Turmeric Energizing Treatment Vs DIY Turmeric Face Mask | How To Use The Turmeric Energizing Treatment 

    Indian woman holding turmeric spice


    Benefits Of Using Turmeric For Your Skin

    Turmeric owes its anti-inflammatory and pigment-inhibiting properties to its active compounds, collectively referred to as curcuminoids. Among these, curcumin stands out as the most important, providing potent anti-inflammatory effects and effectively inhibiting tyrosinase — the enzyme responsible for activating pigment production. With its anti-inflammatory, antioxidant and anti-everything properties, turmeric skin care is the way to go if you want to achieve head-to-toe radiance.

    Here are some turmeric fast facts around its benefits for the skin.

    1. Anti-Inflammatory Properties

    Curcumin, which is found in turmeric, significantly lowers levels of inflammatory markers in the body. “Turmeric is an anti-inflammatory and antibacterial — these properties help tighten pores and improve skin tone and pH balance,” says Dr. Taz Bhatia MD, Integrative Health Expert, and Founder and Medical Director, CentrespringMD. 

    2. Helps To Treat Acne

    This spice’s powerful anti-inflammatory properties can improve scarring and dark spots left behind by acne, while decreasing redness and soothing irritated skin. As Dr. Bhatia explains, “In Ayurvedic medicine, turmeric was also mixed with yogurt to lessen acne.”

    Additionally, turmeric’s antimicrobial, antioxidant and anti-inflammatory properties may help prevent clogged pores, breakouts or reduce existing ones.

    3. Brightens Undereyes

    If you’re concerned with dark eye circles, turmeric’s properties help to brighten dark undereye circles and bring out your natural glow. Turmeric also works well to reduce any puffiness in your eye area.

    4. Reduces Signs Of Aging

    This golden root helps diminish the appearance of wrinkles, keeps skin supple and improves skin’s elasticity. You might be thinking that turmeric seems like a magical ingredient! We certainly think so. So, how exactly should you be using turmeric in your skin care routine? Turmeric face masks are extremely popular, but there is a difference between a DIY turmeric face mask and a professional treatment. 

    Turmeric Face Mask FAQs

    Is Turmeric Good For A Face Mask?

    Yes, turmeric is a good ingredient in a face mask as it exfoliates and awakens the skin so that it looks reinvigorated and clear. 

    Will A Turmeric Face Mask Stain My Skin?

    While turmeric on its own may leave a yellow stain on the skin, this is not an issue when it is professionally formulated into skin care products. We recommend avoiding DIY turmeric face masks and instead recommend using our own expertly formulated skin care products.

    What Does Turmeric Do For Your Face?

    Turmeric supports skin health to reduce breakouts and contains anti-inflammatory properties to improve skin tone. It also improves acne scarring and brightens dark undereye circles.

    Does A Turmeric Mask Reduce The Signs Of Aging?

    Turmeric can minimize the signs of aging by reducing the appearance of fine lines and wrinkles, keeping the skin supple and improving the skin’s elasticity.

    Does Turmeric Make Your Skin Clear?

    Yes, turmeric can make the skin appear clearer and smooth due to its antimicrobial, antioxidant and anti-inflammatory properties. It calms the look of inflamed skin and is known to minimize scarring. 

    Turmeric Energizing Treatment Vs DIY Turmeric Face Mask

    We know what you’re thinking — can’t I just create a DIY turmeric face mask at home? Mix some turmeric and apple cider vinegar together? The idea of mixing a mask up in the kitchen is very appealing and is frequently touted as a great solution on social media. However, a professional skin care product will provide you with safety and real results that you can’t achieve with a DIY mask. It comes down to the formula, concentration level and ingredients that you’ll find in professional skin care companies’ products. Additionally, when you mix up a DIY concoction at home, you can’t be sure that the ingredient proportions are ideal for the skin. Formulas made by beauty chemists eliminate this issue. 

    Product Picks

    Eminence Organics Turmeric Energizing Treatment

    Turmeric Energizing Treatment

    VIEW PRODUCT

    Our Turmeric Mask Energizing Treatment blends turmeric, citrine gemstones and zeolite, designed to exfoliate and enliven your skin. Kaolin clay cleanses deeply and brings out impurities in the skin without stripping moisture. Paprika is included in the mix, resulting in a vibrant, glowing complexion. Zeolite works to exfoliate, smooth, and tighten the skin, while the treatment’s unique powder-to-mousse texture creates a stimulating and refreshing experience. This multi-functional mask serves as a 3-in-1 treatment, acting as a stimulant, exfoliant and mask to awaken the skin and eliminate impurities. As the mask dries, the kaolin clay purifies the skin for a truly invigorating treatment.

    As our Lead Skin Care Trainer, Natalie Pergar, explains: “This treatment is fantastic for dull or congested skin, and it can also add positivity into your routine thanks to the powerful effects of citrine gemstones.” 

    How To Use The Turmeric Energizing Treatment 

    Infographic: How To Use The Turmeric Energizing Treatment


    Are you ready to enliven your complexion with Turmeric Energizing Treatment? All you have to do is dispense one small scoop of powder (about 1 teaspoon) into the outer cap. Gradually stir in a few drops of water until the texture looks like mousse. The recommended ratio is 4 parts powder to 3 parts water. Next, apply a thin layer to the entire face, extending to the neck and décolleté.

    You can let it dry for 10 – 30 minutes. Rinse with tepid water, massaging gently to exfoliate. Don’t be alarmed, as a hot tingling sensation can last for a few minutes and is an intended effect of this product. For a milder effect, dilute with more water.

    To learn more about this turmeric face mask and how best to apply it, watch Natalie in this In The Mix video. 

    Connect with your nearest Eminence Organics Spa Partner to learn more about the benefits of turmeric and our Turmeric Energizing Treatment with citrine gemstones.

    This article was first written in October 2020.

new online casino
Padişahbet Güncel Giriş
Padişahbet
Crypto Casino
Padişahbet Giriş