Christmas Simmer Pot (Easy & Simple Stovetop Potpourri) – The Real Food Dietitians

Christmas Simmer Pot (Easy & Simple Stovetop Potpourri) – The Real Food Dietitians
Looking for some nourishing holiday recipes to include on your menu this year?
We’ve rounded up a few of our favorite options that are made from nutrient-dense whole foods. All of our recipes are also free of dairy and gluten for those with sensitivities who need variations of some traditional recipes!
It’s great to enjoy the original versions of these recipes — no matter what the ingredients are. But sometimes, you need a nourishing option for one reason or another. It’s about being intentional and having a balanced mindset!
Find that area right in the middle — where you’re nourishing yourself and also having space to experience joy around your food experience.
Here you’ll find a few holiday recipes that are great nourishing choices. These are all easy to make and store well for leftovers!
One way to bring more balance to the holidays is to build a balanced plate at each meal.
The way we do that here at Nutrition Stripped is using our Foundational Five system. This
The Foundational Five are the five elements of a balanced meal: non-starchy carbohydrates, starchy carbohydrates, healthy fat, protein, and what we call the flavor factor.
By making a Foundational Five Nourish Meal, which aims to include all five of these on your plate, helps to support your digestion, stabilize your blood sugar, and provide you with the steady energy you need to feel your best.
Our Foundational Five Nourish Meals can be found as smoothies, yogurts, oatmeal bowls or breakfast bowls, nourish bowls, salads, soups, stews, and many more. Not every meal needs to be a Foundational Five, but if you are mindful to get most of these five elements on your plate at most meals, you’ll feel the difference.
If you need more support with creating balanced meals, sign up for the Healthy Eating Made Easy with The Foundational Five course.
The holidays are often a time to slow down and often when we have more days off and slow mornings. Starting the morning off with a nourishing holiday recipe that you can look forward to either sharing with your loved ones or simply appreciating the slowness and peacefulness of a morning where you don’t have much on your to-do list is one of those little daily moments that we often overlook or take for granted.
This Baked Raspberry Porridge has just the right balance of sweet and savory! An added bonus of this recipe is it uses pantry-friendly foods and frozen fruit, making it affordable and easy to make. You can also store the leftovers in the fridge and reheat them all week!
Frittatas, in general, are one of the easiest nourishing holiday recipes you can make with incredible amounts of flexibility. This Caramelized Onion and Pear Frittata combines the sweet and savory flavors of sweet caramelized onion, pear, and protein-rich eggs. It makes for a great breakfast, quick lunch or dinner reheated, and even a meal on the go!
If there’s one thing we know about the Nutrition Stripped community, it’s that you all love smoothies — year-round! This smoothie tastes like fall in a glass!
Smoothies may not be the first thing you think of when you think of fall and winter recipes, but they’re so convenient and you can make use of seasonal flavors to change it up from what you were drinking all summer.
During the holidays, the main course tends to feature an animal protein like turkey or ham. But if you either don’t enjoy those types of protein, or you’re eating more plant-based, these protein-packed plant-based holiday recipes will be a great addition to the menu. These recipes make a smaller portion, so they’d be easier to manage for 1-4 people if you’re having an intimate celebration this year.
One of the common questions, we get around this time of year is how to make a substantial, hearty, delicious, and non-laborious vegetarian entree for the holiday. I listened, and we served it up today.
This healthy entree for two makes it simple to celebrate several seasonal flavors with a satisfying blend of wild rice and nuts, along with a medley of warming herbs. Not to mention, the delivery of this recipe is basically chef-worthy status.
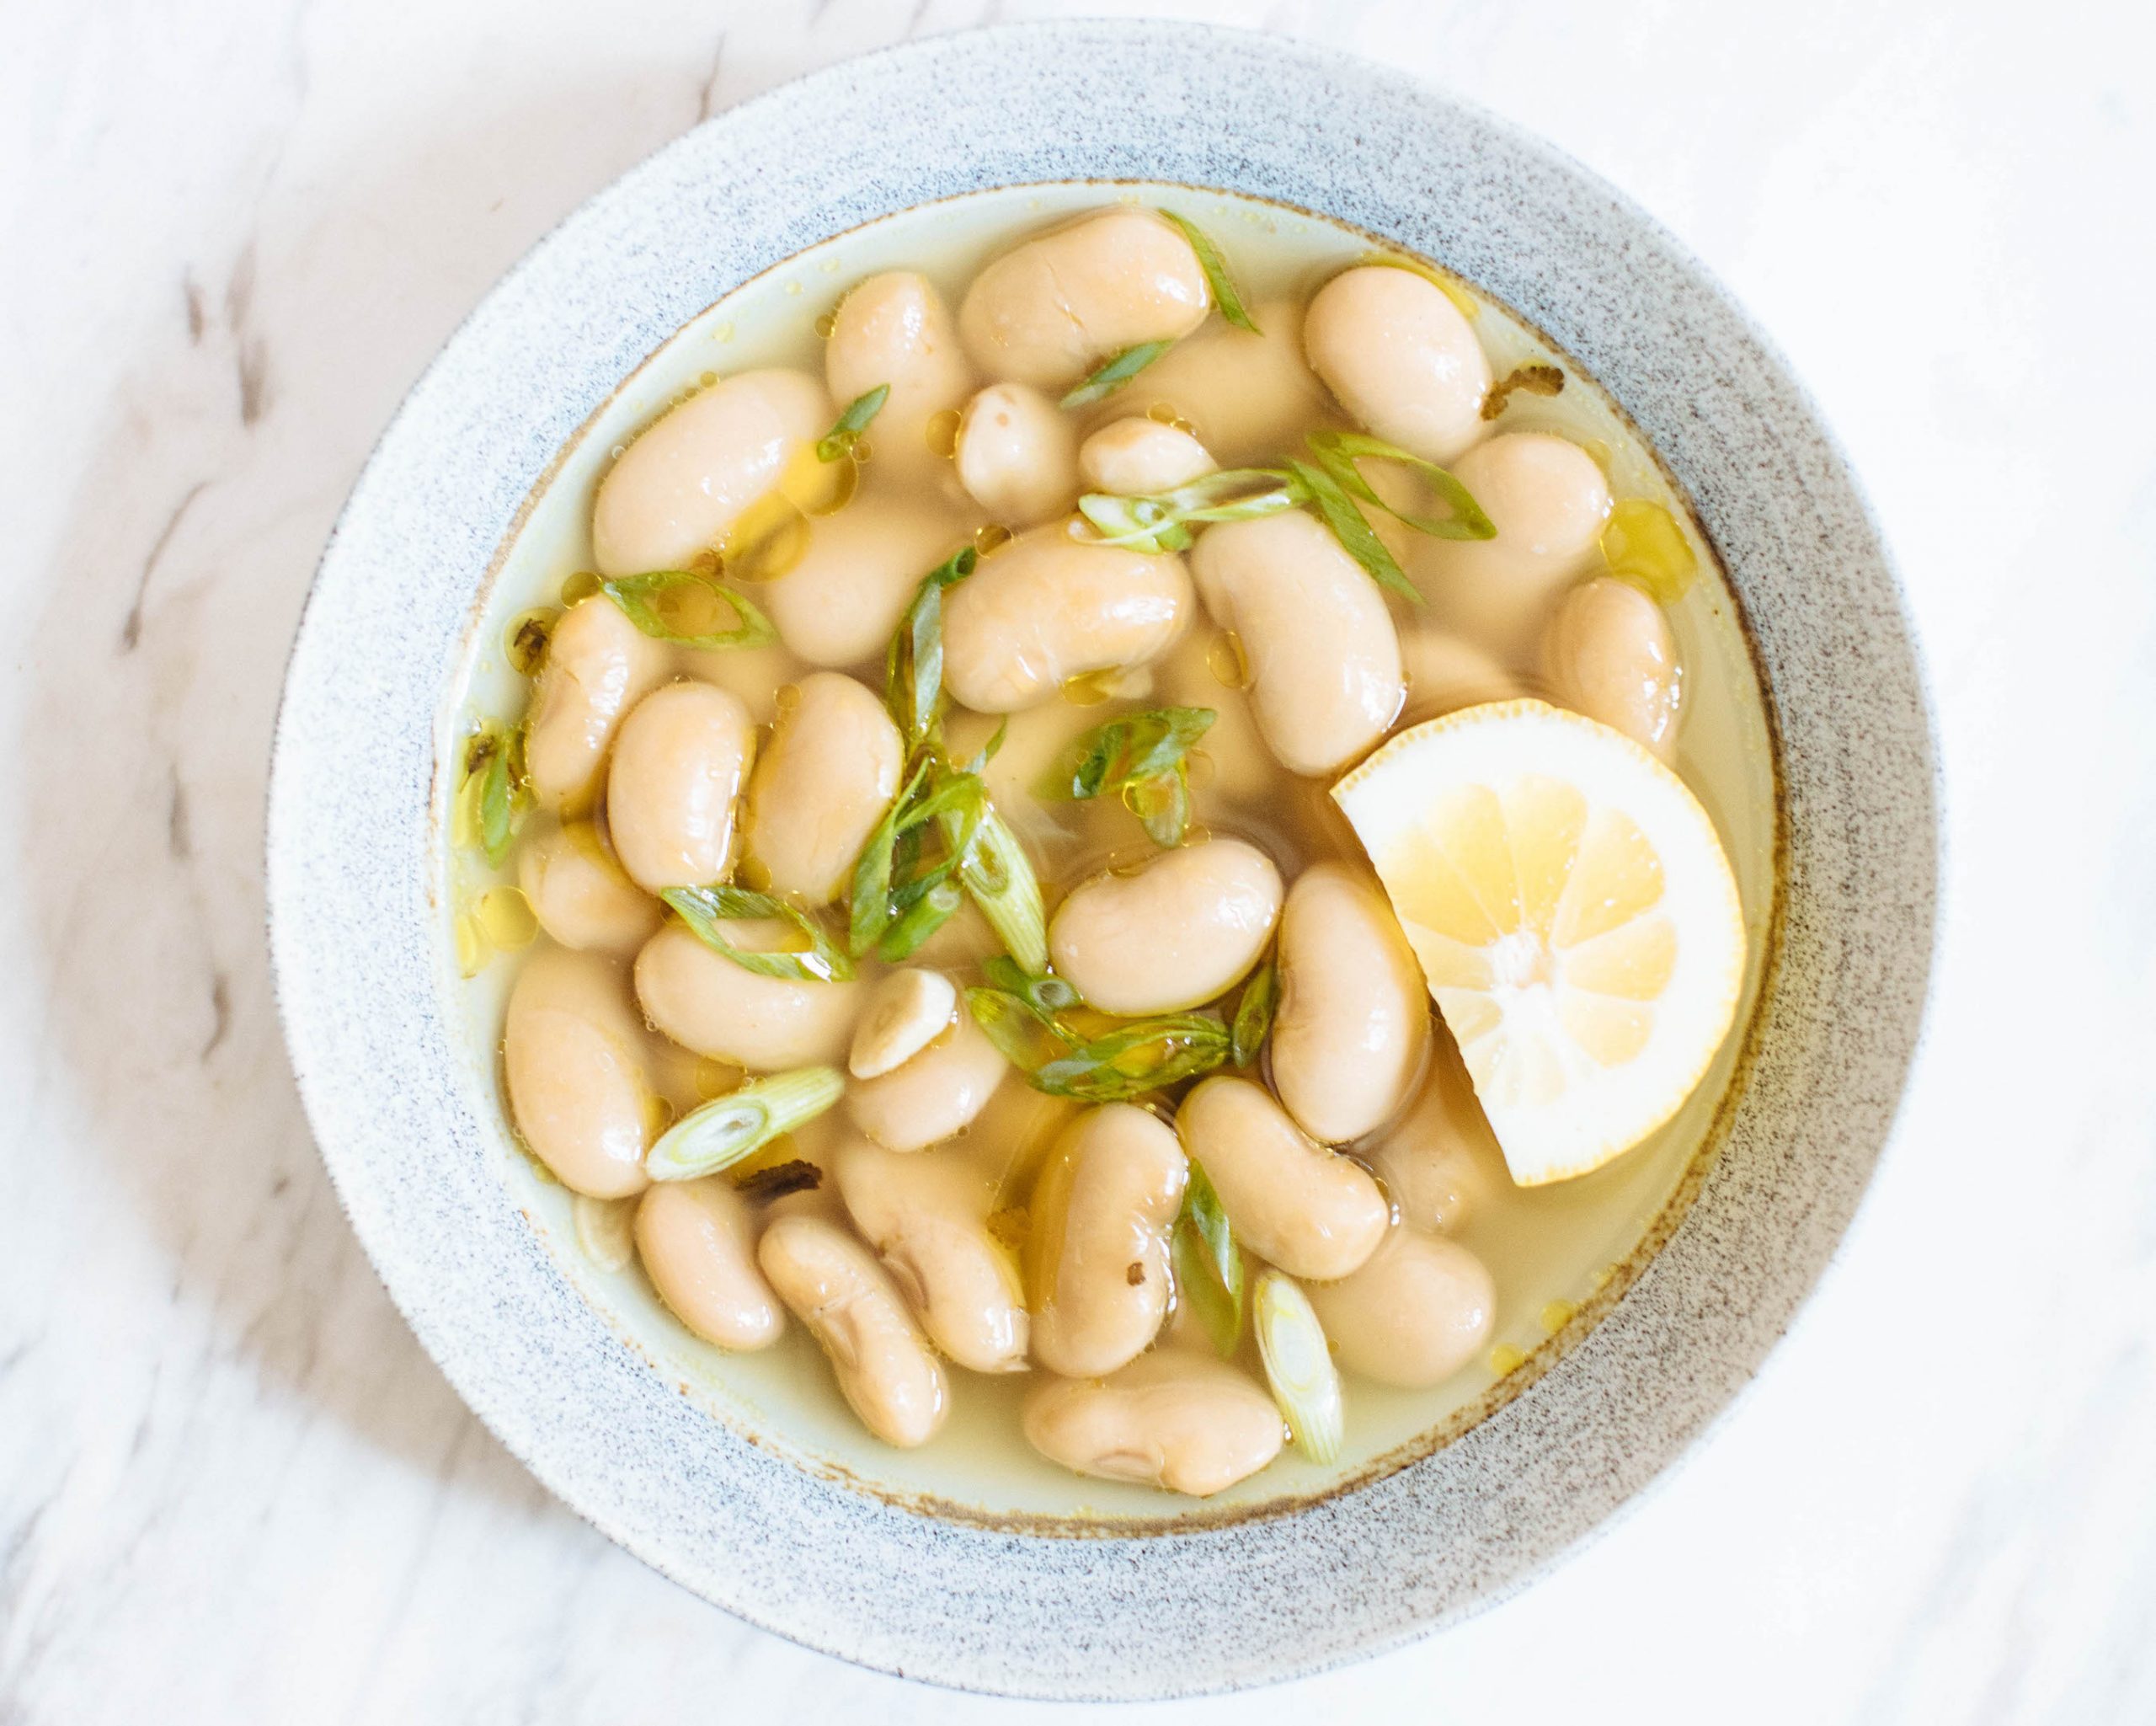
This easy recipe puts beans at the front and center for plenty of plant-based protein and energizing carbohydrates. It quickly became a favorite of the Nutrition Stripped community and it’s one of those recipes that anyone would love, especially since it takes minimal effort! Serve this alongside greens and you’re good to go!
Sides are one of the most fun parts of the holidays! You can load up your plate with one or more of these sides that incorporate super nourishing and filling ingredients into these traditional recipes.
No matter what time of year, this healthy and easy-to-make Plant-Based Green Bean Casserole is sure to please any crowd.
Fresh green beans and herbs, and creamy plant-based mushroom soup come together to create the perfect side dish. Pureeing steamed cauliflower creates a creamy and rich texture without the need for dairy.
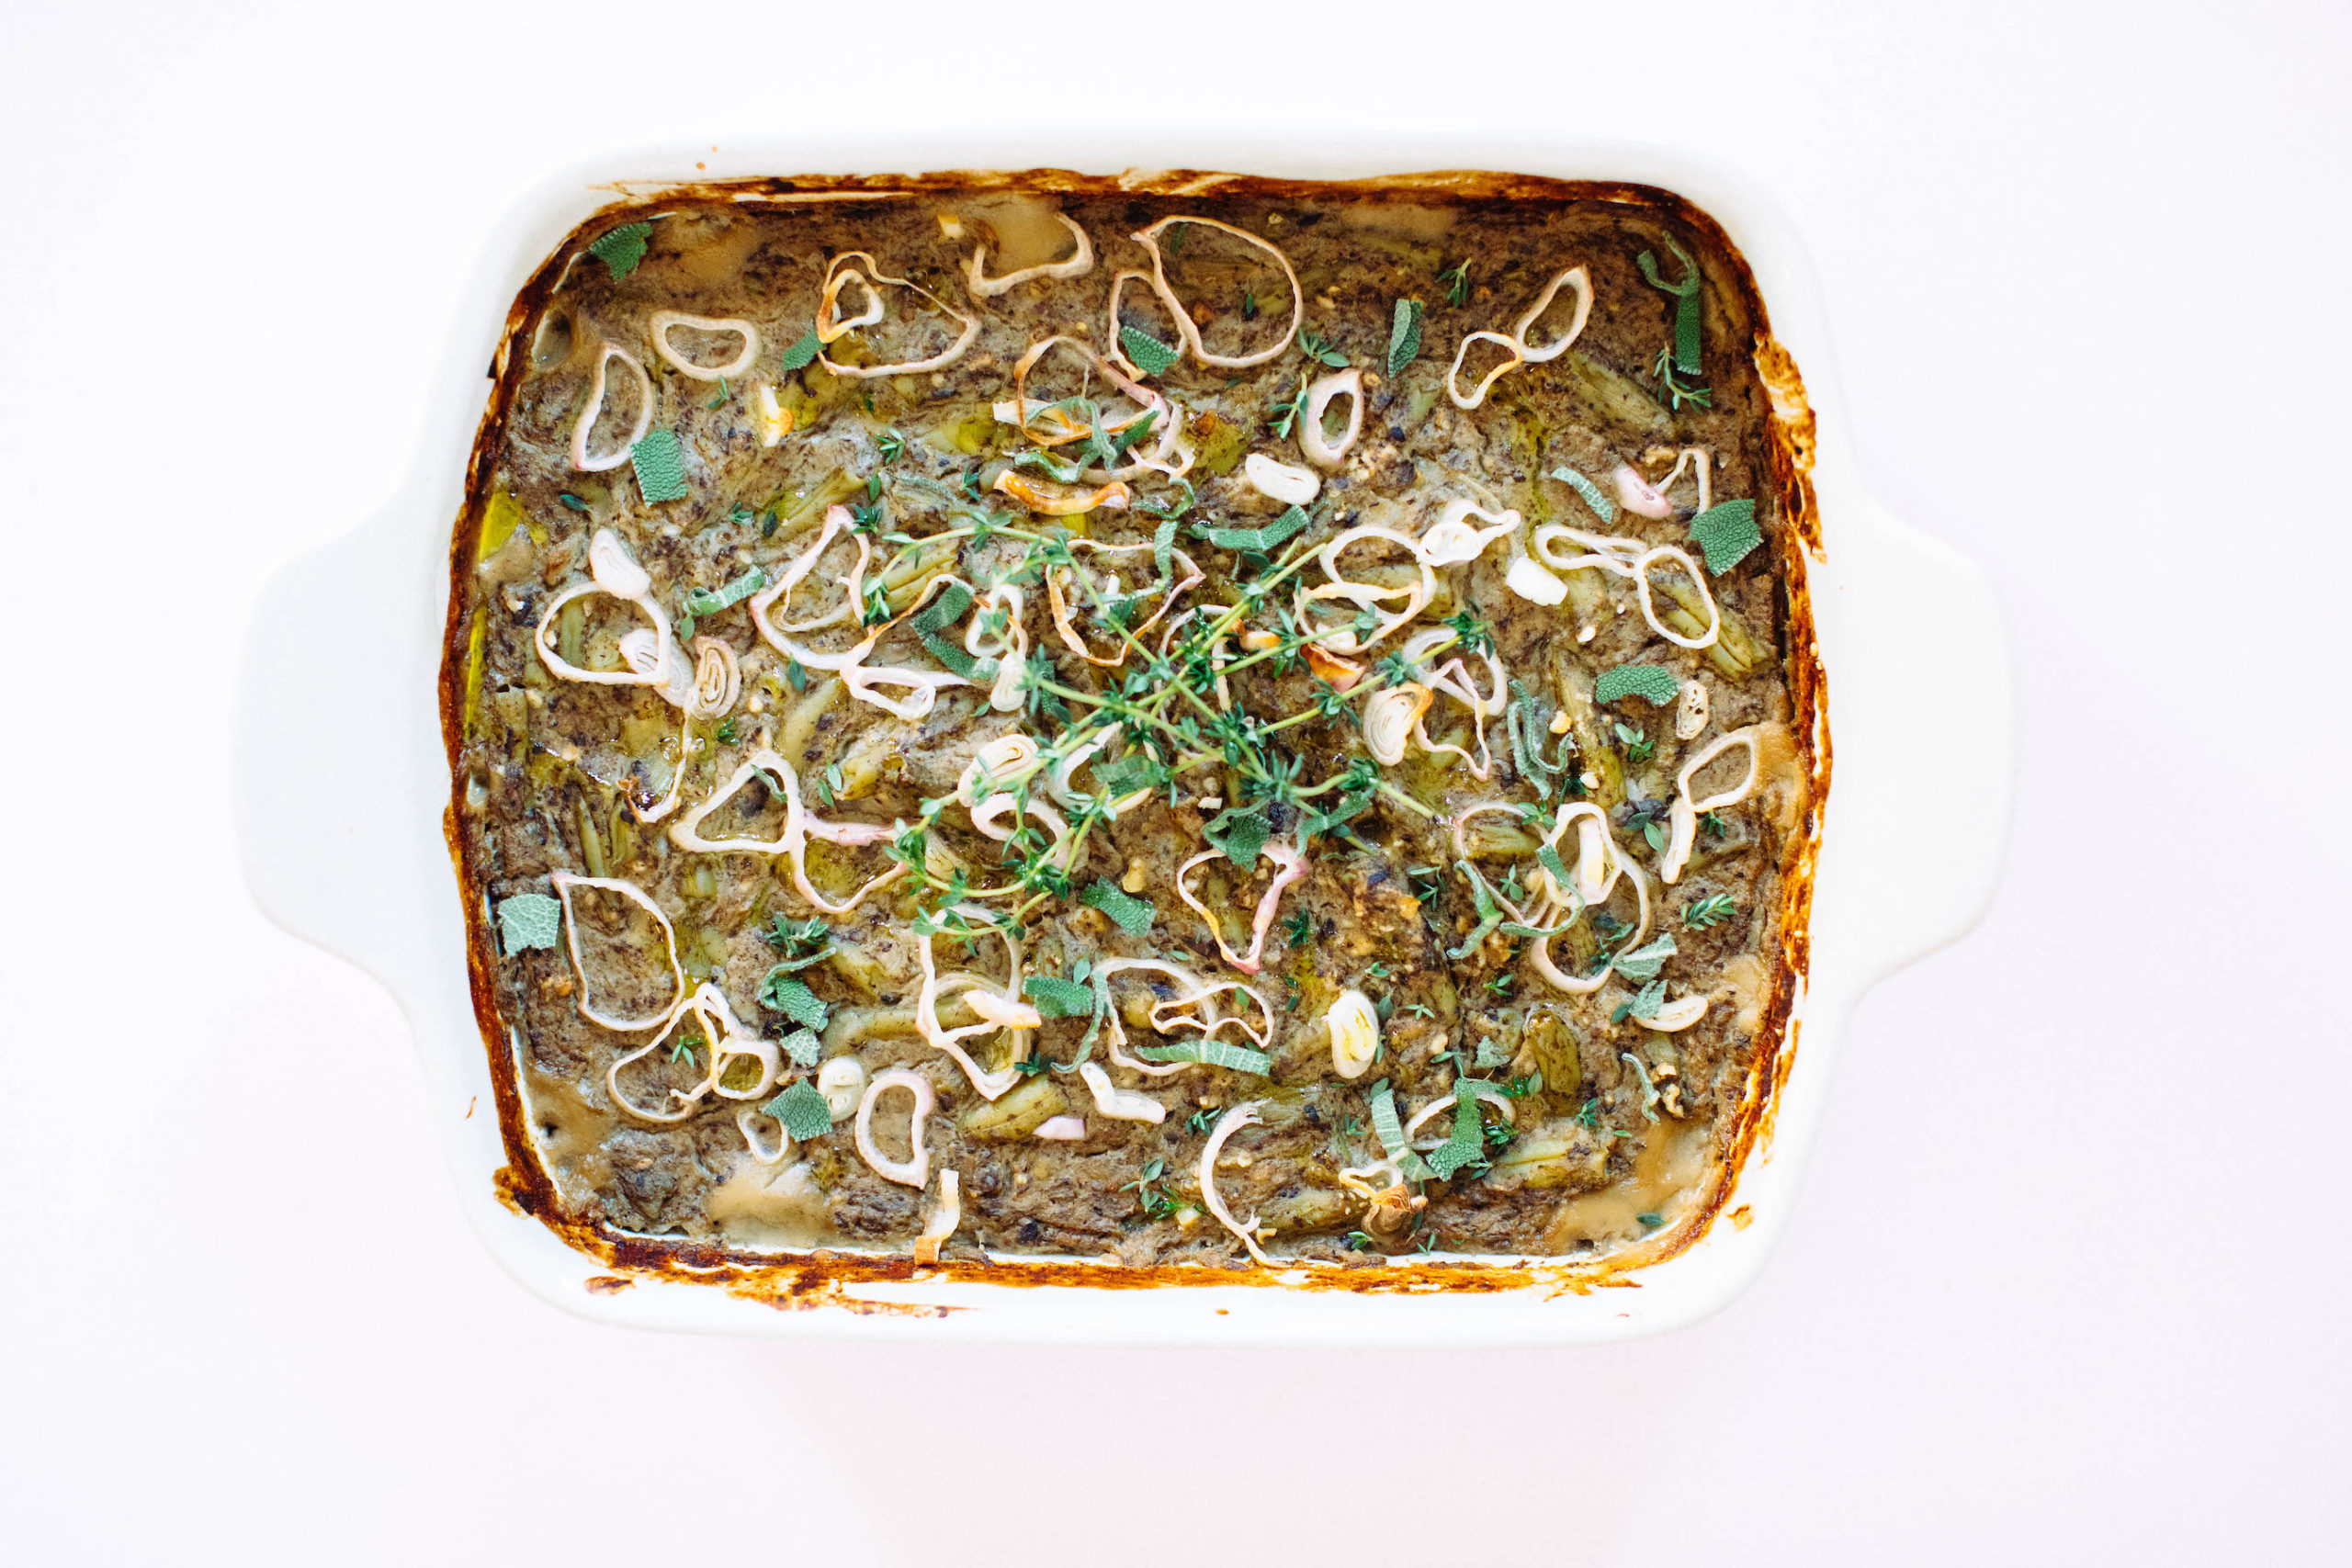
These Mashed Roasted Sweet Potatoes are the perfect nourishing holiday recipe that is packed with nutrients and easy to make!
By roasting the sweet potatoes in the oven, you get smooth and tender potatoes and a caramelized flavor profile you can’t get from boiling. Adding fresh thyme to this dish gives a savory festive fresh taste. Using gluten-free miso adds a rich earthy flavor pairs perfectly with the sweetness of the potatoes.
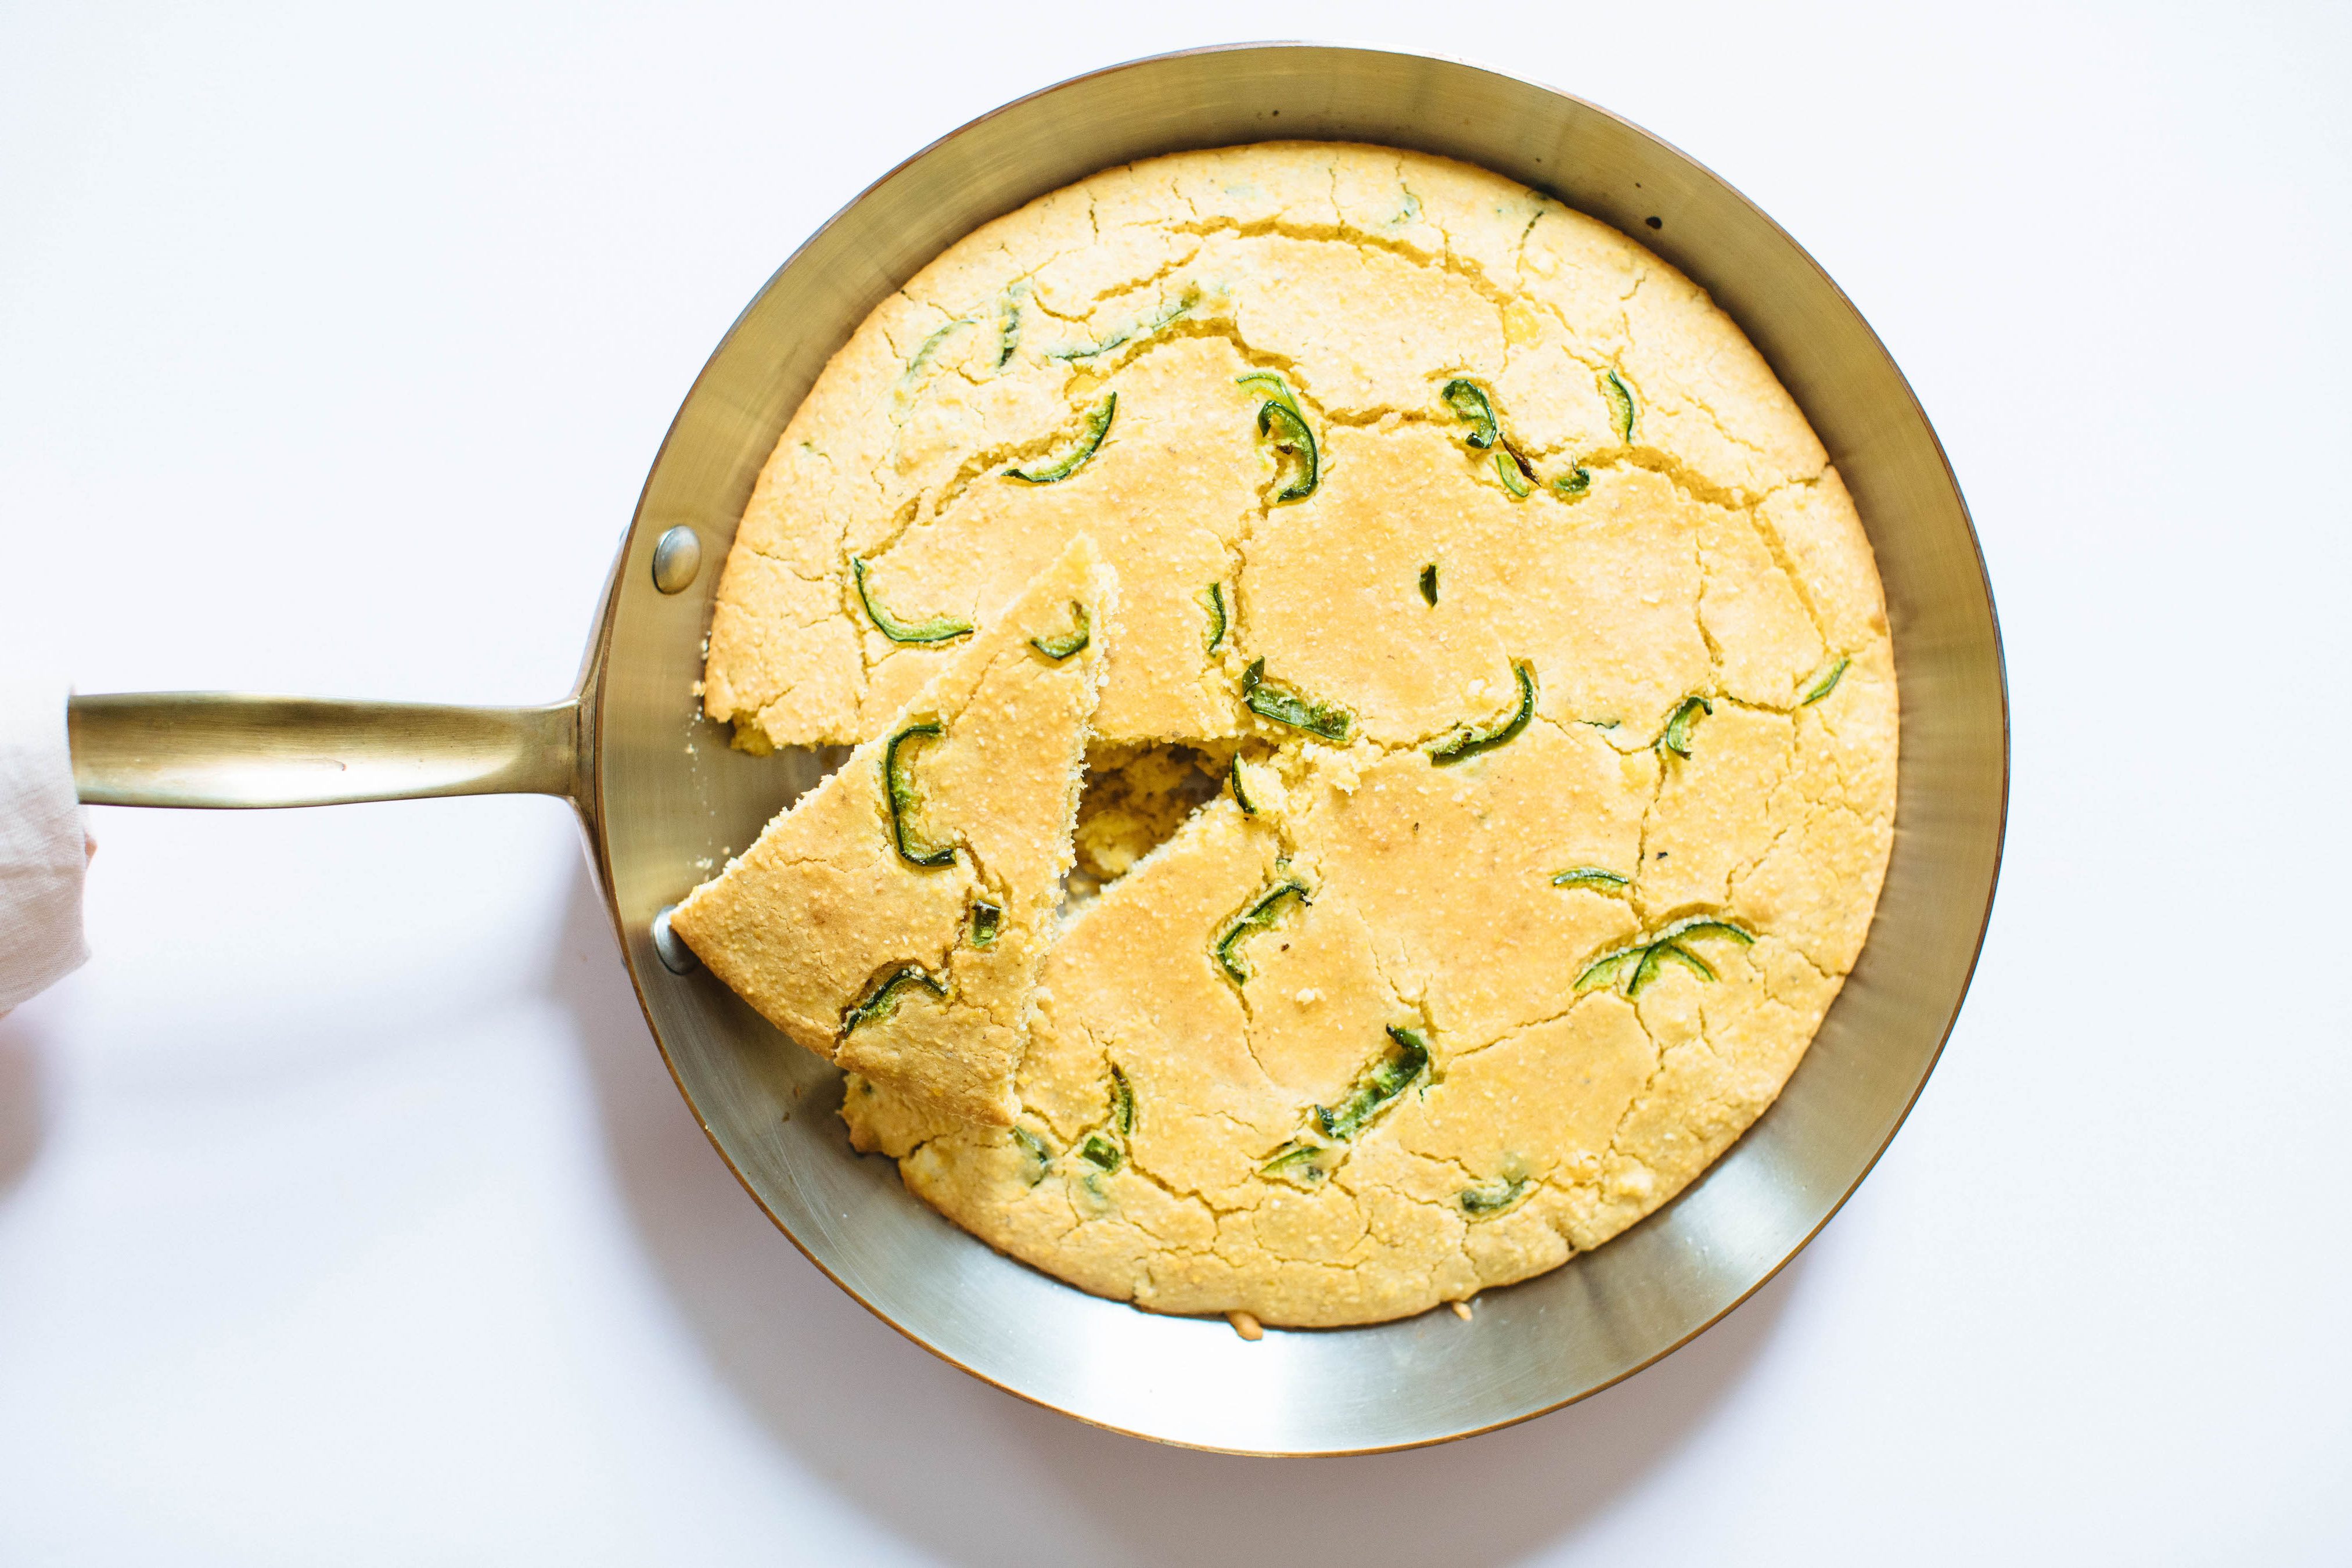
Cornbread is one of those comfort foods you can eat all year long to feel nostalgic. It’s warm and delicious and if you have an oven and a skillet it really couldn’t be easier to make. If jalapeño peppers are too spicy for your taste, try something else like bell peppers or sundried tomatoes.
There are so many dessert options available, and you may already have a favorite in mind. If you’re up for trying a few new recipes, you can’t go wrong with one (or more) of these!
A warm fruit dessert brings those cozy vibes to any celebration! You can serve these stewed apples alone or with a scoop of your favorite ice cream! Top with pecans for a little extra crunch and healthy fat too!

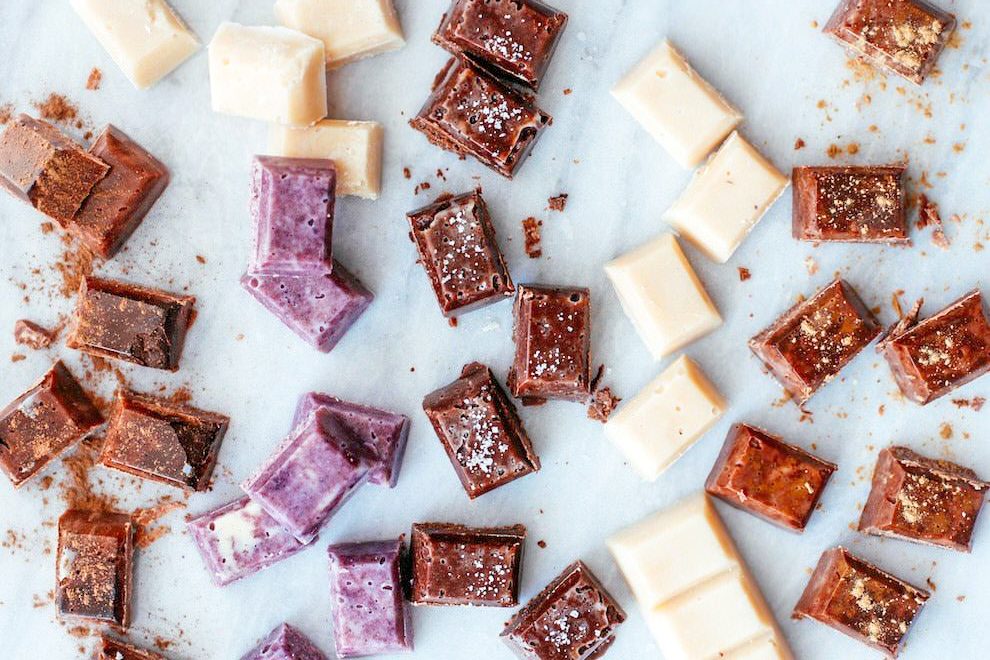
Adding things like strawberry puree, a shot of espresso, key lime juice, cocoa powder, and vanilla to the base recipe will make a variety of raw chocolates within minutes that are all completely indulgent and delicious. You can also experiment with fillings like nut butter or fruit preserves. All in all, you can have multiple different assorted raw chocolates to find your favorite!
These cashew butter cookies are so easy to make, requiring just a few ingredients that you likely have in your pantry and fridge already! The fun thing about this cookie recipe is you can easily swap out the cashew butter and raspberry jam for your preferred nut butter and jam flavor, making it your own!
Then find your balanced eating type!
Take this 45-second free quiz to find out which balanced eating archetype you are, and what your unique type needs to maintain balance with the way you nourish yourself. That way, you can finally be free from food and diet obsession, maintain a balanced weight, and cultivate a positive relationship with food and your body.
Take The Free Quiz Now

If you’re wondering how to give your skin an extra glow factor this summer, it’s simple: You need a toner. But if you choose just any toner, you might end up with a potent alcohol-based astringent that irritates your skin. A suitable option that does everything but aggravate your complexion is REN Skincare’s Ready Steady Glow Daily AHA Tonic, a one-stop shop for brightened, exfoliated and tightened skin. What’s better than that? The fact that the product is 25 percent off with the code BF25 for the brand’s Black Friday promo (which extends across the entire site).
Not all toners are the most gentle on your skin, but REN Skincare’s tonic is kind enough to be used every day. Its key ingredients are lactic acid (an alpha-hydroxy acid) and salicin (a beta-hydroxy acid). This dynamic duo brings dull and tired skin back to life with a radiance that’ll have you shook.
Many reviewers have been able to see such positive results because lactic acid sloughs off dead skin cells to make way for a smooth layer of skin, while salicin makes your pores appear tighter. To top it all off, azelaic acid adds a touch of brightness and radiance that’ll have your skin glowing.
“I can already see a massive difference—what acne scars?” wrote one five-star reviewer. “My skin looks a lot brighter and mark-free! I wish I discovered this before.”
RELATED: The Dark Spot Corrector That’s ‘Even Better Than Laser Treatments’ Is Secretly on Sale

Photo: REN Skincare.
To reap the best results, make sure you apply the toner at night right after cleansing your skin. Use a reusable cotton pad and as always, steer clear of your eye area. If you have super sensitive skin, feel free to dilute the toner by wetting a cotton pad with water first before application. And because the Ready Steady Glow Daily AHA Tonic features a potent blend of ingredients, the brand suggests you avoid using it on the same day as other exfoliating treatments.
“I have been using the tonic for years and I don’t think I could live without it at this point,” raved one shopper. “My complexion looks more even toned and I used it both morning and night. 10/10 would recommend!”
“My skin looks clear and clean all the time!” wrote another shopper. “It’s not drying yet not oily so great for combination skin. The big bottle seems to last ages so it is a great value for [your] money—a total bargain in my opinion.”
Whether you have post-acne scars or hyperpigmentation, swipe REN Skincare’s Ready Steady Glow Daily AHA Tonic all over and get glowing.

With Black Friday just around the corner, we know you’re already thinking about how you can save on your favorite skin care products. You’ll be happy to hear that Mario Badescu has plenty of big things in store to celebrate the start of the holiday season. In addition to a major Black Friday sale event, you’ll find great holiday deals all season long, offering you the perfect opportunity to stock up on your staple skin care products and even purchase some affordable beauty gifts for your loved ones. Learn more about what we have planned and how to find out about the best deals.
Sign Up for Black Friday Deals
Psst – we’ve got a secret we’re sure you’ll want to hear. There’s actually an easy way for you to become a Mario Badescu insider this holiday season. Simply sign up here to get email alerts about all the biggest sales, including Black Friday and Cyber Monday. You’ll get the first look at what’s set to go on sale, ensuring that you’re one of the first to snatch up our discounted products while they last. Just enter your email address, sit back and relax knowing that the very best deals will be arriving in your inbox soon so you can stock up on your go-to skin care items or try out some new products at a discounted price.
Shop for Discount Skin Care Gifts
When you sign up for our email alerts, we’ll also clue you in to great offers and discounts available during the holiday season. This is prime gift-shopping time, so there’s never been a better way to get info about the best sales. Plus, you can use these deals as inspiration when searching for the perfect presents, including our ultra-popular gift set bundles. We can’t wait to share all our best Black Friday and holiday deals with you this year, so sign up now!
Categories: Skin Care |
Permalink
Cleansing is an important step in your skin care routine, but it can be confusing when it comes to choosing the right type that will work best for your needs and for your specific skin. To minimize the time spent determining the right choice, we’re sharing the best face cleansers for your skin type.
Cleansers For Oily Skin | Sensitive Skin | Dry Skin | Combination Skin | Normal Skin
Cleansers help to remove dirt, oil, sweat and products like makeup and sunscreen from your skin. Your skin is also exposed to bacteria and pollution throughout the day. Cleansing is necessary to remove the buildup of these factors so you don’t develop breakouts. You can learn even more about the purpose of cleansing in this cleansers 101 guide.
Do you have oily skin? If your skin is typically greasy, prone to breakouts and has large pores, you may have oily skin. Your goal is to control the buildup of oil or debris and prevent breakouts. If you’re unsure, here are a few signs that you have oily skin.
Greasy to the touch
Visible, large pores
Prone to breakouts
Makeup gets soaked up quickly, but it also slides off easily
Shiny looking
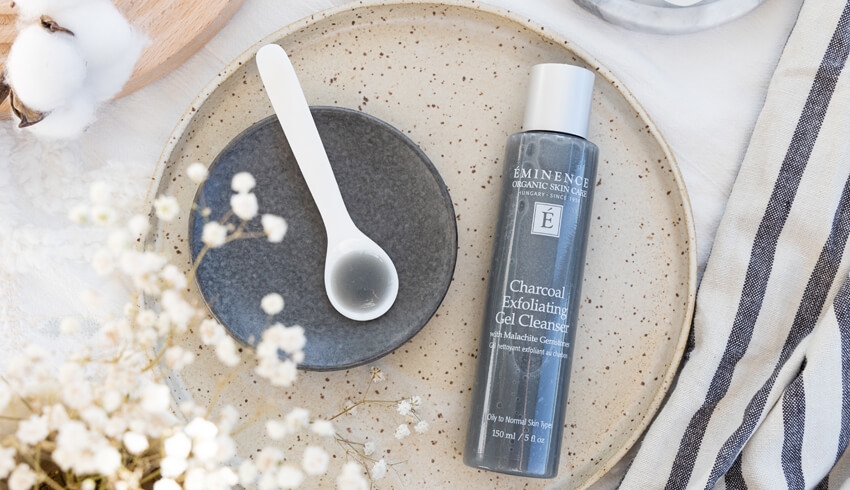
To combat oily skin, Lead Skin Care Trainer Natalie Pergar as well as our Product Support Representatives recommend the Stone Crop Cleansing Oil or the Charcoal Exfoliating Gel Cleanser. The Stone Crop Cleansing Oil gently cleanses and removes impurities. The formula consists of brightening stone crop and supercharged microgreens as well as moisturizing sunflower and jojoba oils. The Charcoal Exfoliating Gel Cleanser contains charcoal which draws out dirt and oil to help prevent clogged pores. This cleanser is also formulated with blue matcha which is rich in antioxidants that improve the visible signs of aging (think fine lines and wrinkles).
Sensitive skin is often genetic, and you’ll know if you have this skin type. Trying new skin care products can be difficult as your skin often becomes irritated, red or itchy. You may react to specific chemicals or ingredients, poor diet or hormonal imbalances.
Sensitive skin can benefit from gentle cleansers including foaming products like our Kombucha Microbiome Foaming Cleanser. It features micellar technology and actives that help balance the skin microbiome and protect the skin barrier, an essential for sensitive skin. A blend of pre, pro* and postbiotics improves the skin barrier while kombucha, jasmine, white tea and ginger combine to refresh and balance the microbiome.
If your skin is rough, flaky or peeling — plus you find yourself constantly applying moisturizer — you probably have dry skin. Both genetics and environmental factors like heating or winter can exacerbate your symptoms.
When your skin is on the dryer side, cream cleansers are a great choice as they help lock in moisture while removing impurities. One of our top picks? The Lemon Grass Cleanser, formulated with a Lactic Acid Complex to remove buildup, gently remove dead skin cells and buff the skin to look smooth and polished.
Combination skin is characterized by oily and dry skin in one complexion. Your T-zone and chin feel extra oily while your cheeks or other parts of your face get dry. The goal for combination skin is to treat both oily and dry areas for a clear, balanced complexion.
We recommend the Mangosteen Daily Resurfacing Cleanser which has a Lactic Acid Complex to remove build-up, gently remove dead skin cells and buff the skin to look smooth and polished. Mangosteen, a super fruit, defends your complexion from pollution and other environmental stressors that could dry out the skin.
Normal skin types simply need to maintain their balanced and healthy skin. You don’t notice dry or oily patches, nor do you suffer redness or itchiness from trying new products. You might occasionally notice breakouts related to hormones or infrequent cleansing, but your skin is generally balanced.
Normal skin would benefit from using the Stone Crop Gel Wash. This gel cleanser offers a mild foaming action and leaves your skin feeling refreshed and clean. The stone crop ingredient hydrates and nourishes while chamomile calms the look of the skin.
If you don’t gravitate to any of the above suggestions, the Stone Crop Cleansing Oil can be used safely for all skin types including normal skin. This non-greasy cleansing oil cleanses and removes impurities after each use.
Have you found a cleanser that suits your complexion? To narrow your selection down, you can view the full lineup of Eminence Organics cleansers here.
I’ve been a believer in the benefits of retinol ever since I met Dr. Fitzpatrick over 30 years ago. At the time, he was the Chief of Dermatology at Mass General Hospital in Boston. Dr. Fitzpatrick was instrumental in getting tretinoin FDA-approved for the treatment of wrinkles (prior to that, it was only being used to treat acne). I vividly remember seeing how one of his hands—the hand he applied tretinoin to during demonstrations to his acne patients—was significantly smoother and brighter than the other. Eventually, I used what I had learned about retinoids from Dr. Fitzpatrick to develop my own retinol serum.
I’ve been watching my clients get amazing results from retinol for decades. And yet, people are still confused about the proper application techniques. And I get it! Retinol is a powerful ingredient, so how you apply it can affect your skin’s response. In this post, I’ll tackle one of the questions I get asked most often: “How long should I let my retinol soak in before applying moisturizer?”
The answer is a little more complicated than you might think, but hopefully, the information I’m about to share will shed some light. Let’s dive in!
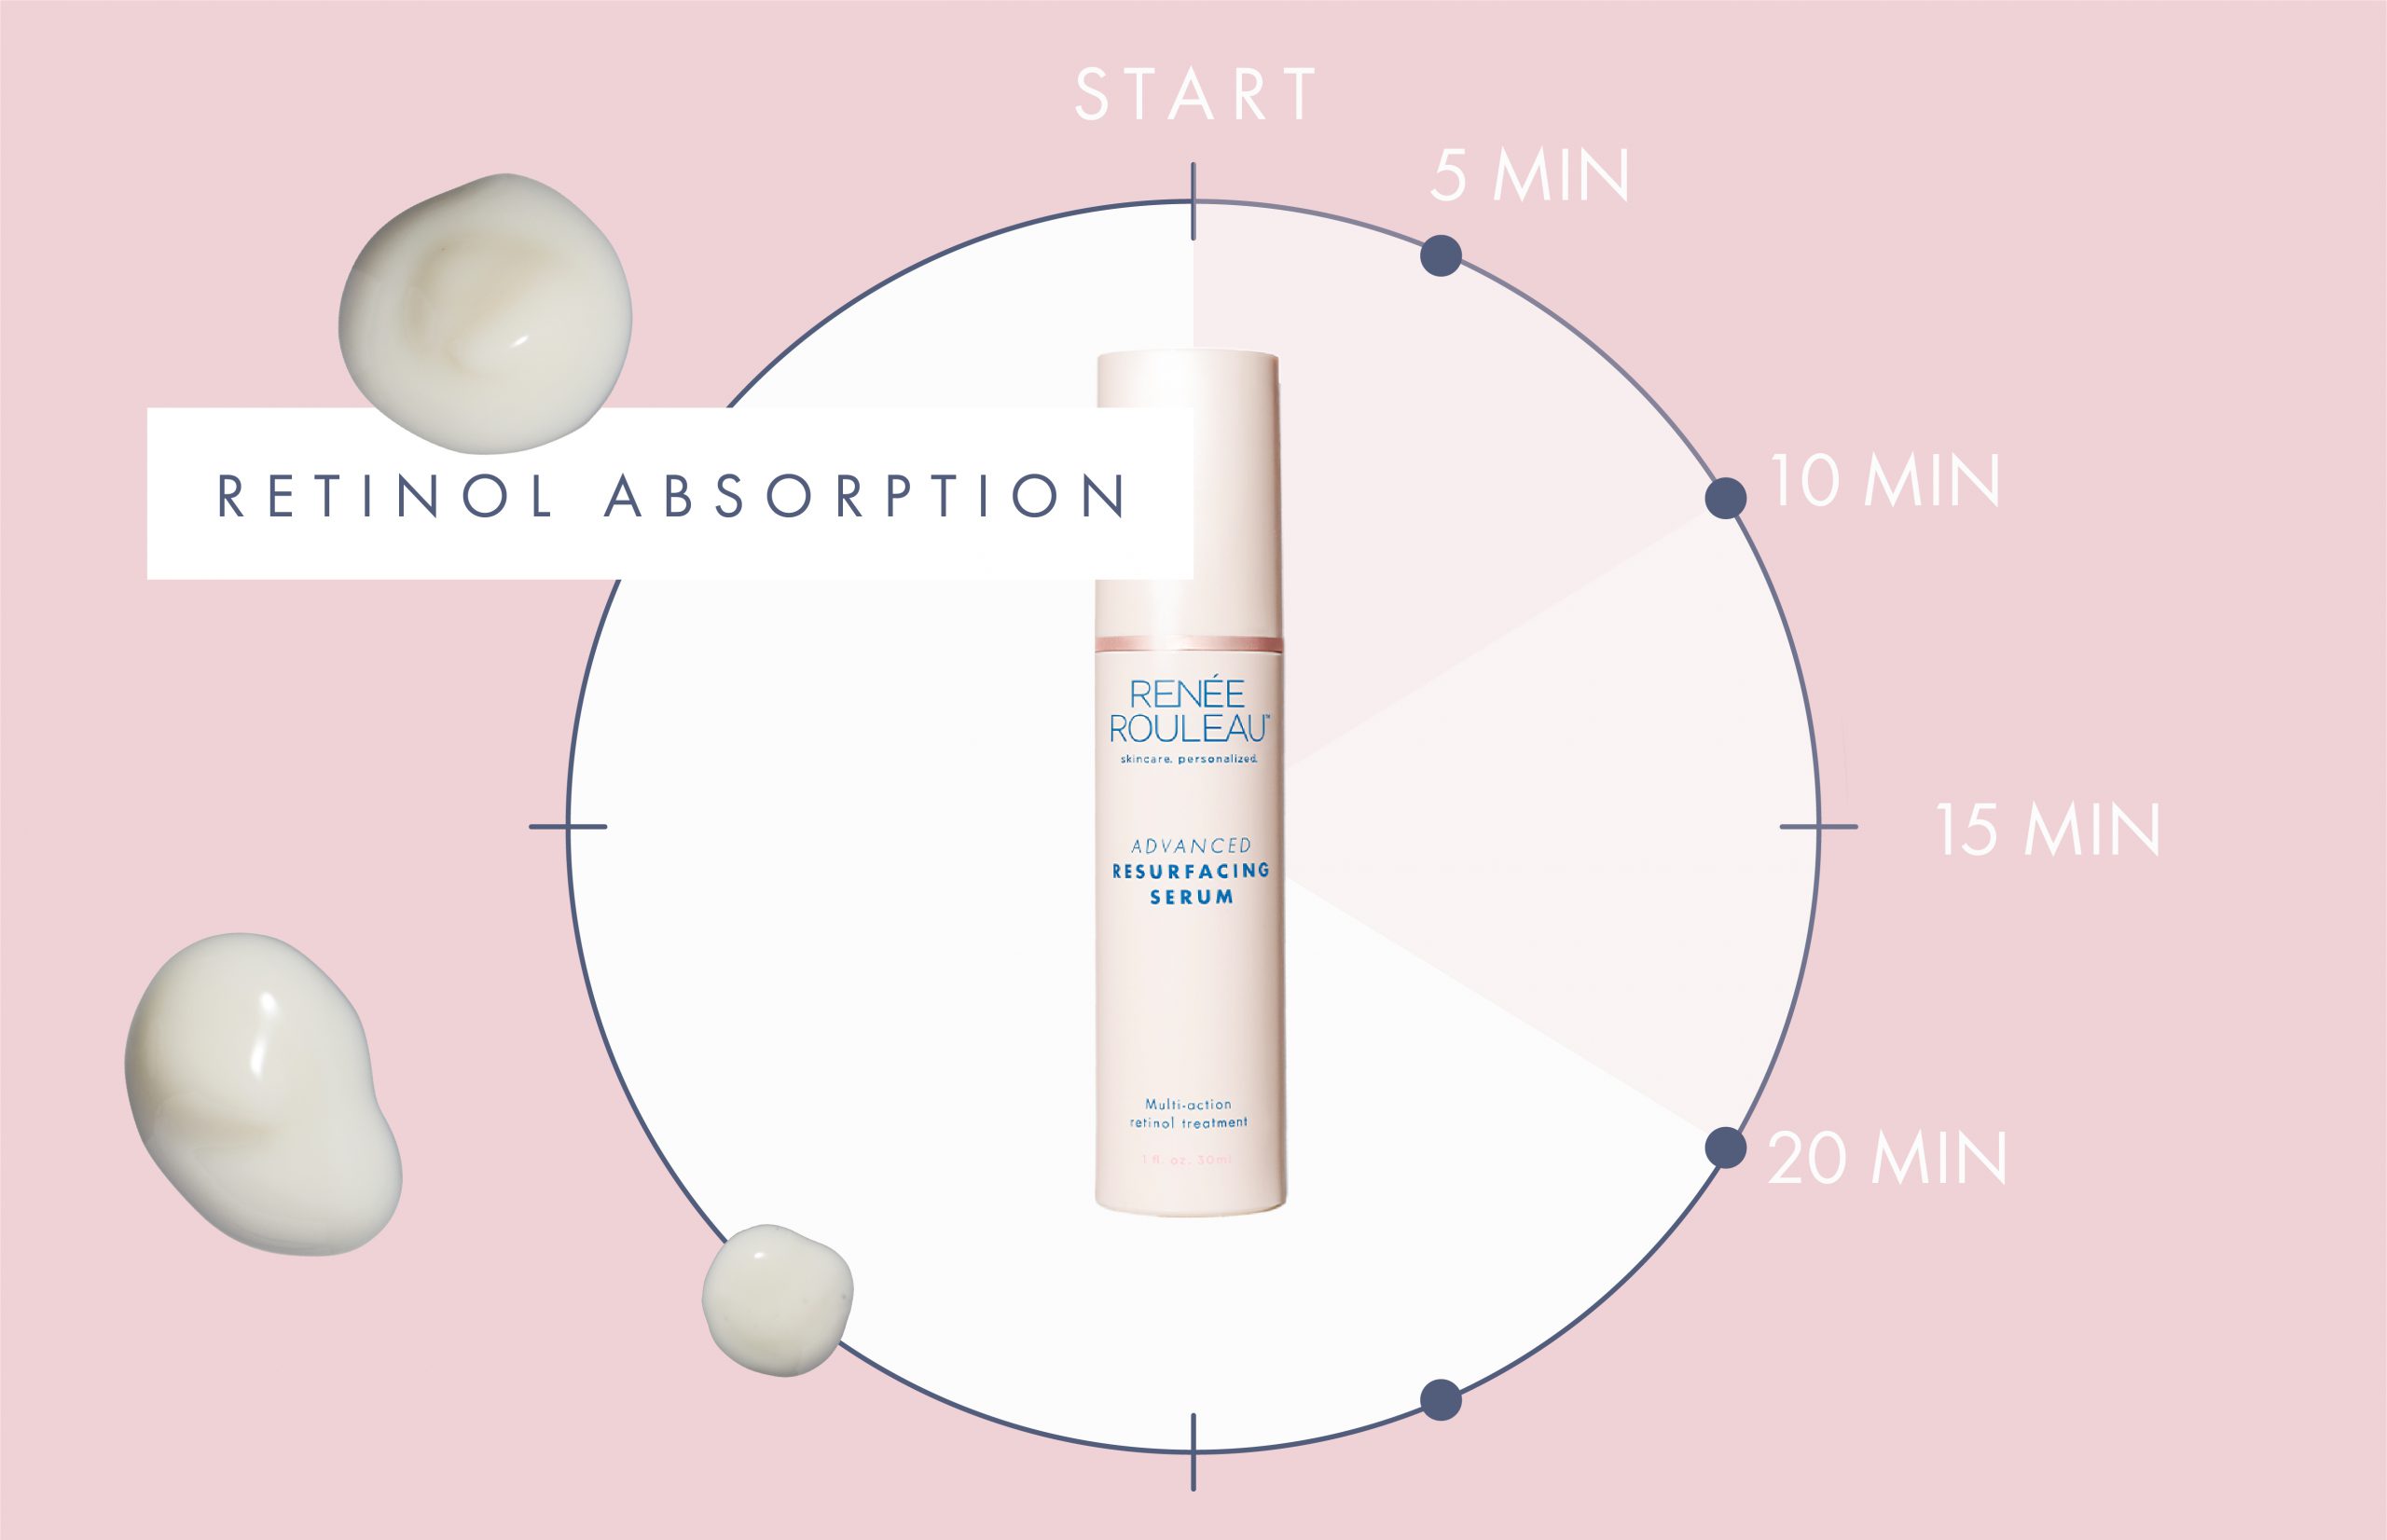
After applying your retinol product, it’s best to wait roughly 10 minutes before moving on to the next step in your routine.
When you apply a moisturizer directly after a treatment product like retinol, you dilute the active ingredients. The moisturizer essentially “picks up” some of the product underneath and spreads it around. This is why, to get the most bang for your buck, it’s ideal to let your retinol fully soak in and get absorbed for about 10 minutes. It’s a surefire way to prevent dilution and will make the retinol more potent.
With that in mind, some people may have to take a milder approach, and it often depends on which type of retinol you’re using.
There are many different types of retinol, but for the sake of this post, I’ll split it into two basic categories. The first is prescription retinoids, and the second is non-prescription retinol products.
Prescription retinoids are an FDA-approved drug, and they’re much stronger than non-prescription retinol. This is because prescription retinoids are pure retinoic acid, meaning your skin doesn’t have to convert them. They can get right to work. Non-prescription retinol products come in a variety of strengths, but they all have to go through a certain number of conversions before becoming retinoic acid.
Since prescription retinoids are stronger, they’re more likely to cause unwanted side effects such as redness, flaking, dryness, and irritation. This means most people won’t be able to jump right into letting their retinol soak in for 10 minutes before applying moisturizer. Instead, it’s best to work your way up incrementally. Start by using moisturizer immediately after applying your prescription. After a week, wait a minute or two before applying your moisturizer (and so on).
If you’re really struggling to tolerate your prescription, you can even start by applying a thin layer of moisturizer before you apply the retinoid (and then again after). This creates a buffer or a “moisture sandwich,” and it can really help mitigate those nasty side effects. Many people worry that their retinoid won’t work if they apply moisturizer first, but it will—it will just take longer to see the results. If you’re experiencing serious irritation, though, it’s worth the wait to avoid this.
While you should always try to avoid serious irritation, keep in mind that it’s normal to experience flaking when you start using a prescription. Technically, this means it’s working. After you apply retinol, it takes about 48 hours to see flaking. So, if you can tolerate it, allow this phase of retinization to run its course. If you want to avoid flaking or have an event coming up, you can continue to buffer with moisturizer.
Finally, remember that the journey doesn’t have to be linear. You can always make adjustments based on your skin’s needs, taking things like seasonal changes into account. For example, come winter, you might revert to a shorter window between retinol and moisturizer application.
If you’re using a prescription retinoid, here’s how the rest of your skincare routine should change.
Non-prescription retinol products are a little easier since they’re less likely to cause irritation, but they still shouldn’t be underestimated. Always err on the side of caution and slowly work your way up to letting your non-prescription retinol soak in for the full 10 minutes.
You can learn more about how to incorporate retinol into your routine by following this Beginner’s Guide to Retinol and Retinoids.
Applying your retinol to damp skin is best (if you can tolerate it). Per my Golden Minute Rule, I always recommend swiping a toner on right after cleansing to prevent water evaporation. Then, I suggest applying your treatment product (in this case, retinol) while your skin is still slightly damp from the toner as this enhances penetration. This also allows the skin to stay hydrated and helps maintain your moisture barrier.
One caveat is that, since applying a product to damp skin enhances penetration, it could potentially also lead to increased irritation (especially with a prescription retinoid). In this case, apply your toner, then let the skin dry for about one minute. You don’t want to wait much longer than that since this is when water evaporation starts to occur, which could backfire and lead to dehydration.
Finally, slugging may be a trendy way to improve barrier function, but you should never slug when using active ingredients like retinol or exfoliating acids. Since petrolatum is so occlusive, it will force those ingredients deeper into the skin, which can quickly lead to irritation. Here’s everything you need to know about slugging.
Celebrity Esthetician & Skincare ExpertAs an esthetician trained in cosmetic chemistry, Renée Rouleau has spent 30 years researching skin, educating her audience, and building an award-winning line of products. Her hands-on experience as an esthetician and trusted skin care expert has created a real-world solution — products that are formulated for nine different types of skin so your face will get exactly what it needs to look and feel its best. Trusted by celebrities, editors, bloggers, and skincare obsessives around the globe, her vast real-world knowledge and constant research are why Marie Claire calls her “the most passionate skin practitioner we know.”

by Caitlin H,
Nov 14, 2022


When starting on a weight loss journey, knowing exactly where to begin can be a challenge.
There are so many questions to navigate!
Which diet is best for me?
What does proper nutrition look like?
How much weight can I lose each week?*
Do I need to exercise, and if so, how much?
How do I create a plan that will work for me?
It’s okay to feel overwhelmed and unsure. Thankfully, there are professionals who can provide guidance, answer your questions, and help you create an individual weight loss plan that works best for you.
A registered dietitian is a health professional who is an expert in the best ways to utilize nutrition, food, fitness and more to help you reach your health goals. Diet-to-Go knows how essential it is to offer that service to its customers, which is why our in-house dietitian and nutritionist Rebecca Mohning is on standby to help you create a unique weight loss plan that will work for you.
Read on for eight ways you can benefit from working with a dietitian.
1) They spend time learning about you.
It’s impossible to create a proper plan without knowing who you are — your lifestyle, what makes you tick, your health goals, you name it. That’s why a good dietitian takes the time to learn all about you, ensuring they understand what needs you have that may differ from someone else.
2) They can pinpoint your individual nutrition needs.
No two people are exactly alike. That’s why a dietitian’s insight is an excellent way to ensure you’re getting a balanced diet tailored to you and your body. For example, a keto diet might work well for someone who has too many refined sugars in their diet, but it may not work as well for someone who exercises a lot. A dietitian will know.
3) They will help you create or critique your goals.
It’s all well and good to have goals, particularly SMART goals. Still, sometimes we can be unrealistic with what is achievable in a given amount of time. A dietitian will help you create or adjust your goals so you can have realistic expectations about what will work, enjoy the journey while you get there, and celebrate the milestones you achieve along the way!
4) They can help keep you on track throughout your journey.
After assisting you with creating a plan, a dietitian can use follow-up visits to keep you on track. These include assessing your progress along the way and making adjustments when necessary.
5) They can help you tackle the emotional issues around food.
There are typically deeper mental and emotional issues that may have caused your weight to balloon or your health to get out of hand. Dietitians get to know you to help you identify and understand your own so that you can work on healing. Knowing why you made poor health choices can go a long way toward helping you achieve your goals.
6) They can assess your health history and lab work.
You should always consult your doctor about treatment for any health issues, such as diabetes, high blood pressure or high cholesterol. Nutrition also often plays a vital role in proper treatment plans. Dietitians can help assess how eating healthier may work wonders in treating other health conditions.
7) They can offer fitness guidance.
Not everyone can or wants to exercise as part of a weight loss plan. However, a dietitian can help assess how much, if any, fitness you might need to do to not only meet your weight loss goals* but get there faster.
8) They provide motivation.
An often overlooked (but essential!) part of every weight loss journey is motivation. You can find inspiration to keep going in many ways — online groups, friends and family, social media, you name it. But there’s something about having your own personal dietitian cheering you and your progress every step of the way. It’s a deep kind of motivation you won’t find anywhere else.

Diet-to-Go’s in-house dietitian, Rebecca Mohning, is ready to help you with your goals. Rebecca has more than 17 years of experience helping people lose weight, exercise, eat right and get healthy. She will help you focus on the big picture and find the plan that will work best for you. Plus, Diet-to-Go customers can take advantage of her services for free! Email us at support@diettogo.com to set up your appointment.
————————————————————————————

Author: Caitlin H
Diet-to-Go Community Manager
Caitlin is the Diet-to-Go community manager and an avid runner. She is passionate about engaging with others online and maintaining a healthy, active lifestyle. She believes moderation is key, and people will have the most weight loss success if they engage in common-sense healthy eating and fitness.


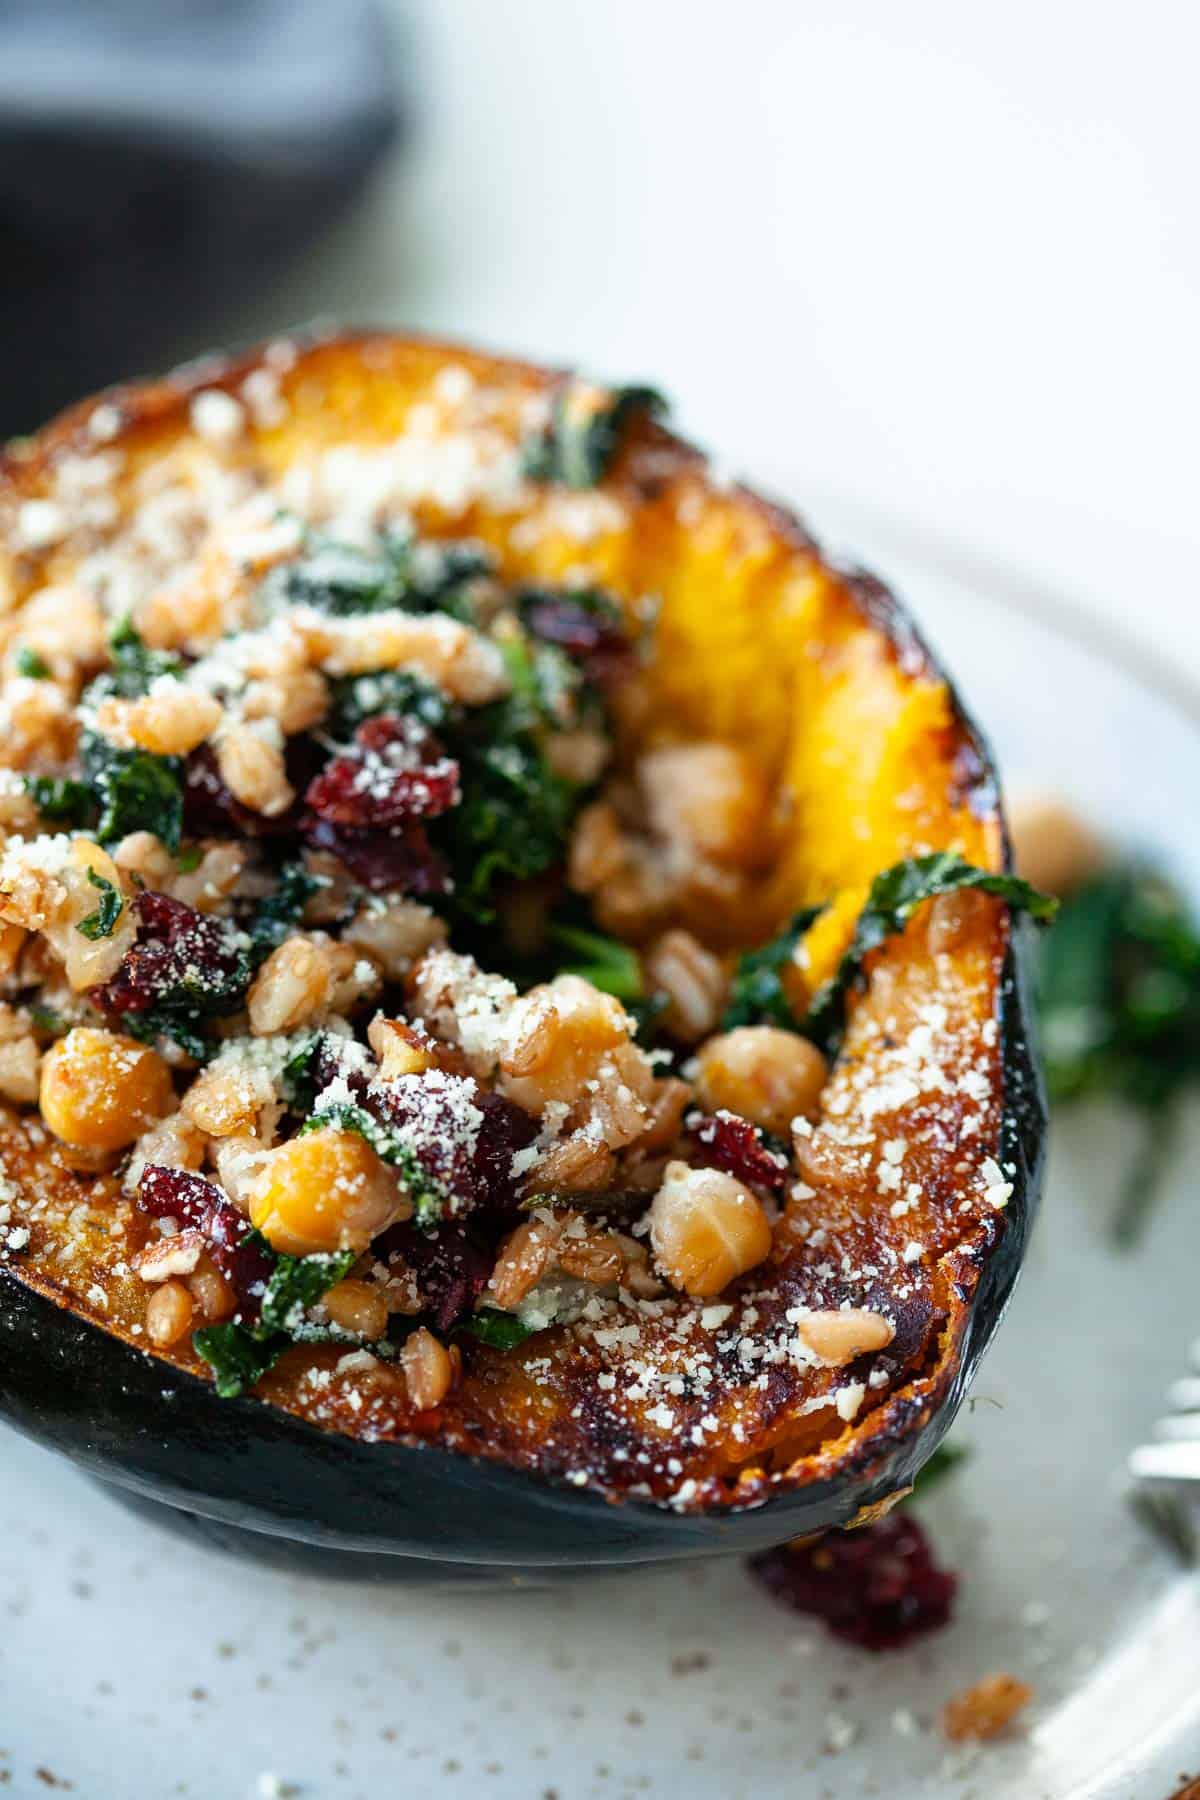
This vegetarian stuffed acorn squash is perfect for a hearty plant-based meal or side dish. It’s warm and cozy for fall or winter evenings and is especially delicious on Thanksgiving or over the holidays!
I’m obsessed with this dish for vegetarians or those trying to eat more plant-based.
It’s rich, hearty, satisfying, filling, and is packed with whole grains, protein-powered legumes, leafy greens, sweet dried cranberries, crunchy pecans, and umami-laden cheese!
I used to only promote this as a Thanksgiving side dish because it’s the best vegetarian main or side dish for Thanksgiving and its flavors of thyme, rosemary, and cranberries scream Thanksgiving to me!
And if you’re here for a Thanksgiving recipe for your vegetarian guests or self, hooray! You’ll love it.
But I realized I was selling this recipe short. It’s not just a Thanksgiving recipe!
It’s a delicious vegetarian recipe for any night of the year, but is especially cozy during the fall and winter months.
Vegetarians deserve filling, satisfying, and delicious food too. This recipe hits the mark for all of the above.
If you love acorn squash and cozy flavors, this recipe is for you!
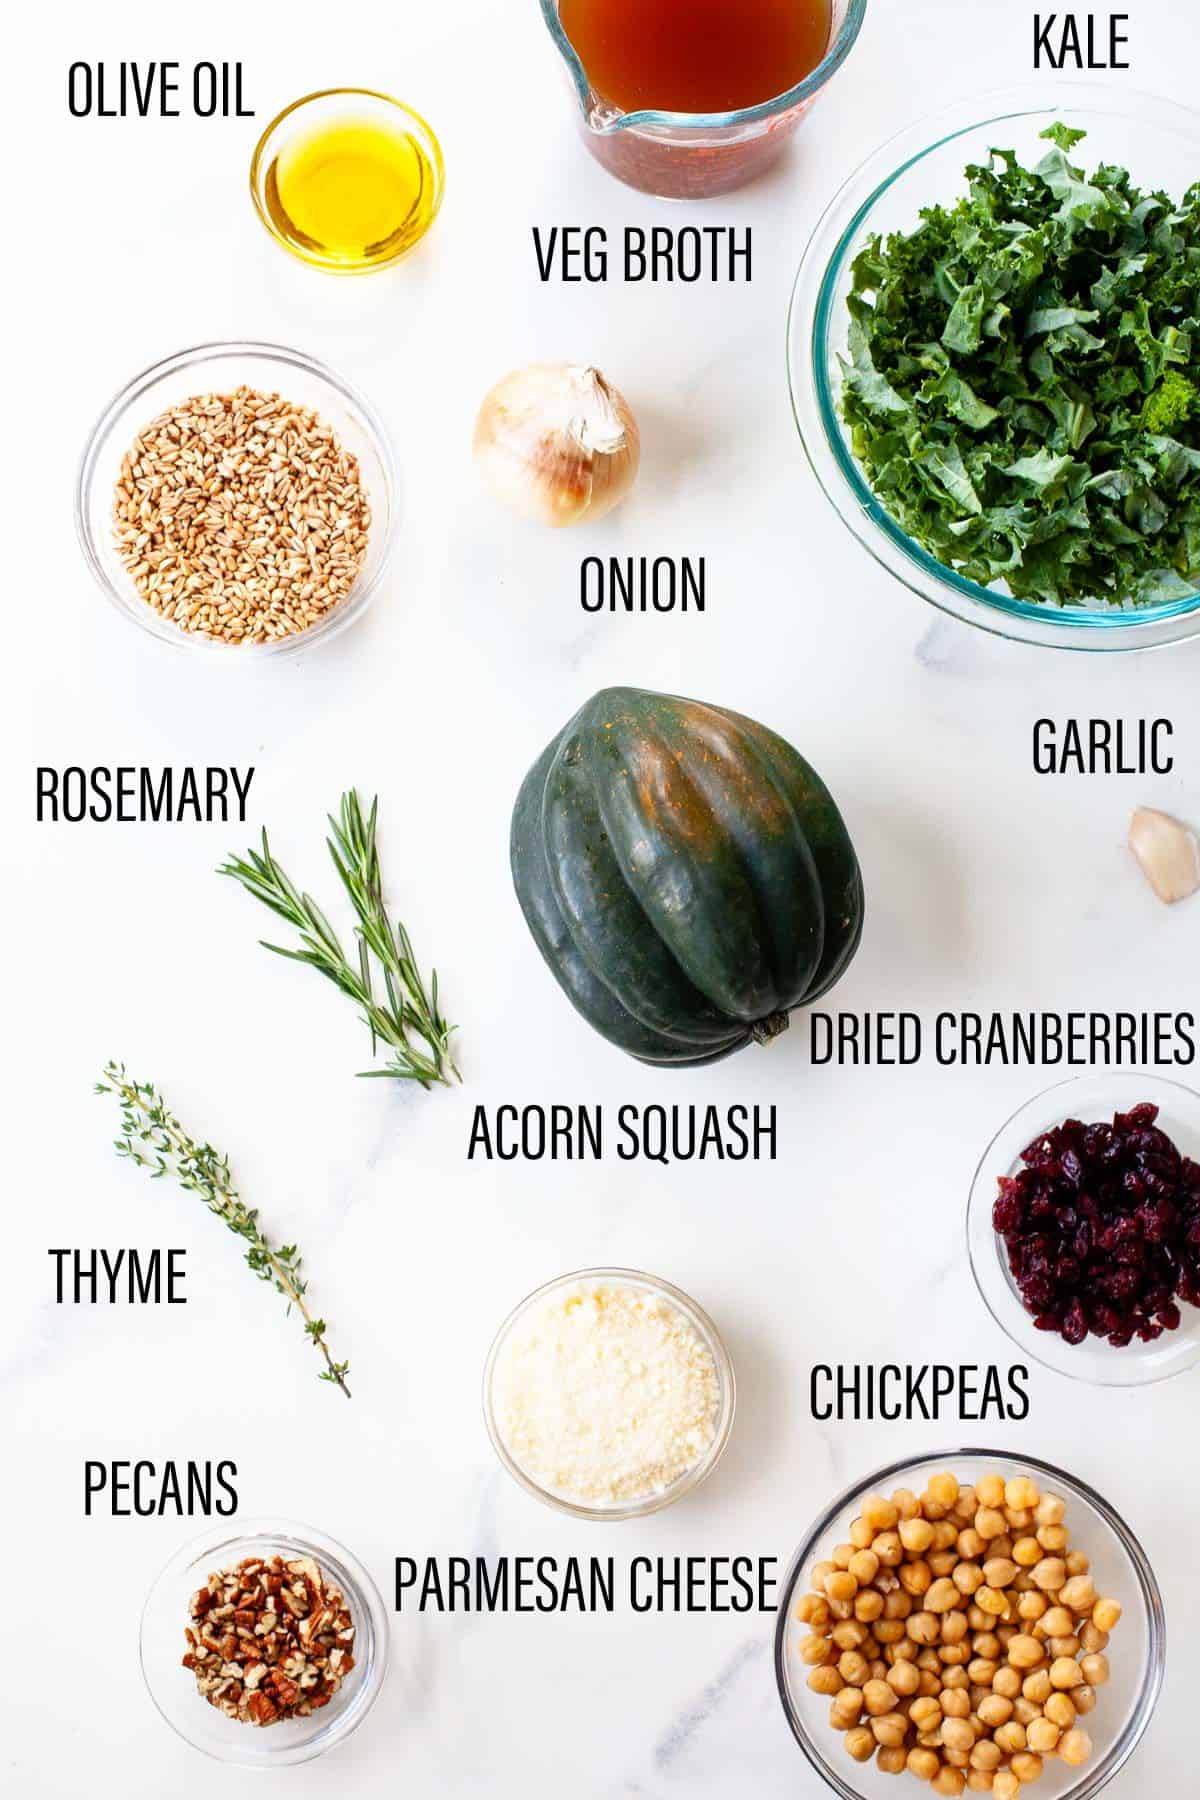
Notes on Ingredients
acorn squash: you can cut these in half lengthwise or horizontally, but I like the presentation lengthwise better.
farro: a nutty whole grain, high in fiber, protein, and vitamins like B3, magnesium, and zinc. Use quick-cooking farro as a time saver!
vegetable broth: to cook the farro in to give it more flavor
onion: adds aromatic flavor to the dish
garlic: also adds a punch of flavor!
kale: buy pre-shredded, pre-washed kale as a time-saver!
chickpeas: adds plant-based protein to the dish!
thyme: adds an earthy, minty, lemony flavor
rosemary: adds a piney, peppery flavor
pecans: adds a satisfying crunchy texture and source of protein and fat!
dried cranberries: adds an element of sweetness to contrast the savory farro mixture
parmesan cheese: adds a savory (umami) flavor
Equipment You’ll Need (affiliate links – if you make a purchase I receive a small commission)
Baking sheet

Bake the squash. Preheat the oven to 375 degrees F. Brush squash with olive oil, salt and pepper. Bake until fork-tender, about 40-50 minutes.
Cook the farro. Bring vegetable broth and farro to a boil then simmer, covered, until farro is chewy, about 30-40 minutes.
Make the savory stuffing. In a large sauté pan, cook onion, garlic, and kale. Stir in farro, chickpeas, and remove from heat. Stir in thyme, rosemary, pecans, and cranberries. Season with salt and pepper, to taste.
Fill the squash. Fill each squash with about 1/2 cup farro mixture. Top with parmesan cheese.
Bake the squash. Reduce oven temperature to 325 degrees F. Bake squash until filling is heated through, about 15 minutes.
Expert Tips
For time-saving, I like to use quick cooking farro, which cooks in just 10 minutes on the stove. It’s partially cooked and dried, which is how it takes significantly less time to cook.
Another time-saving tip is to buy pre-washed, pre-shredded kale.
Roast the squash cut side down so it doesn’t dry out and form string-like strands.
Save any leftover stuffing for a delicious, satisfying topping for salads.
Acorn squash pairs well with almost everything! Enjoy it as side dish with chicken, salmon, turkey, or beef. It also is delicious on top of pizza or mixed into pasta dishes.
You can keep the skin on acorn squash – no need to remove!
At 375 degrees F, it takes about 40-50 minutes to cook.
You can! As long as the acorn squash is cooked enough the skin should be soft enough for you to eat, if you choose! It also peels away easily if you don’t want to. Or, you can just scoop the squash and stuffing right out of the skin without eating it.
I suggest roasting squash cut side down so that it doesn’t dry out, and you don’t end up with stringy squash.
Acorn squash pairs well with savory spices like rosemary and thyme and sweeter spices like cinnamon and ginger.
Acorn squash is high in antioxidants and packs in vitamins A and C, B vitamins, potassium, and magnesium.
Yes! Simply substitute the Parmesan cheese with nutritional yeast!
Stuffed acorn squash leftovers can be stored in an airtight container in the refrigerator for up to 3-4 days. You can also freeze acorn squash raw or cooked and store in the freezer for up to 3 months.
You can prepare the filling ahead of time and store in the refrigerator for up to two days.
Recipes That Pair Well
Instant Pot Green Bean Casserole
Slow Cooker Mushroom Stuffing
Slow Cooker Pumpkin Bread Pudding
Holiday Shaved Brussels Sprout Salad
For more squash inspiration, check out my other recipes below!
Spiced Roasted Butternut Squash Soup
Stuffed Acorn Squash with Curried Lentils
Fall Harvest Salad Stuffed Acorn Squash
Farro Breakfast Bowl
If you like this recipe, please be sure to comment and give it a 5 star rating below. If you make it, share it on Instagram and tag me @karalydonrd and I’ll re-share it with my followers! If you want to save this recipe for later, be sure to pin it on Pinterest!
Ready to enjoy eating foods like this without the guilt? Download my free guide: Rediscover the Joy in Eating: How to Stop Stressing About Food + Enjoy Every Meal.
This recipe was retested, reshot and revamped to bring you the most delicious (and most beautiful) dish! The original post was published November 2017.
clock clock iconcutlery cutlery iconflag flag iconfolder folder iconinstagram instagram iconpinterest pinterest iconfacebook facebook iconprint print iconsquares squares iconheart heart iconheart solid heart solid icon
This vegetarian stuffed acorn squash is perfect for a hearty plant-based meal or side dish. It’s warm and cozy for fall or winter evenings and is especially delicious on Thanksgiving or over the holidays!
4 acorn squash, cut in half lengthwise and seeded
2 tablespoons olive oil, divided
Salt and pepper
2/3 cup farro
2 cups vegetable broth
1/2 medium onion, diced (about 1/2 cup)
1 garlic clove, minced
1/2 bunch kale, stemmed and roughly chopped (about 4 cups)
1 cup canned chickpeas, drained and rinsed
½ tablespoon chopped fresh thyme
½ tablespoon chopped fresh rosemary
¼ cup chopped pecans
3/4 cup dried cranberries
½ cup grated Parmesan cheese
Preheat oven to 375 degrees F and line baking sheet with parchment paper.
Brush inside of squash with 1 tablespoon olive oil and season with salt and pepper. Place squash cut side down on parchment-lined baking sheet and bake until fork-tender, about 40-50 minutes.
Add farro and vegetable stock to a medium saucepan and bring to a boil. Reduce heat to a simmer, cover, and cook until farro is chewy but no longer tough, about 30-40 minutes. Drain excess liquid.*
In a large sauté pan, add 1 tablespoon olive oil over medium heat. Add onion and let cook until translucent, about 4-5 minutes. Add garlic and let cook until fragrant, about 1 minute.
Stir in kale and add 2 tablespoons water and cover until wilted, about 3-5 minutes. Reduce heat to low and continue to cook for 2-3 minutes, stirring occasionally.
Stir in cooked farro and chickpeas and remove from heat.
Stir in thyme, rosemary, pecans and cranberries. Season with salt and pepper, to taste.
Reduce oven temperature to 325 degrees F.
Fill each squash cavity with about 1/2 cup farro mixture. Top with Parmesan cheese. Bake until filling is heated through, about 15 minutes.
For time-saving, I like to use quick cooking farro, which cooks in just 10 minutes on the stove. It’s partially cooked and dried, which is how it takes significantly less time to cook.
Roast the squash cut side down so it doesn’t dry out and form string-like strands.
Save any leftover stuffing for a delicious, satisfying topping for salads.
For a vegan version, substitute parmesan cheese with nutritional yeast.
Prep Time: 10 minutesCook Time: 55 minutesCategory: DinnerMethod: OvenCuisine: Holiday
Keywords: vegetarian stuffed acorn squash, vegetarian acorn squash recipe, stuffed acorn squash for vegetarian
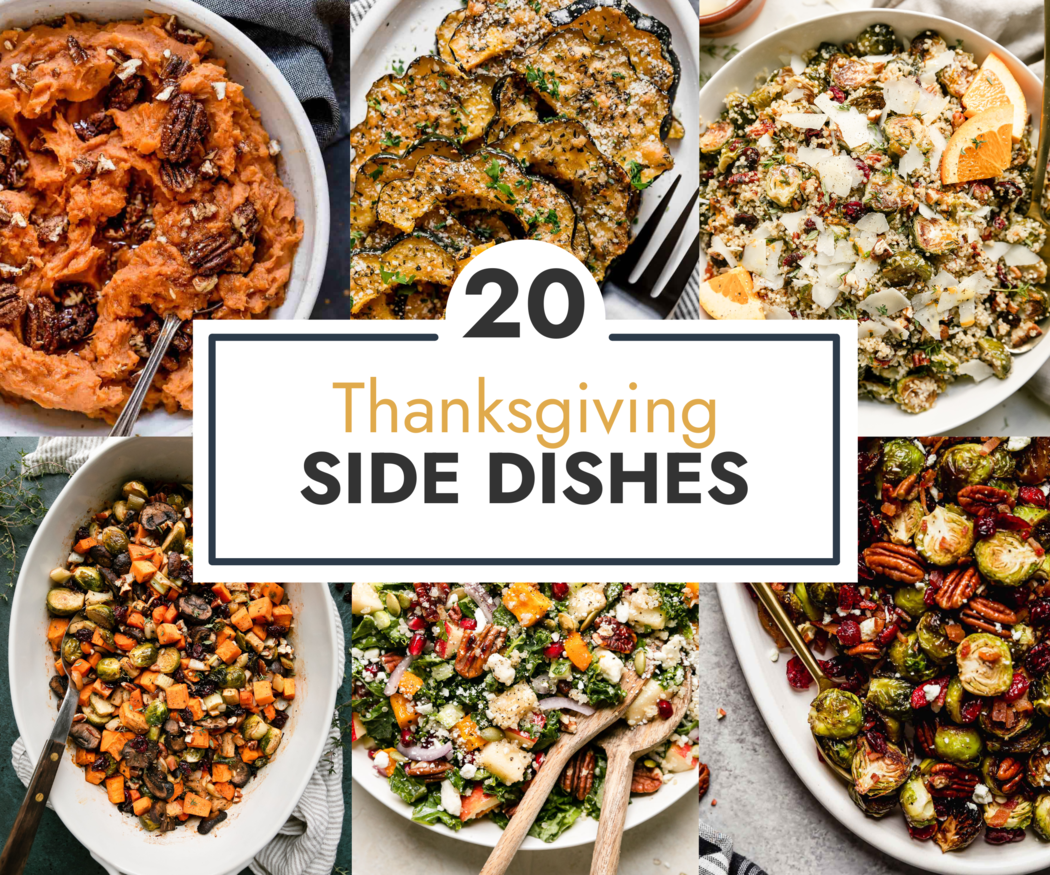
20 Thanksgiving Side Dishes (Healthy, Simple, Gluten Free) – The Real Food Dietitians

Do you often lose control when you’re around food? Keep reading to learn how you can gain self-control around food today.
Maybe it’s a specific type of chips, or a brand of crackers, where no matter how much you tell yourself no, you feel like you completely lose control around them. Does this sound like you? If so, you’re certainly not alone. Losing control when you’re around food is one of the most common ailments we see clients with today. People often struggle to control how much they eat or what they eat when certain food items are placed in front of them.
In order to take back control, we actually have to relinquish a bit of control. Confusing, I know. But I promise it will make sense in a moment. Let’s get into it.
So how do you know if you’re really losing control around food? There are a few tell-tale signs we can use.
You often find yourself mindlessly eating without intention
You’re overcome with guilt, stress, and overwhelm after eating “bad” foods
Certain foods aren’t allowed to be kept in your house
When you eat certain foods you eat much more than you had intended
You sometimes feel sick because you’ve eaten so much of something without intention
If you see yourself in some of these signs, then chances are your relationship with food is causing you to feel out of control around food. Now let’s chat through how you can take control back.
In order to gain self-control around food, we need to create a sustainable, positive relationship with food. That even includes the food items you’ve told yourself you shouldn’t have! The loss of control you’re experiencing is a direct result of the restrictions, rules, and morality that you’ve put into place.
Take the following 5 steps to take back control and create a sustainable relationship with food that puts you back in the driver’s seat.
Thinking about food as good or bad creates those feelings of, “I should eat this.”, or, “I’m not supposed to eat that.”. Which doesn’t seem very harmful, right?
Unfortunately, it can be.
When we try and force ourselves to eat something we really don’t want to eat, we’re inherently unhappy about it. The same goes for restrictions. When we don’t allow ourselves to eat something that we truly want and enjoy, we’re undoubtedly going to rebel. This is where the loss of control comes in.
Eventually, you break the rules. You don’t do what you, “should” do and instead do what you want to do. The result? You’re completely out of control around food and left feeling guilty and ashamed. The root cause of the scenario is the assigning of morality to food. If we can simply look at food as food, we’re then able to make decisions based on our wants, needs, likes, and dislikes. You have self-control around food.
Your body doesn’t function on a strict schedule. Instead, it has hunger and satiety cues that tell you when you’re hungry and when you’re full. When you ignore these cues and try to abide by a schedule instead, chances are you’ll eventually hit your breaking point.
Before you know it, it’ll be 6:00 pm and you can’t help but eat everything in sight in the kitchen while you’re preparing dinner. It feels like you’ve completely lost control! When in reality, your body simply hasn’t had enough to eat all day, so your hunger cues are shooting through the roof.
Ditch the eating schedules to gain back self-control around food.
Whenever you try to follow the newest diet or trend, you’re often completely ignoring your personal preferences and needs in order to do so. As a result, you’ll probably have to cut out some of your favorite foods or heavily restrict them.
In reality, does that mean you’re never going to eat those foods again? No, of course, it doesn’t. Eventually, the diet ends. Then what? You decide to have the food item again, and you feel like you’ve completely lost control. At this moment, it’s so easy to blame the food item. As if it’s the food item’s fault or it’s the food item causing the reaction. Yet instead, this extreme loss of control is a result of restriction.
By no longer following diets, detoxes, or food trends, you can stick to your inherent wants and needs and gain self-control around food.
Balanced meals allow you to feel satiated, energized, and satisfied. They don’t leave you feeling lethargic, hungry, and ridden with cravings.
In order to gain back self-control around food, start paying attention to the components you’re including in your meals. Aim to get a source of protein, fat, a starchy and/or sugary carbohydrate, a non-starchy carbohydrate, and a flavor factor. This is what we call the Foundational Five!
Lastly, after ditching the diets and removing morality, we need to also leave the food rules behind. Food rules are just as wrapped up in restrictions as the previous topics we’ve discussed.
They’re often implemented with great intentions! Maybe you’d like to eat more nourishing meals to increase energy or lower your weight for health purposes, so you create a few food rules. Unfortunately, they almost always come back to bite us. Instead of abiding by food rules, utilize the Foundational Five and a mindset of balance to sustain healthy habits for life.
The more control we try to exert over food, the less control we feel like we have. Take your time to mend your relationship with food and make peace with it. This will allow you to feel in control around food and stress about it so much less.
Then find your balanced eating type!
Take this 45-second free quiz to find out which balanced eating archetype you are, and what your unique type needs to maintain balance with the way you nourish yourself. That way, you can finally be free from food and diet obsession, maintain a balanced weight, and cultivate a positive relationship with food and your body.
Take The Free Quiz Now