Category: Latest Articles

  • Buffalo Cauliflower Dip | Kara Lydon

    Buffalo Cauliflower Dip | Kara Lydon

    This Buffalo Cauliflower Dip is a delicious vegetarian spin on a classic game day snack. Made with roasted cauliflower, Frank’s hot sauce, Greek yogurt, and ranch, it’s perfect served with tortilla chips or celery sticks. Easy to make in the oven, slow cooker, or Instant Pot!

    Buffalo Cauliflower Dip in white baking dish topped with sliced green onions and crumbled blue cheese.

    Why I Love This Recipe

    This Buffalo Cauliflower Dip is deliciously cheesy, rich, and spicy, and can definitely compete with a buffalo chicken wing dip.

    That’s right I have a vegetarian chicken wing dip recipe made with cauliflower that’s going to knock your socks off.

    Don’t believe me? Ask my carnivore Buffalo-born husband and he’ll tell you how he almost finished the dip off in one sitting :).

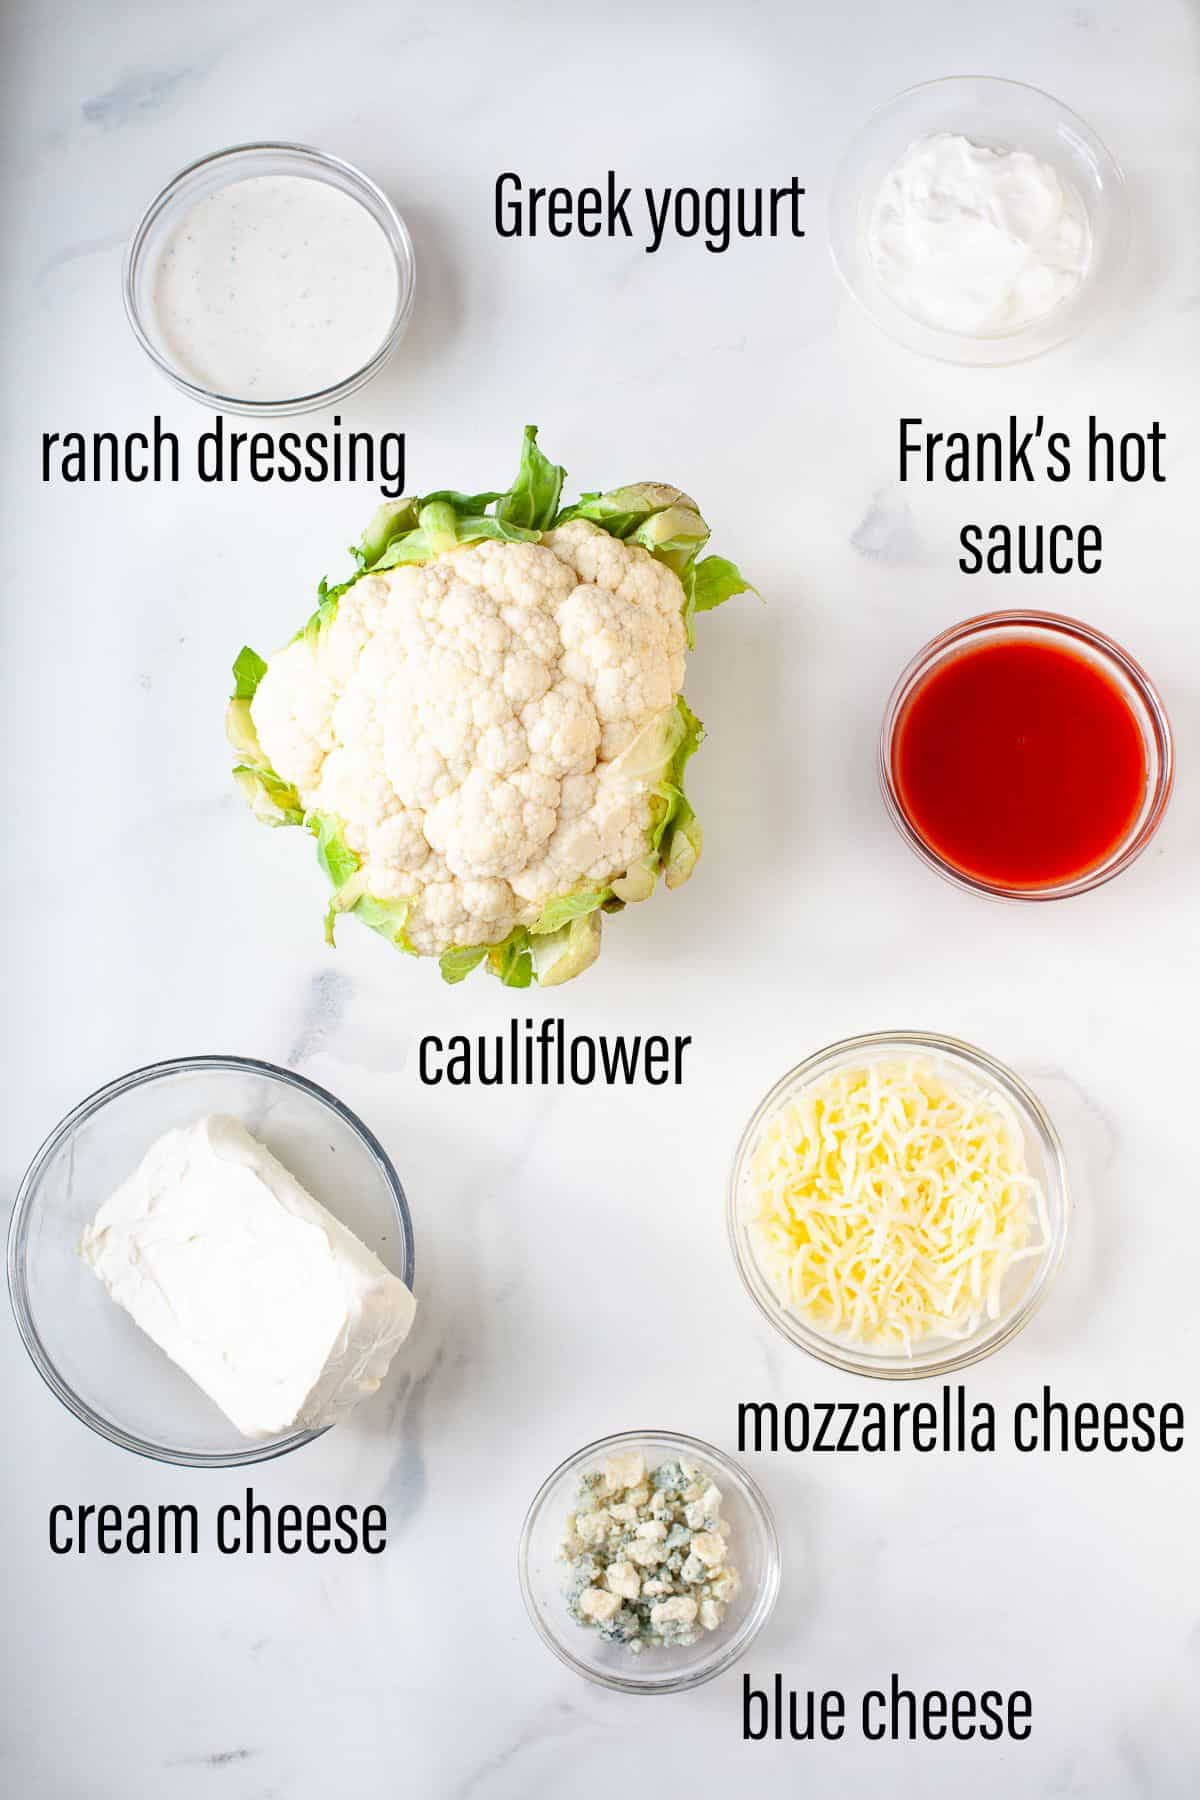
    This dip swaps the chicken for cauliflower, adds Greek yogurt as well as cream cheese, uses mozzarella and blue cheese, and can be made with ranch dressing or seasoning.

    Not only is it deliciously spicy, cheesy and indulgent-tasting, it’s vegetarian, gluten-free, has more fiber, and is super satisfying.

    It only requires 7 simple ingredients and comes together quickly, though maybe not as fast as it’ll get eaten!

    Buffalo Cauliflower Dip is also customizable so you can switch up the type(s) of shredded cheese based on what you have on hand or add more or less hot sauce depending on your spice preferences.

    You can also easily make it in the slow cooker or Instant Pot if your oven isn’t available (instructions for all three methods below!).

    Ingredients You’ll Need

    graphic of ingredients for buffalo cauliflower dip on marble surface with black text overlay

    Notes on Ingredients

    cauliflower: I like to roast the cauliflower in the oven first because I love roasted veggies and think it brings out more flavor but if you’d rather microwave or steam your cauliflower as a time saver, go for it! Use a small head or a bag of pre-cut cauliflower florets.

    Frank’s hot sauce: I highly recommend trying to find Frank’s hot sauce for this recipe but don’t sweat it if you need to use another type of Buffalo sauce. You can add a little more or less depending on your desired spice level!

    cream cheese: acts as the base of the dip. I recommend using a regular full-fat block of cream cheese and letting it soften before you get started.

    Greek yogurt: contributes to the creamy texture and adds a boost of protein.

    ranch dressing: helps combat the spice of the hot sauce along with the cream cheese. If you’d like your dip to have a thicker consistency you can use 1 tablespoon of ranch seasoning instead.

    mozzarella cheese: I like using shredded mozzarella cheese in this recipe but feel free to swap it out with other cheeses like cheddar, Colby, pepper jack, or some combination of different cheeses. 

    blue cheese: blue cheese is often paired with buffalo sauce to combat the heat but you can omit if blue cheese isn’t your thing!

    Equipment You’ll Need (affiliate links – if you make a purchase I receive a small commission):

    Baking Dish

    How to Make Buffalo Cauliflower Dip

    step by step graphic of how to make buffalo cauliflower dip

    Roast the cauliflower. On a parchment lined baking sheet, toss the cauliflower with olive oil, salt and pepper and bake until tender and slightly browned, about 20-25 minutes.
    Combine ingredients. To a large mixing bowl add roasted cauliflower, cream cheese, Greek yogurt, Frank’s hot sauce, ranch dressing (or seasoning), 1/2 cup shredded mozzarella and blue cheese. Stir until cream cheese is mostly incorporated.
    Transfer and bake. Transfer to a baking dish and top with remaining 1/2 cup mozzarella and optional extra blue cheese. Bake until mixture is bubbling and the sides are just starting to brown, about 25-30 minutes.
    Serve! Top with optional sliced green onion and serve warm with tortilla chips, carrot and celery sticks, for dipping.

    Expert Tips

    You can prep Buffalo Cauliflower Dip in advance by preparing it up until it needs to be baked in the oven. If you’re making it in advance, cover the baking dish with plastic wrap and store it in the fridge (no longer than 24 hours) until you’re ready. Before baking, let the dip come to room temperature while the oven preheats.
    If you don’t like small cauliflower chunks in your dip, you can pulse the roasted cauliflower in a food processor or dice the florets before combining with the other ingredients.

    How to make this dip in the Instant Pot

    If you want to save oven space or just don’t want to turn on your oven, you can easily make this dip in the Instant Pot!

    In Instant Pot, add cauliflower, Frank’s, ranch dressing or seasoning, salt and pepper, and stir to coat.
    Secure lid onto Instant Pot and set to pressure cook/manual for 2 minutes.
    Use quick release valve to release steam.
    Once pressure is released, open lid and add cream cheese, yogurt, mozzarella, and blue cheese.
    Using an immersion blender or hand mixer on low, blend ingredients until smooth and creamy, or your desired texture (I like some little chunks of cauliflower in mine!).
    Pour out into a serving bowl and garnish with green onion.

    How to make this dip using the slow cooker

    Roast cauliflower in the oven.
    Spray slow cooker bowl with cooking spray. Add all ingredients to slow cooker, stir to combine, and cook on high for 1.5 to 2 hours or on low for 3-4 hours, or until cheeses have melted and dip is heated through.
    Stir dip again before transferring to a serving bowl and topping with green onion garnish.

    Recipe FAQs

    What goes good with buffalo cauliflower?

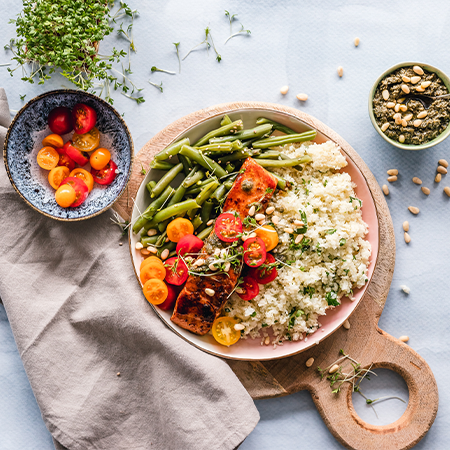
    Buffalo Cauliflower Dip goes well with tortilla chips, crackers, sliced baguette, carrots and celery sticks. If you’re planning on making this in part of a game day menu, you can serve it alongside nachos, chicken wings, fries, coleslaw, etc. 

    Can I use blue cheese dressing instead of ranch dressing?

    I haven’t made this dip with blue cheese dressing but I’m sure this would be delicious! You can try using my vegan blue cheese dressing or any store bought dressing should work.

    Can this dip be made without blue cheese?

    Absolutely! Feel free to omit the blue cheese completely or even swap it out with goat cheese or feta cheese for that salty, crumbly effect. 

    What is the best hot sauce for buffalo cauliflower dip?

    Hand’s down use Frank’s hot sauce. Frank’s hot sauce is by far my favorite Buffalo sauce (and I’m from Buffalo, NY so I know a good wing sauce!). 

    How long is buffalo cauliflower dip good for in the fridge?

    Buffalo Cauliflower Dip will stay good in the refrigerator for 3-4 days. To store,  you can wrap the entire baking dish tightly in plastic wrap or transfer the dip to an airtight container before putting it in the fridge. 

    Buffalo Cauliflower Dip in white baking dish beside kitchen towel and a few tortilla chips

    Storage and Preparation

    This dip can be prepared ahead of time and stored in the refrigerator for up to 24 hours before baking. Let dish come to room temperature before before baking while the oven preheats.

    Leftovers can be stored in an airtight container in the refrigerator for up to 3-4 days. You can freeze this dip for up to three months but the texture and consistency will change (although the flavor will still be good!).

    Recipes That Pair Well

    Vegetarian Nachos

    Healthy Sweet Potato Skins

    Mexican Street Corn Dip

    Vegan Chickpea Burgers

    Kohlrabi Fries (Baked or Air Fryer)

    Sheet Pan Potato Nachos

    Buffalo Cauliflower Dip in baking dish garnished with sliced scallions and crumbled blue cheese with tortilla chip on top

    For more buffalo cauliflower inspiration, check out my other recipes below!

    Buffalo Cauliflower Wings – Air Fryer or Oven

    Buffalo Cauliflower Pizza

    Buffalo Cauliflower Tacos with Ranch Slaw

    Instant Pot Vegetarian Buffalo Cauliflower Wing Dip

    If you like this recipe, please be sure to comment and give it a 5 star rating below. If you make it, share it on Instagram and tag me @karalydonrd and I’ll re-share it with my followers! If you want to save this recipe for later, be sure to pin it on Pinterest!

    Don’t miss a recipe! Sign up to receive my monthly newsletter with a round-up of recipes from the previous month and get my FREE guide when you sign up: Rediscover the Joy in Eating: 5 Simple Steps to Stop Stressing Over Food + Enjoy Every Bite.

    This recipe was retested, reshot and revamped to bring you the most delicious (and most beautiful) dish! The original post was published February 2017.

    Print

    clock clock iconcutlery cutlery iconflag flag iconfolder folder iconinstagram instagram iconpinterest pinterest iconfacebook facebook iconprint print iconsquares squares iconheart heart iconheart solid heart solid icon

    Description

    This Buffalo Cauliflower Dip is a delicious vegetarian spin on a classic game day snack. Made with roasted cauliflower, Frank’s hot sauce, Greek yogurt, and ranch, it’s perfect served with tortilla chips or celery sticks. Easy to make in the oven, slow cooker, or Instant Pot!

    1 small head cauliflower, chopped into small, bite-sized florets (about 56 cups florets)
    1 tablespoon olive oil
    1/8 teaspoon salt
    1/8 teaspoon pepper
    8 ounces cream cheese, softened to room temp and cut into 1-inch cubes
    1/2 cup plain Greek yogurt
    1/2 cup Frank’s hot sauce (or Buffalo wing sauce)
    1/2 cup ranch dressing (or 1 tablespoon ranch seasoning)
    1 cup shredded mozzarella cheese, divided
    1/4 cup crumbled blue cheese (plus extra for topping, if desired)
    Optional: sliced green onion, for garnish
    Tortilla chips, carrot and celery sticks, for serving

    Preheat oven to 425 degrees F. Line a baking sheet with parchment paper.
    On the baking sheet, toss cauliflower with olive oil, salt and pepper. Bake until tender and slightly browned, about 20-25 minutes. Lower oven temperature to 350 degrees F.
    Add roasted cauliflower to a large mixing bowl. Add cream cheese, Greek yogurt, Frank’s hot sauce, ranch dressing (or seasoning), 1/2 cup shredded mozzarella, blue cheese, and stir until  ingredients are combined and cream cheese is mostly incorporated.
    Transfer to a 9×9 or 10×7 baking dish and top with remaining 1/2 cup mozzarella and optional extra blue cheese.
    Bake until mixture is bubbling and the sides are just starting to brown, about 25-30 minutes.
    Top with optional sliced green onion and serve warm with tortilla chips, carrot and celery sticks, for dipping.
    Instant Pot:  Add cauliflower, Frank’s, ranch dressing or seasoning, salt and pepper to Instant Pot and stir to coat. Secure lid onto Instant Pot and set to pressure cook/manual for 2 minutes. Use quick release valve to release steam. Once pressure is released, open lid and add cream cheese, yogurt, mozzarella, and blue cheese. Using an immersion blender or hand mixer on low, blend ingredients until smooth and creamy, or your desired texture (I like some little chunks of cauliflower in mine!). Pour out into a serving bowl and garnish with green onion.
    Slow Cooker: Spray the bowl of the slow cooker with cooking spray. Roast your cauliflower first and then add all ingredients to a slow cooker and stir to combine. Cook on high for 1.5 to 2 hours or on low for 3-4 hours, or until cheeses have melted and dip is warm throughout. Give it another stir and transfer to a serving dish with your desired garnishes.

    Notes

    This recipe was updated and improved October 2023. If you loved the original recipe, here are the key ingredient differences: 4 ounces cream cheese, 1 cup Greek yogurt, 1 tablespoon ranch seasoning, blue cheese is an optional topping. The main instruction difference is to pulse all the ingredients in the food processor to combine before transferring to the baking dish to bake.
    This recipe has bite-sized cauliflower chunks. If you prefer more of a smooth consistency, pulse ingredients in the food processor before transferring to the baking dish.
    I used ranch dressing because it was more accessible in stores I shop at than ranch seasoning but if you’d like your dip to have a thicker consistency, use seasoning instead.
    Frank’s hot sauce is my favorite Buffalo sauce (and I’m from Buffalo, NY so I know a good wing sauce!) and I highly recommend trying to find it for this recipe but don’t sweat it if you need to use another type of Buffalo sauce.

    Prep Time: 5 minutesCook Time: 45 minutesCategory: DipMethod: BakeCuisine: American

    Keywords: buffalo cauliflower dip, vegetarian buffalo cauliflower dip, vegetarian buffalo dip

  • How to Make the Perfect Baked Potato (Every Time)

    How to Make the Perfect Baked Potato (Every Time)

    How to Make the Perfect Baked Potato (Every Time)


    Privacy & Cookies Policy


  • The Impact Of Stress On Your Skin: Effective Strategies For Stress Management

    The Impact Of Stress On Your Skin: Effective Strategies For Stress Management

    Stress is peaking these days. Between managing households, deadlines at work and daily commutes, none of us are immune to the chaos that can exist in everyday life. And if you notice that your skin is seeming a little dull or you’re experiencing more breakouts than usual, you’re not imagining things: Stress can have a major impact on how your skin looks and feels. So, what can you do to lower stress levels to improve overall well-being and get your skin back to its naturally glowing state? Read on to find out how to manage stress and feel better inside and out. 

    The Impact of Stress on Skin

    Much of what we know about how stress affects the body is through symptoms like elevated heart rate, stiff or tense muscles, low energy and digestive issues. But stress also plays a significant role in how your skin looks and feels, whether you experience tension on a chronic level or not. So how does stress show up on the skin?

    Skin Irritation And Rashes

    Because of a weakened immune system, the skin barrier is compromised when you’re experiencing a stressful situation or going through chronic stress. As the body’s outermost layer, the skin barrier is vital to protecting you against environmental irritants and free radicals. The health and strength of this protective barrier can become compromised by factors including excessive sun exposure, humid or dry environments, over-exfoliation and stress. Stress levels impact the skin barrier and immune system and, for some, can even trigger flare-ups of contact dermatitis, psoriasis or eczema.

    Dry Skin And Wrinkles

    Stress impacts the skin on a molecular level and affects how cells age. For example, stress hormones (such as adrenaline and cortisol) cause collagen and elastin to break down, making it harder for the skin to rejuvenate and stay supple. According to neuroscientist Dr. Tara Swart, “Because cortisol is pro-inflammatory, it’s very drying of the system … so you might notice that your skin is really dry or you’ve got skin problems. Your skin isn’t just the physical border of your body, it’s the psychological boundary of your body too, so often stress shows up in the skin.”

    As the turnover of healthy skin cells slows down, fine lines and wrinkles become more pronounced. Couple that with facial expressions that get repeated during stressful situations – furrowing of the brows, for example – and you have a recipe for more fine lines and wrinkles. 

    Fluid Retention And Dark Circles

    For many, sleep patterns are disrupted by stress. Insomnia and sleeping issues are common symptoms of stress, and poor sleep quality impacts numerous systems within the body, including the skin. A lack of sleep leads to increased signs of aging – notably undereye bags and dark circles. Loss of elastin and collagen makes the skin and muscle under the eyes weaker, which allows fluid retention to look more prominent.

    Stress Hormones And Skin Health

    What are stress hormones and are they bad? Not exactly. From suppressing inflammation to regulating metabolism and controlling sleep cycles, we need stress hormones to live optimally. Steady levels of cortisol and adrenaline are ideal, but when your body responds to internal and external stimuli, it causes hormone levels to rise and fall beyond the recommended range.

    When the nervous system experiences a surge in stress hormones, it kicks off a number of reactions throughout the body and skin, such as:

    Skin glands producing more oil
    Slowed digestion in the gut
    Aggravated or angry skin due to triggered inflammation or setting off autoimmune disorders
    Trouble sleeping, leading to exhaustion and poor cognitive reasoning

    Does Stress Cause Acne?

    In a word: “Yes”! When the adrenal glands release excess cortisol due to chronic or acute stress, that stimulates another hormone (corticotrophin-releasing hormone or CRH) to release oil from the sebaceous glands. These tiny glands are found alongside hair follicles and emit oily sebum to keep skin hydrated naturally. Excess sebum production mixes with dead skin cells deep within the pore to create a clog, leading to buildup, irritation, bacterial growth and, you guessed it, acne.

    Understanding The Mind-Body Connection

    The mind and body are inextricably connected, which you notice through sensations like flushing when embarrassed, sweating when nervous or feeling itchy when stressed. As much as we notice the state of our skin when stressed, studies have shown that skin cells and hair follicles can create their own stress signals that get delivered to the brain!

    The Brain-Skin Axis

    In a simplified explanation, the brain-skin axis is a pathway that relays stress messages from the skin to the brain and from the brain to the skin. As we’ve already learned, stressful experiences and environments cause a release of hormones like cortisol into the body, leading to issues like irritation, dry skin and acne. However, exposing skin to specific stressors (ultraviolet rays from excessive sun exposure, for example) can cause stress signals to be sent from the skin to the brain, leading to an increased chance of psychological stress.

    A Vicious Cycle: Stress Triggers and Skin Health

    Both short and long-term stress can impact your skin health and show up as dry skin, prominent lines, wrinkles, baggy undereyes and inflammation. Plus, just seeing how stress impacts your skin adds another layer of stress to manage!

    Whether you work or live in a stressful environment, or you’re simply going through a period of stress, there are things you can do to alleviate symptoms internally and externally, as well as manage how your body responds to various situations.

    Creating a Skin Care Routine During Stressful Cycles

    Getting your skin care routine back to basics is recommended when going through stressful periods and your skin is reactive. Using soothing ingredients and gentle care can help keep skin looking healthy without irritating the skin barrier. A simple routine is often best to help you manage the stress that is showing up on your skin.

    Start by cleansing skin with a gentle formula, such as the Calm Skin Chamomile Cleanser, which contains revitalizing ingredients like rosemary, chamomile and grape leaf extract. The Echinacea Recovery Cream is filled with nourishing ingredients like evening primrose oil, echinacea and yarrow, making it an ideal moisturizer to calm and hydrate skin after cleansing.

    If acne is present due to stress, consider deep cleansing masks to absorb excess oil and clear pores to prevent clogging. The Clear Skin Probiotic Masque features soothing yogurt, cucumber and kaolin clay to cleanse, soften and calm inflamed skin. Customer, Veronika, reviewed the mask online saying: “I have never used a face mask that actually yielded such results. I have been using it whenever I am breaking out or feel like I’m about to break out and it really saves my skin. LOVE!!!”

    Look and Feel Better Using Stress Management Strategies

    Though not ideal, stress is a part of everyday life. The best way to keep it at bay and reduce excess stress hormone production is to practice stress management strategies in a way that feels right for your situation or lifestyle. Learning how to cope with stress can give you a better handle on whatever comes your way and keep your skin and body in good condition.

    Meditation, Mindfulness And Relaxation

    There is so much noise in our lives, both literally and figuratively. The best way to balance that out and calm the body is by practicing mindfulness or meditation each day. Practicing these techniques can train you to be more aware of your surroundings and feelings, which can be grounding and calming during stressful times. It doesn’t have to be overly complicated — anything that allows you to tune out distractions and let your body and mind calm down and relax. Some good options include taking a walk, listening to a guided meditation or engaging in solo activities like painting or reading. 

    Exercise

    Exercise is good for the body in more ways than one. As well as lowering stress hormone levels and reducing anxiety, it also boosts sleep quality. Something as simple as cleaning the house, gardening, joining a workout class or lifting weights can be a beneficial activity to add to a daily routine for stress management. Deep breathing exercises are another powerful tool to use as a way to reduce stress, as they lower cortisol and activate the parasympathetic nervous system (the restful counterpart to the fight or flight sympathetic nervous system).

    Eating Healthy (And Staying Hydrated!)

    Drinking enough water and eating a diet rich in vitamins and antioxidants helps your body manage the effects of daily stress. Nutrients repair damaged cells, boost the immune system, regulate stress hormone levels and give the body the necessary energy to get through daily stressors. Studies suggest that fiber-rich vegetables and omega-3 fatty acids are especially helpful in balancing stress hormones. Plus, a healthy diet is good for skin health in general. 

    Quality Sleep

    Sleep is a prime opportunity for the body to repair and reset. A good night’s sleep also improves cognitive performance and mood, which are crucial to managing stress. To improve sleep hygiene, keep the bedroom free of electronics and distractions, avoid sugary foods and drinks before bed and create (and stick to) a consistent sleep schedule.

    Other Relaxation Tips And Techniques

    Need more tips to help relax and reduce stress? Consider some of the following relaxation techniques in addition to the practices mentioned above:

    Aromatherapy
    Massage and other spa treatments
    Deep breathing
    Yoga
    Visualization
    Hydrotherapy

    Stress is unavoidable, but that doesn’t mean it needs to impact your skin health. By engaging in daily stress management techniques and using skin care ingredients that address concerns, you’ll be better able to navigate life’s curveballs without seeing acne, wrinkles or baggy undereyes creep up.

    Are you looking to reduce stress in your life? Visit an Eminence Organics Spa Partner near you to learn how to minimize stress and get your glow back. 

  • 5 Benefits of Toner That Will Convince You to Add One to Your Routine

    5 Benefits of Toner That Will Convince You to Add One to Your Routine

    When people don’t use toner as part of their daily skincare routine, it’s usually because they’re unclear of its purpose. They see it as an unnecessary step in an otherwise well-rounded routine. They wonder, Is using a toner really worth it? And, How much can a toner really do for my skin?

    As an esthetician and product formulator with over 30 years of experience, I’m here to tell you that toners are extremely important and can benefit your skin in multiple ways—five ways to be exact. In this post, I’ll discuss the game-changing benefits of toner that will convince you to introduce one into your skincare routine if you haven’t already.

    5 Major Benefits of Toner

    1. Toners Can Give Your Skin a Drink, Offering Instant Hydration

    I always say that skin cells are like fish in that they need water to survive. An easy way to hydrate your skin is through the use of toner. Here’s how I suggest using one: cleanse your skin, apply toner, leave it damp on your skin, then immediately follow up with your next product. Doing this will offer an instant boost of hydration to thirsty skin cells.

    Leaving toner damp on your skin before applying your next product is the key. I call this the Golden Minute Rule. It’s the easiest way to get plump, hydrated skin and avoid unnecessary moisture loss.

    Just make sure you’re using an alcohol-free toner because, generally speaking, toners that contain alcohol are extremely drying to the skin. (Every single Renée Rouleau toner is alcohol-free and there is one for every skin type. If you don’t know your skin type, you can take the Skin Type Quiz to find out. At the end of it, you’ll get personalized product recommendations.)

    Read drinking water won’t hydrate your skin, but these three things will.

    2. Toners Can Remove Chlorine and Minerals Found in Tap Water

    Chlorine, salts, and minerals are put into tap water to make it safe for drinking and bathing, but they can be very harsh on the skin’s surface layers. You know all that cloudy white stuff that you have to clean off your shower doors? That’s what’s being left behind on your skin after cleansing. Using a toner is like a rinse cycle for your skin after using a cleanser.

    Read more about tap water and how it can affect your skin.

    3. Toners Can Balance Your Skin’s pH

    If you use bar soap or a foaming face wash that’s too strong, it could be drying out your skin due to a high pH. One of the many benefits of toner is that it can help counteract the dryness that occurs. However, I never recommend washing your face with a cleanser that leaves your skin feeling tight and dry. You should only use a gentle, low-foaming, and sulfate-free cleanser.

    Read the importance of your skin’s pH level.

    4. Toners Often Contains Active Ingredients to Enhance Your Skincare Routine

    Toners often contain active ingredients to help calm the skin, control oil production, deliver antioxidant benefits, help combat breakouts, and more. Also, it is thought that moist skin is actually 10 times more permeable than dry skin. This means that by leaving your skin damp after you apply toner, and applying your next product immediately after, you’re allowing active ingredients to penetrate deeper into your skin. This can, in turn, enhance the results of your skincare routine.

    Read if you want to improve your skin, use these 20 active ingredients.

    5. Toners Can Support Your Moisture Barrier

    By supplying your skin with essential hydration and nutrients, you’re supporting its moisture barrier. This is the outermost layer of the skin that provides protection to help retain water and defend against external irritants like bacteria and environmental debris. Think of it as your skin’s personal bodyguard. It keeps the good in and the bad out. It’s made up of lipids (oils) that bind your skin cells together, and when it’s intact, it’s responsible for keeping your skin soft, calm, and healthy-looking.

    Read more about the moisture barrier and what to do if it’s damaged.

    The Bottom Line

    Incorporating toner into your skincare routine is an easy way to give your skin a boost. I recommend that everyone use one, regardless of their skin concerns and goals. As I said before, every single Renée Rouleau toner is alcohol-free and there’s one for every skin type! I know from experience how beneficial they can be, which is why I use toner every single day.

    Next, find out whether or not you should avoid alcohol in all skincare products.

  • Blog

    Blog

    Size 10 Again: Retired Teacher Drops Over 40 Pounds

    by Caitlin H,

    Oct 16, 2023

    Size 10 Again: Retired Teacher Drops Over 40 Pounds

    When Lara Scheffel took her retirement trip to Kauai she loved it, but at 200 pounds she felt uncomfortable and was self-conscious.

    “I was mad at myself for being so big during this special thing.”

    That was one catalyst that pushed Lara to make a change. She had tried dieting in the past, but ultimately decided to try Diet-to-Go. And when 55-year-old Lara recently fit comfortably into a pair of size 10 pants she’d held onto for years, it was a powerful moment for her.

    Tweet

    Examining the Link Between Stress and Weight Gain

    by Caitlin H,

    Oct 9, 2023

    Examining the Link Between Stress and Weight Gain

    Traffic. Work. Groceries. Bills. Stress is a part of life — and most of us face it daily. Thankfully, we tend to be proficient in managing all those common day-to-day stressors.

    But when stress gets overwhelming, it can make maintaining a healthy weight very challenging.

    What exactly is the link between stress and weight gain?

    Tweet

    Living with Type 2 Diabetes? Foods to Eat and Foods to Avoid

    by Caitlin H,

    Oct 2, 2023

    Living with Type 2 Diabetes? Foods to Eat and Foods to Avoid

    Healthy eating plays a significant role in whether you may develop type 2 diabetes — and a recently published study confirms that.

    According to the study, a considerable rise in people living with type 2 diabetes globally directly results from poor diet. The study demonstrates just how essential it is to improve the quality of your food. If you have prediabetes or type 2 diabetes, changing your diet is critical to improving your health.

    So, what should you be eating?

    Tweet

    How Do the Most Popular Diets Rank for Heart Health?

    by Caitlin H,

    Sep 25, 2023

    How Do the Most Popular Diets Rank for Heart Health?

    Skim any social media feed related to weight loss, and there’s a good chance you’ll see it chock full of everyone from fitness influencers to celebrities touting a diet that helped them shed pounds in record time. Here’s the thing: Many of those diets — such as very-low-fat and very-low-carb — may indeed help you lose weight, but that doesn’t mean they’re good for you.

    What makes a diet heart healthy and where does Diet-to-Go stand in the rankings?

    Tweet

    Financial Analyst Loses 30 Pounds in Six Months with Diet-to-Go

    by Caitlin H,

    Sep 18, 2023

    Financial Analyst Loses 30 Pounds in Six Months with Diet-to-Go

    Tweet

    8 Healthy Recipes to Level Up Your Grilling

    by Caitlin H,

    Sep 11, 2023

    8 Healthy Recipes to Level Up Your Grilling

    Summer may be ending, but that doesn’t mean you have to stop using your grill! Cookouts might always make you think of burgers and brats, potato salad, brownies, and lemonade. As delicious as all those things can be, they’re far from the only barbecue options. In fact, you can add variety to your menu by grilling proteins like steak, chicken, pork, and fish — particularly when they star in some delicious, unique, and healthy recipes that everyone will rave about.

    Why don’t you add a new recipe to your cookout grilling menu plan?

    Tweet

    U.S. News & World Report Names Diet-to-Go #1 for Best Vegetarian Meal Delivery Service Overall

    by Caitlin H,

    Aug 21, 2023

    U.S. News & World Report Names Diet-to-Go #1 for Best Vegetarian Meal Delivery Service Overall

    Being a vegetarian can definitely mean eating healthier. In fact, studies show that vegetarians tend to eat less saturated fat and cholesterol and enjoy more nutrients, like dietary fiber, potassium, magnesium, folic acid, and vitamins C and E.

    But trying to lose weight as a vegetarian can also be challenging, especially if you’re unsure where to begin.

    That’s where we come in. Diet-to-Go’s No. 1 rated Vegetarian Meal Plan has been helping people lose weight for over 30 years. Our dietitian-approved menu delivers restaurant-quality flavors and balanced potions of delicious, chef-crafted meals. And the best part? You just heat and eat.

    Ready to learn more?

    Tweet

    U.S. News & World Report Names Diet-to-Go #1 for Best Weight Loss Prepared Meals

    by Caitlin H,

    Aug 7, 2023

    U.S. News & World Report Names Diet-to-Go #1 for Best Weight Loss Prepared Meals

    Diet-to-Go has been crafting balanced, nutritious, tasty meals that help people eat healthy and lose weight since 1991.

    Along the way, we’ve adapted our menus to align with sound scientific research and healthy eating trends that purport actual results that ultimately lead to a long-lasting lifestyle change for our tens of thousands of customers across the U.S.

    Want to learn more about healthy eating?

    Tweet

    A Deep Dive into Intuitive Eating

    by Caitlin H,

    Jul 24, 2023

    A Deep Dive into Intuitive Eating

    Remember when you were a small child, and you ate when you were hungry and stopped when you were full? Even if you faced challenges surrounding eating, such as temptations from sweets or rules about finishing everything on your plate, there truly was a time when your body told you what it wanted to eat and how much — and you listened.

    That’s the core message of intuitive eating, a method that dates back to 1995 but has recently gained momentum in mainstream healthy living culture.

    Tweet

    U.S. News & World Report Names Diet-to-Go #1 for Best Mediterranean Prepared Meals

    by Caitlin H,

    Jul 10, 2023

    U.S. News & World Report Names Diet-to-Go #1 for Best Mediterranean Prepared Meals

    Here at Diet-to-Go, our team of nutritionists and chefs work tirelessly to ensure Mediterranean plan meals adhere to this diet’s cultural and nutritional guidelines. That means delivering high-quality, tasty meals packed with healthy fats, whole grains, and fruits and vegetables.

    It’s hard work, but it pays off. Diet-to-Go is thrilled to announce that U.S. News & World Report named us No. 1 for Prepared Meals on its 2023 “Best Mediterranean Diet Meal Delivery Services.”

    Tweet

    Alternative Ways to Track Weight Loss

    by Caitlin H,

    Jun 26, 2023

    Alternative Ways to Track Weight Loss

    When you embark on a weight loss journey, you may find yourself focusing solely on one thing: the scale.

    It’s easy to get hung up on that number and feel frustrated when it doesn’t budge, no matter how hard you try. While the pounds do play a part, they don’t tell the complete story, not by a long shot.

    Let’s explore why scales don’t give the full picture and additional ways to track your progress for a more comprehensive understanding of just how far you’ve come.

    Tweet

    Do You Really Need 10,000 Steps a Day?

    by Caitlin H,

    Jun 19, 2023

    Do You Really Need 10,000 Steps a Day?

    When you think about how many steps you need to take in a day to be healthy, what’s the number that immediately comes to mind? There’s a solid chance it’s 10,000.

    That’s because 10,000 steps a day has become the fitness industry baseline for living a healthy lifestyle. After all, it’s the default setting for most pedometers and fitness trackers, and a simple internet search will yield thousands of articles on the topic.

    But is that number, which generally equates to about 5 miles daily, really based on science?

    Tweet

    Do You Struggle With Self-Confidence?

    by Caitlin H,

    Jun 12, 2023

    Do You Struggle With Self-Confidence?

    Confidence is a powerful, sometimes obscure, sense of self-assurance that leads to believing in yourself, your judgments, your abilities, and your identity.

    The more confident you are, the more quickly you’ll be able to tackle life’s challenges, achieve your goals and find positivity in your day-to-day life.

    Thankfully, there are practical ways to boost your self-esteem and improve your overall confidence, which can go a heck of a long way toward improving your personal and professional life.

    Tweet

    7 Reasons to Book a Wellness Retreat

    by Caitlin H,

    Jun 5, 2023

    7 Reasons to Book a Wellness Retreat

    Imagine waking up feeling energized and fresh in a clean, luxurious hotel room before heading to a short yoga session with a stunning backdrop of distant mountains or a beautiful blue ocean and sandy beach. Then, consider how great it would feel to enjoy a nutritious, balanced meal and spend the rest of your day getting a massage or spa treatment, exercising with a trained fitness instructor, or working with therapists to learn how to incorporate mindfulness into your daily routine.

    Those are just a few of the extraordinary things you can expect when you take a wellness vacation, which are getaways designed to help you focus on your overall well-being.

    Tweet

    Turn Your Daily Stroll Into a Walking Meditation

    by Caitlin H,

    May 29, 2023

    Turn Your Daily Stroll Into a Walking Meditation

    One of the most accessible and perhaps enjoyable fitness activities to make a part of your daily routine is walking. That’s especially true during the late spring and summer months when the fresh air, sunshine, and beautiful scenery can elevate it to the next level.

    And while those things may improve your fitness and well-being in and of themselves, what if there were a way to make them even more beneficial?

    Enter…meditation.

    Tweet

    12 Healthy Snacks Everyone Should Have On Hand

    by Caitlin H,

    May 22, 2023

    12 Healthy Snacks Everyone Should Have On Hand

    Do you often find yourself eyeing the snack machine in the office or scanning the pantry at home between meals?

    Constantly feeling hungry can be a recipe for disaster when it comes to weight loss, especially if you’re snacking on unhealthy foods like chips or candy bars all day.  Stocking your pantry or office desk with healthy snacks packed with filling nutrients like fiber and protein is essential.

    We have 12 suggestions for filling, healthy, simple snacks that can break the hangry cycle and keep you satisfied and energized all day.

    Tweet

    10 Tips to Break a Bad Habit for Good

    by Caitlin H,

    May 15, 2023

    10 Tips to Break a Bad Habit for Good

    Many of us structure our lives around habits, such as getting up at 7 a.m., drinking a cup of morning coffee, or eating dinner at 6 p.m. These regular practices may be a critical part of ensuring your everyday life is consistent and manageable, and that’s a good thing.

    But some habits—such as smoking, overeating, drinking, consuming too much caffeine, or scanning social media right before bed—can negatively impact your overall health and well-being.

    There’s a good chance you can quickly identify your own bad habit (or habits). There’s an even better chance you are well aware of their harmful effects. So how do you go about breaking those bad habits? 

    Tweet

    7 Brain Exercise Activities to Keep Your Mind Sharp

    by Caitlin H,

    May 8, 2023

    7 Brain Exercise Activities to Keep Your Mind Sharp

    Creating a healthy lifestyle is about many things. It’s about a consistent diet with balanced nutrition. It’s about staying active and exercising. It’s about ensuring your mental well-being. And it’s about keeping your brain active and engaged.

    Need a little help keeping that mind sharp, engaged, and present in the moment?  Read on!

    Tweet

    10 Signs Your Diet is a Dud

    by Caitlin H,

    May 1, 2023

    10 Signs Your Diet is a Dud

    If you’re like many of our customers, there’s a solid chance you have tried some weight loss plans in the past—and didn’t see the long-term results you desired.

    Here’s the thing: The people who find lasting success do so by making it a lifestyle. That doesn’t mean you shouldn’t try a diet. But it means you need to find a diet that works for you and allows you to incorporate healthy eating into your everyday life.

    But how can you tell if that “diet” can become a lifestyle?

    Tweet

    Delicious Recipes For Our Favorite Spring Fruits

    by Caitlin H,

    Apr 24, 2023

    Delicious Recipes For Our Favorite Spring Fruits

    Spring is the most colorful time of year, and that’s especially true when it comes to spring fruits!

    While you can find these fruits year-round in supermarkets, using seasonal produce tends to elicit the best-tasting results. You can also visit farmers’ markets to support local growers and get the freshest stuff available.

    We love springtime and the colorful fruits that come with it. Now is the perfect time to try a new light, healthy snack or dessert that everyone will love!

    Tweet

  • What is Ghee? Benefits + Our Favorite Brand

    What is Ghee? Benefits + Our Favorite Brand

    What is Ghee? Benefits + Our Favorite Brand


    Privacy & Cookies Policy


  • How To Remove Makeup | Eminence Organic Skin Care

    How To Remove Makeup | Eminence Organic Skin Care

    Whether you’re exhausted after a long work day or home late from a night on the town, removing makeup before bed can feel like an insurmountable task. Between waterproof mascara, smudge-proof foundation and lip stain that lives up to its name, sometimes it can seem easier to just ignore the chore and deal with it in the morning. We’re here to tell you that removing makeup is a non-negotiable for the long-term health of your skin. Read on to find out how to make the whole process easier on you and your complexion.

    What Happens When You Don’t Remove Makeup? | How To Remove Your Makeup | How To Remove Special Occasion Makeup | What To Do After Removing Makeup 

    What Happens When You Don’t Remove Your Makeup? 

    Is sleeping in your makeup really that bad? In a word, “yes”! New York City-based board-certified dermatologist Dr. Charlotte Birnbaum explains: “Oil, dirt, pollutants and makeup when left on the skin [overnight] can lead to breakouts, irritation, styes and even accelerated aging of the skin.” In other words, you’re doing damage when you go to bed without a good cleanse. Taking five minutes to tackle the issue head on will make a world of difference now and later. 

    And we get it, after a long day or night out, it can be tempting to hit the sheets without washing your makeup off, but this skin care step isn’t optional. While one slip-up won’t ruin your complexion, consistently skipping your nighttime cleanse can cause cumulative damage. Some of the other effects of inconsistent makeup removal include:

    Dull skin 
    Free radical damage
    Clogged pores
    Inflammation

    Skin renews itself overnight, so when you leave makeup on, you are interfering with the skin’s natural turnover process whereby dead and damaged skin cells are shed from the surface and replaced by new, healthy cells. Hence the term “beauty sleep.”

    How To Remove Your Makeup

    Now that we’ve established that going to bed with makeup on is not the move, what’s the best way to remove it?

    Double Cleansing 

    It’s been buzzy in the skin care world for a minute, and for good reason. Double cleansing is the most effective way to break down makeup and other surface impurities like dirt and oil. This face washing technique begins with an oil-based cleanser, followed by a second cleanser of your choice, usually gel-based or foaming.

    Double cleansing can seem daunting to anyone with oily skin but don’t let it scare you. The reasoning behind slathering your face in oils in the name of cleansing stems from the idea that “like dissolves like.” According to Healthline: “Putting clean, nourishing oils on your skin aims to help … lift excess sebum, the oily substance produced by glands on your skin, clean out clogged pores, like blackheads and whiteheads, and remove dead skin, pollutants and makeup.”

    Because oil attracts oil, it’s a gentle first step to get rid of some of the pollution, dead skin, makeup and general gunk of the day that have accumulated on your face. This is why many makeup removers contain oil. Makes sense, right? 

    Ready to give this a try? These are the steps to perform a double cleanse:

    Break down makeup with a cleansing oil, balm or a creamy cleanser. The oil in the cleanser will solubilize oil-based products like foundation and mascara so they lift easily from your skin’s surface. Warm a small bit of Stone Crop Cleansing Oil in your hand. Then, use your fingers to swipe it across your eyelids and lips and use circular motions to lightly massage it over your face. Rinse clean with lukewarm water. Another good option is the Coconut Milk Cleanser, which is creamy and gentle enough for all skin types. 
    Remove remaining impurities with a second cleanser. Now that you’ve loosened and lifted your makeup, you need to sweep away stubborn dirt, grime and bacteria that are left on the skin. Simply apply your favorite cleanser to wash your skin more deeply and target specific skin concerns such as acne or aging. With this two-step process, you clear both types of impurities that can clog pores, dull your skin and contribute to premature aging. Ideally, the second cleanser should be gel-based or foaming.

    The Stone Crop Gel Wash is designed for all skin types. It hydrates while cleansing thanks to the inclusion of shea butter and stone crop ingredients. For those with problem skin, consider the Acne Advanced Cleansing Foam to clear blocked pores and clean the skin. This foam features time-released encapsulated salicylic acid to unclog pores, and contains a natural herb blend. Alternately, if you’re concerned with large pores, the Mangosteen Daily Resurfacing Cleanser minimizes the appearance of pores. This milky gel contains a Lactic Acid Complex that works together with mangosteen to give the skin a smoother, more radiant complexion by sloughing off dead skin.

    Ready to start double cleansing? Watch this video for tips and product recommendations from our Lead Skin Care Trainer Natalie Pergar.


    Other Makeup Removal Tips 

    Avoid Cleansing Wipes

    Skip the cleansing wipes. While they may be convenient, most makeup wipes won’t fully remove your makeup. As James C. Marotta, MD tells Good Housekeeping, “very few makeup wipes contain ingredients that can actually break down all of your face oils, makeup and gunk on your skin, so you’re really just rubbing bacteria, irritants and makeup wipe residue around your skin.” Plus, many cleansing wipes contain chemical ingredients and preservatives that can irritate the skin and cause dryness. And if you’re looking for one more sign to ditch the wipes, think of their impact on the earth. Most makeup wipes aren’t biodegradable, and some estimates suggest that over 20 million pounds of them end up in landfills every day!  

    Removing Eye Makeup 

    Waterproof mascara and eyeliner can be notoriously difficult to remove. If you’ve done a double cleanse, you’ve probably removed most of your eye makeup, but it’s worth touching up the area with a natural and organic product like our Herbal Eye Make-up Remover. 

    Don’t forget, the skin around the eyes is thinner and more delicate, so it’s important to be gentle. Instead of scrubbing vigorously, saturate a cotton pad with remover and hold it over each eye for ten seconds. This will give the remover time to break up and dissolve the makeup products before you gently wipe them off. If you need to get into the eye line and inner corners, gently wipe with a cotton swab to complete your cleanse.

    Don’t Forget Your Neck And Hairline

    You may have removed a layer of foundation from your face, but be sure you haven’t skipped your neck and hairline. If you stop short of these easy-to-miss areas, you can accumulate makeup residue that clogs pores and leads to breakouts. Pull back your hair with a headband and extend your face wash past your jaw to ensure you catch every last bit of makeup.

    Try our Calm Skin Chamomile Cleanser to remove the impurities of the day from your skin. Infused with chamomile, arnica and rosemary, this calming cream cleanser is perfect for sensitive skin prone to redness and makes a great second step in a double cleanse. 

    If you’re fighting the appearance of breakouts, our Clear Skin Probiotic Cleanser is the best choice to remove excess sebum from your complexion. It’s a clarifying cream-gel cleanser that treats oily and problem skin with cucumber and tea tree oil. Sweet almond milk and yogurt reduce the visible signs of problem skin without stripping the skin of moisture. In other words, it can help your skin recover from past “mistakes.”

    Removing Special Occasion Makeup

    Some occasions (like your wedding day) call for heavy-duty makeup, while others (Halloween parties) require full-fledged face paint. Whether your look is more romantic comedy or horror movie, the removal part can be a little scary. But fear not, we have a few tips, tricks and treats to help. 

    Wedding Makeup

    Since wedding makeup is essentially just long-wearing and waterproof makeup, you don’t have to veer too far from your usual routine, with a couple of exceptions. You have probably been spending extra time taking care of your skin leading up to the big day, so don’t stress too much about the aftermath of a very long day in full makeup, but all the more reason to get it off before bed! 

    Start with the eyes. Your false eyelashes may have stayed on through your vows, first dance and those tear-jerker speeches, but they shouldn’t stay on overnight. Just like with waterproof mascara, your best bet is to use makeup remover on a cotton round and hold it over the eye for 10 or more seconds. This should loosen the glue and allow you to gently pull the false lashes off without taking any of your real ones with them. If you don’t have eye makeup remover, use your oil-based first step from your double-cleansing routine or simply place a warm, moist face cloth over the eye for 10 seconds. Long wearing eye shadow can be removed the same way. Make sure you’re treating the delicate area gently to avoid causing irritation to the skin.

    To tackle the heavy-duty foundation, a double cleanse is recommended. Follow the instructions above and if you have the time and energy, finish off with an overnight mask to help replenish any moisture. The Kombucha Microbiome Leave-On Masque is a great option. 

    Halloween Makeup

    Halloween makeup is a whole different beast. Not only is it usually applied with a heavier hand than regular makeup, it can be a nightmare for your skin. While we strongly advise against it, the face paint sold at Halloween stores often gets used that one night of the year. As with all products you apply to your body, do your best to avoid ingredients like heavy metals, formaldehyde and petrolatum.  

    To remove your Halloween makeup, start with an oil-based cleanser like the Stone Crop Cleansing Oil or a cream-based cleanser like the Coconut Milk Cleanser. Another option that can help break through that thick layer is the Kombucha Microbiome Foaming Cleanser. Crafted with micelles, an aggregate of mild surfactants gently trap and lift oil, dirt and debris like a magnet from the skin. The liquid-to-foam formula gently breaks down the makeup without overdrying. 

    The next step in the process is a second cleanse. Whether the first cleanser was oil-based or foamy, chances are, there is still some makeup lingering. A gel or foaming cleanser is your best bet. And follow that with a swipe of toner like the Pineapple Refining Tonique for a gentle exfoliation or the Kombucha Microbiome Balancing Essence help soothe dry, dull skin. 

    Pro tip: If your costume included body or face glitter, a lint roller will lift it off the skin. The adhesive is much gentler than what you’ll find in regular tape (which is what a lot of people use). 

    Use Steam

    Still not feeling squeaky clean? You can give your skin a facial steam to deepen your cleanse. Steam softens surface debris and releases any leftover grime and makeup that is still trapped in your pores after washing. Follow these steps for a facial steam at home:

    Fill your sink or a bowl with hot water.
    Place a large towel over your head.
    Hover your face 5 – 10 inches away from the steam. Lower or raise your head for more or less heat.
    Steam for 5 – 10 minutes (we recommend 2-minute intervals so you don’t overheat).

    What To Do After You’ve Removed Your Makeup

    Makeup removal gives your skin a clean slate, but it needs to be followed with proper care to maintain your skin’s health and resilience. After cleansing, continue your skin care routine with these essential steps:

    Use a serum, oil or concentrate to target specific skin concerns and conditions. 
    Moisturize to lock in hydration and protect your skin’s lipid barrier. 
    Tap on an eye cream for a bright and smooth eye area. 
    Apply SPF to protect your skin from the drying and aging effects of UV rays. 

    Are you looking for more advice about which products to use in your cleansing routine? Visit an Eminence Organics Spa Partner for skin care recommendations from a licensed esthetician! 

    This article was originally written in August 2019.

  • How to Prevent and Get Rid of “Tech Neck,” According to Skincare Experts

    How to Prevent and Get Rid of “Tech Neck,” According to Skincare Experts

    I always say you should treat your neck as an extension of your face. That means you should be caring for the skin on your neck in the same way that you care for the skin on your face (yes, that means cleansing, exfoliating, moisturizing… the whole nine yards). After all, the neck is one of the first areas to show visible signs of aging, and that includes the horizontal lines and wrinkles that are commonly referred to as “tech neck.”

    In this post, I’m sharing all things tech neck along with additional input from Dr. Kavita Mariwalla of Mariwalla Dermatology. I wanted to hear her thoughts on this topic as a medical skincare expert. Keep scrolling to learn all about the causes of tech neck and how to address it, according to us pros!

    What Is Tech Neck, and What Causes It?

    Tech neck is a colloquial term that refers to the premature development of horizontal lines across the neck caused by the position of our faces as we look down at technology. “In the past, we called them necklace lines,” Dr. Mariwalla says. “In general, the idea is that if you are looking down at your screen for many hours a day, there will be signs of aging and changes associated with draping that occur over time in the neck area.”

    Over my thirty-year career as an esthetician, I can confidently say that the development of horizontal lines on the neck has always been prevalent. In fact, looking down at technology isn’t the only thing that can cause tech neck—your sleeping position has something to do with it, too. Back sleepers and people who sleep with their heads elevated on multiple pillows cause a 45-degree bend in their neck as they sleep, leading to the formation of lines and wrinkles.

    With that being said, neck lines have certainly been exacerbated by the use of technology. It seems that as screen times increases, so does the development of premature folds and wrinkles. Dr. Mariwalla agrees. “Because of the amount of time we are spending at home and the increase in a digital-work-from-home-force more people are aware of it,” she says. “Interestingly, because we are working from home, I think people are spending more time looking at electronics and practicing poor posture.”

    How Can I Prevent Tech Neck?

    Tech neck can develop as early as your 20s or 30s. It’s difficult to get rid of once it appears, so prevention is key. Here are a few easy, expert-recommended ways to keep those pesky lines and wrinkles at bay.

    Be Mindful of Your Posture

    The best way to prevent tech neck is to be mindful of your posture and positioning throughout the day. If you spend hours looking down at a computer (like so many of us do), you may want to switch up your seating. Instead of looking down at your screen, keep your screen at eye level. This will keep your neck straight throughout the day, preventing premature lines and wrinkles from forming in the first place. “Create a space for working in your home that requires you to sit properly in a chair with good posture,” Dr. Mariwalla says. “Then, once you are done with your work be done with it, and don’t switch to sitting on the couch staring down at your phone.”

    Sleep on One Pillow

    Are you one of those aforementioned people who sleep on multiple pillows every night? Like I said before, this can be detrimental to the appearance of the skin on your neck because it can cause your neck to remain bent at an angle. Whenever your neck remains bent for long periods of time (such as when you sleep), it can encourage lines and wrinkles to form. Luckily, the fix is easy. Simply sleep on one pillow (the thinner the pillow, the better), so your neck remains in a more neutral position. It may not sound like much, but given that we spend nearly a third of our lives asleep, the effects really add up.

    Use Sunscreen

    UV rays are the number one cause of premature aging, which is why consistent sunscreen application is paramount. Make no mistake. This goes for the skin on your neck, too. I can’t tell you how many times I’ve seen someone apply sunscreen to their face, take whatever was left on their fingers, and bring it down to their neck. I can assure you that this application technique simply isn’t providing enough sun protection. You’re going to want to squeeze an additional nickel to quarter size out for the neck. Learn how to properly apply sunscreen properly to the neck, here.

    Moisturize Every Day

    Dry, damaged skin is more likely to develop early signs of visible aging, which is why it’s important to give your skin the moisture it needs. Using a neck cream daily, like this Intensive Firming Neck Creme, which is formulated to lift, de-puff, and nourish the delicate skin on the neck, will keep premature signs of aging at bay. (Then, be sure to read up on the difference between dry and dehydrated skin).

    Use the Right Active Ingredients

    Using skincare products with the right active ingredients can keep premature signs of aging—including tech neck–at bay. Below, find three effective ingredients that you should consider adding to your current skincare routine in order to prevent tech neck.

    Retinol

    Retinol has been proven to stimulate cell regeneration, boost the production of collagen, and promote skin elasticity, among other things. It’s a true multi-tasking skincare ingredient. One of the major benefits of using retinol (or a prescription retinoid) is that it can make a major impact on the appearance of wrinkles, and that includes wrinkles that are on the neck (take THAT, tech neck!).

    Beware that prescription retinoids may prove irritating, especially to sensitive skin types, which is why it’s important to patch test, first. After all, the skin on your neck is thin and delicate, and the last thing you want to do is cause widespread irritation. Dr. Mariwalla suggests using a sandwiching technique, in which you apply moisturizer, then retinol, then another layer of moisturizer. This will help the sensitive skin on the neck tolerate the potentially irritating ingredient. (On that note, read my beginner’s guide to using retinol.) 

    Antioxidants

    Antioxidants are key in the prevention of premature aging. This is because they prevent free radicals (unstable electrons that attack healthy cells and change their composition) from oxidizing molecules. Much like the skin on your face, the skin on your neck can come into contact with damaging free radicals daily, whether that’s from UVA and UVB rays, pollution, or other environmental stressors. When exposed to these, the DNA, lipids, and proteins in our cells are susceptible to damage. What happens next? The production of collagen and elastin slows down, which can lead to loss of firmness and wrinkling. Protect your neck from free radicals by using an antioxidant-rich serum.

    Peptides

    Peptides are long or short chains of amino acids, which are the building blocks of protein. These send signals to your cells to produce collagen. Dr. Mariwalla suggests incorporating peptides into your skincare routine since they can improve the quality of the skin on the neck. I recommend using a peptide serum in the evening to help your skin regenerate while you sleep.

    What If I Already Have Lines on My Neck?

    Proper skin care will certainly help lessen the appearance of neck lines and wrinkles, so I suggest practicing all of the above if you already have a case of tech neck. At the very least, this will ensure that lines and wrinkles won’t deepen, becoming even more stubborn and noticeable. With that being said, there are a few other options you turn to, including smoothing patches and professional treatments. Let’s talk about smoothing patches first.

    Wrinkle and Line Smoothing Patches

    Smoothing patches, such as those from Frownies and SiO Beauty, hold the skin taut to decrease the appearance of deep lines. I tried the Sio Beauty NeckLift Treatment, which is a silicone patch that hugs the contours of the neck. Since it needs to compress the skin to work, it feels tight (some people might find these too uncomfortable to wear overnight or for long periods of time). Facial patches like these discourage muscle movement and skin creasing, so they’re certainly worth checking out! (Read more about facial patches for wrinkle formation prevention here).

    Professional Treatments

    When it comes to professional options, which will offer fast and dramatic results, Dr. Mariwalla suggests micro-needling, microdroplets of Botox, and Ultherapy and Sofwave. The latter two use ultrasound technology to lift the neck, chin, and brow and improve lines and wrinkles. She also makes note of various laser treatments, which can resurface the skin’s texture. I have undergone a few treatments on the neck myself, and can confidently say there are several effective surgical (and non-surgical) ways to tighten the neck. Consult a dermatologist to find out which one is right for you.

    I hope this helps you understand the causes of tech neck, as well as the best ways to prevent it and address it once it’s already appeared.

    Next up, read all about microcurrent devices and how they can lift and tone your skin at home.

  • 3 Ways to Foster a Healthy Relationship with Candy

    3 Ways to Foster a Healthy Relationship with Candy

    Tired of feeling stressed and guilty around candy come Halloween? As an intuitive eating dietitian, I’m sharing 3 ways to foster a healthy relationship with candy.

    With Halloween around the corner, comes the inevitable stress of having access to an abundance of candy. In a culture that is constantly fear mongering around sugar consumption, how could you not stress about it?

    But how does that stress affect your enjoyment of the holiday? How does that anxiety impact your kiddos (if you have ’em)? Do you find yourself sneaking candy after the kids go to bed and feeling guilty afterwards? Are your kids (again, if you have ’em) learning that candy is “bad” or “junk” from you?

    What if you could have a more peaceful and neutral relationship to candy in your household?

    What if you could tune into your body to tell you how much candy to eat (or not eat) instead of listening to arbitrary rules?

    What if you could actually enjoy the candy without feeling guilty afterward?

    What if your kiddos could approach candy with attunement and not feel like they have to eat it all because they don’t know when they’ll have another chance to?

    It is all possible, my friend.

    They key to changing your relationship to candy is changing your mindset around candy. How do you do that, exactly?

    Graphic with quote: "The key to changing your relationship to candy is changing your mindset around candy."

    Here are 3 ways to stop feeling stressed and guilty around candy: 

    1. Take candy off the forbidden food pedestal.

    When you restrict certain foods or food groups because you feel out of control around them, you’re essentially putting them up on a pedestal. You’re giving them this forbidden food allure and power over you.

    It’s kinda like how when you put a toddler in a room with a million toys and tell them the one toy they can’t have is the blue ball. Well, guess which toy they’re going to want to play with and will fixate on until they can?

    As adults, we do the same thing with food. If you tell yourself you can’t have pizza or pasta or candy, guess which foods you’re going to constantly be thinking about?

    You can also think of it as the “bad boy effect.” There’s something alluring about something or someone we’ve deemed bad for us. If you deem candy as bad, you might find you want it even more.

    If you want a healthier relationship with candy, take it off the pedestal. Begin to see it as morally neutral. Give yourself permission to enjoy it without guilt.

    Graphic with quote: "If you want a healthier relationship with candy, take it off the pedestal. Begin to see it as morally neutral. Give yourself permission to enjoy it without guilt."

    Tune into your body and notice if you enjoy candy as much as you convinced yourself you did. Notice how candy makes you feel, mentally and physically.

    Start to make choices around candy from a place of attunement, instead of a place of rules and restriction.

    2. Keep candy in the house outside of Halloween.

    An important piece of making peace with food (even candy) is giving yourself permission to eat it. I’m talking unconditional permission.

    This is not permission only around Halloween. This is not permission only if you were “good” the rest of the day. This is not permission if you worked out that day.

    This is permission, no matter the circumstances.

    When you restrict food, you create a scarcity mindset around it. Your brain only thinks about that food and when you finally have access to it, you feel out of control, maybe you binge, and then convince yourself you can’t be trusted around it, and the restriction begins again.

    But it’s the restriction of food that’s leading to the binging or feeling out of control, not the food itself.

    Graphic with quote: "But it's the restriction of food that's leading to the binging or feeling out of control, not the food itself."

    Research shows this is the case. When folks are dieting, the pleasure centers in their brains light up even more in response to food that’s been off-limits compared to folks who are not restricting. No wonder you feel out of control around foods you’ve been avoiding.

    If you only give yourself permission to have candy once a year, you can bet on a last supper effect (i.e. I must eat this all now because I don’t know when I’ll have it again). Giving yourself permission to have candy in the house outside of just Halloween time can help to neutralize the morality around it.

    It can also help your brain to switch from a scarcity mindset to an abundance mindset, helping it to realize that you have access to candy whenever you want it, and not just on this one occasion each year. 

    3. Watch the language you use.

    The language we use around or toward food can impact our beliefs and feelings about food. If you’ve got kids at home, they’re going to adopt the language you use about food.

    If you say “candy is full of junk”, you’ll believe that candy is junk.

    If you say “I’m so bad for eating that”, your kids will think candy is bad.

    If you say “we don’t keep candy in our house”, you’re creating a scarcity mindset around it.

    Instead try saying phrases like:

    “Candy is just candy, it’s neither good nor bad. Just like an apple is an apple – it’s neither good nor bad.”

    “How does candy make me feel?” (Or to a kid, “how does your belly feel after you eat candy?”)

    “All food serves a purpose. Candy gives me pleasure.”

    “I can have candy at any time of year. Not just today.”

    Graphic listing 3 ways to foster a healthy relationship with candy

    Are these tips helpful? What would you add to this list? Please leave a comment below and let me know!

    For more intuitive eating blog posts, check out these below!

    5 Tips to Make Meal Planning Easier

    6 Tips to Make Cooking Easier

    6 Ways to Find More Enjoyment in Eating

    Is Food Addiction a Real Thing?

    The Beginner’s Guide to Intuitive Eating

  • Perfect Baked Sweet Potato Recipe

    Perfect Baked Sweet Potato Recipe

    Perfect Baked Sweet Potato Recipe – The Real Food Dietitians


    Privacy & Cookies Policy


new online casino
Padişahbet Güncel Giriş
Betnano Giriş
Padişahbet Giriş
Padişahbet Giriş
Padişahbet
Crypto Casino