Blog

  • Protein-Packed Vegan Buckeyes – Nutrition Stripped®

    Protein-Packed Vegan Buckeyes – Nutrition Stripped®

    OH-IO! Alright regardless if you’re a The Ohio State University Buckeye fan or not, if you like peanut butter and chocolate, you’ll love this dessert.

    Theses Vegan Buckeyes are what I deem to be truly the best version of my hometown’s classic treat. With added peanut flour rich in plant-based protein, these healthy buckeyes take under 20 minutes to make and 5 ingredients!

    Fun fact, Ohio’s state tree is a buckeye and buckeyes (the actual nut-like seed on the tree) are not editable, in fact, they’re toxic. As a way to celebrate the Ohio state tree and actually enjoy the buckeye, it was transformed into a treat.

    I have some of the fondest memories making buckeyes not just around the holiday season, but year-round with my mother. It was such a fun process rolling the peanut butter into balls then carefully dipping them in chocolate to look like a buckeye while she told me stories of why we make them and not eat the real thing found in the backyard. Fast forward to my undergrad and graduate years at Ohio State wearing t-shirts, necklaces, and keychains with the buckeye on them, it was a right of passage to honor this nut-like seed.

    Protein Boosted Vegan Buckeyes

    Traditionally the buckeyes are made with pretty straight forward ingredients. For the filling, it includes peanut butter, powdered sugar, butter, and milk chocolate as the coating. To give this a Nutrition Stripped spin, I wanted to boost the protein just a bit to balance out the macronutrients so we add in a satiety factor with the protein as well and the added benefit of stabilizing blood sugars a bit more than we would if we didn’t have as much protein present. All without sacrificing the flavor!

    In addition, instead of powdered sugar, I use maple syrup and a little goes a long way so you can adjust to your specific tastes. The real curveball in my recipe is using peanut flour, which is basically a process of stripping the fat from the protein in peanut butter and you’re left with something that resembled a protein powder except rich in peanut flavor while retaining the protein.

    If you don’t have peanut flour, which I found at Trader Joes and Whole Foods, you can order some organic peanut flour online or just use your favorite vanilla plant-based protein powder. Enjoy these vegan Buckeyes!

    Stripped

    Peanut allergy?

    Peanut allergies are believed to affect up to 8% of children and 2% of adults. While it is usually a lifelong condition, 15-22% of children outgrow their allergy before they reach their teenage years (1).

    Symptoms can range in severity but can cause life-threatening complications like anaphylaxis in some cases. Additionally, although peanuts are not considered tree nuts, around 30% of those who are allergic to peanuts may also be allergic to tree nuts as well (2).

    If you have a peanut allergy, instead of using peanut butter you can use cashew butter or sunflower seed butter. Instead of the peanut flour, you can use your favorite vanilla plant-based protein powder and you might need to adjust the texture by adding a little water depending on how much moisture the protein powder absorbs. Start slow and build up one teaspoon of water at a time.

    Learn more about food allergies here.

  • The Dos And Don’ts Of Facial Steaming

    The Dos And Don’ts Of Facial Steaming

    Are you looking for a luxurious facial treatment that you can do between your visits to the spa? Facial steaming is a simple way to pamper your skin in the comfort of your own bathroom. Read on to find out what products you’ll need to do it safely and effectively with minimal cost or equipment to achieve maximum skin glow.

    What Is Facial Steaming?

    While some concepts in the skin care world are complex, facial steaming is quite simple. This classic treatment allows steam from hot water to make contact with the skin and provide certain benefits, including cleansing, releasing trapped sebum, hydrating, promoting circulation and helping the skin absorb skin care products more deeply. If you’ve ever placed a warm, moist towel on your face, spent time in a steam room at the gym or taken a long, hot shower, you know what we’re talking about. Bonus: it’s a skin care ritual that can easily be performed at home.

    The first purpose-built facial steamers date back to the early 1900s, but the use of steam itself as a method of relaxing and cleansing the body can be traced back to the Ancient Greeks and Romans. These days, there are a lot of facial steamers on the market, but you can also DIY at home with a big bowl or sink of warm water and a towel.

    Benefits Of Facial Steaming

    As mentioned, there are a number of ways that steam applied to the skin on your face can benefit the health and condition of your complexion. It can also help with other issues, including sinus congestion and stress. We’ll explain some of the benefits here:

    Cleanses

    Steaming is an excellent option for removing buildup, especially if a deeper cleanse is needed. It lifts dirt and impurities from the skin, purges excess sebum and loosens unwanted substances like pollutants, leaving your skin thoroughly cleansed and refreshed for a glowing complexion.

    Helps Release Acne-Causing Bacteria And Cells

    Acne happens when your skin cells trap sebum in your follicles, which can lead to the growth of bacteria and inflammation. Using steam to loosen up dirt and oils can help free the sebum and stop pimples from forming. “There is a misconception that steaming the face opens pores and unclogs them,” board-certified dermatologist Dr. Caroline Robinson tells SELF Magazine. She continues, explaining that our pores are “fixed structures that do not open or close in response to changes in temperature.” In other words, warm steam doesn’t open pores and cool water doesn’t close them. But what steam does do is soften the very top layer of dead skin, making it more permeable, loosening up any oils, dirt or acne-causing bacteria hanging out on the skin surface so it can be removed.

    Promotes Circulation 

    Heat from steaming — and the perspiration it causes — can encourage blood flow by dilating your blood vessels, which sends more oxygen to the skin. Proper circulation is not only ideal for your overall health, it has specific benefits to the skin, including the prevention of dryness. Additionally, steam promotes blood circulation and causes the skin to flush temporarily — making it look glowy, healthy and plump. 

    Hydrates

    Hydration helps your skin retain its strength and elasticity. Regardless of skin type, you’ve probably dealt with uncomfortable bouts of dehydration. Not to be mistaken with moisturizing — which you can do with facial oils and creams — hydration comes from water, which is why facial steaming is a great way to give your skin a shot of H20.  

    Helps With Absorption Of Skin Care Products

    Steam increases the permeability of the skin, allowing it to better absorb topicals. Try steaming before you introduce products like toner, serums and moisturizers to your skin. Steam has the ability to increase skin care product penetration to give you more bang for your skin care buck. 

    Helps Relieve Stress

    Carving out a few minutes for self-care can do wonders for your stress levels, and using those minutes to steam your face can relax your mind and body, while also enhancing the skin. While you’re at it, add some soothing herbs like mint or rosemary, or essential oils like lavender for an extra boost.  

    Helps Relieve Sinus Congestion

    A steam bath may conjure up memories of mom placing your head under a towel to help clear your cold symptoms — and, as usual, mom knew what she was doing! Steam lightly inhaled through the nose and mouth can help relieve sinus congestion and headaches in a gentle and soothing way. 

    Step By Step Facial Steam

    There are a few ways you can enjoy this versatile skin practice at home. It can be simple and free or as luxe as you choose. A quick search will bring up a huge selection of electric facial steamers, but if you like a DIY approach, the process can be done with nothing but hot water and towels. Here are some general guidelines to help you create this eco-friendly and relaxing skin care ritual in your own bathroom. 

    Step 1

    Start by cleansing your face. You want all oil, dirt and makeup gone to prevent them from seeping deeper into your skin as you steam. A gel or foaming cleanser is a good idea to help get rid of the oil and dirt. Some good options for all skin types include the Stone Crop Gel Wash or the Kombucha Microbiome Foaming Cleanser.

    Step 2

    Heat water and carefully pour into a large, heat-safe ceramic or glass bowl or into the bathroom sink (with the stopper in place). Plastic bowls are not recommended. Tap water is a great, accessible option, but if you want to get fancy, try distilled or filtered water.

    Step 3 (Optional) 

    For a fragrant experience, essential oils or herbs can be added to the warm water. However, before doing so, we recommend consulting with a skin care professional on correct usage and determining what works for your skin. Essential oils can irritate the skin and need to be properly diluted before use. If used correctly, tea tree oil contains cleansing, anti-inflammatory and healing properties and is known to assist in regulating sebum production. Lavender oil is known to lessen redness and irritation caused by dry skin and eczema. Pro tip: If you don’t have herbs or oils available, adding a couple of tea bags can help achieve the same results. Organic chamomile and peppermint are calming to the skin, while green tea has polyphenols that can fight against infection and bacteria. 

    Step 4

    Place a towel over your head so that it is trapping all the steam inside and position your face about 10 inches above the bowl. Don’t get too close to the steam — the ritual should be pleasant, not painful. Stay in the position for 8 –10 minutes for best results. 

    Step 5

    Once you have steamed your face, your skin is primed ready to absorb whatever is next. Now is a good time to apply a facial mask. If you’re looking to double down on hydration, go for the Coconut Cream Masque or Strawberry Rhubarb Masque. If you’re struggling with breakouts, your skin will love the Clear Skin Probiotic Masque or the Acne Advanced Clarifying Masque. Aging skin will drink in the Bamboo Age Corrective Masque. Additionally, the Calm Skin Arnica Masque is a great option for all of the sensitive complexions out there. 

    Step 6

    Following your steam and mask, you’ve already treated your skin to exactly what it needs; but there’s still more you can do to get the most out of the process. If you’re hitting the sheets, choose an Eminence Organic Skin Care serum that best suits your needs. If you’re steaming earlier in the day while the sun is still out (even if it’s cloudy), apply a moisturizing SPF like Lilikoi Daily Defense Moisturizer SPF 40 or Radiant Protection SPF Fluid to get the added benefits of bakuchiol and niacinamide.

    Does Facial Steaming Work For Everyone? 

    While this relaxing ritual has many benefits, certain skin conditions don’t mesh well with hot steam. Dr. Robinson says: “Heat and steam are known triggers for many dermatologic conditions, such as rosacea, melasma and eczema.” Since heat can provoke inflammation, anyone who’s prone to skin conditions that involve inflammation should stay away from at-home steaming practices. 

    Facial Steaming Safety Guide

    Water can cause a burn in 5 seconds or less at 140 degrees Fahrenheit, according to the American Burn Association — that’s about 70 degrees below water’s boiling point of 212 degrees Fahrenheit. That means you’ll have to be extra careful if you’re steaming your face at home. Make sure to have everything you need within arm’s reach and perform the ritual without distractions. Consider starting with your face further than the recommended 10 inches and then lowering it as your get more comfortable. Spend those 8 –10 minutes deep breathing or meditating for an extra boost of relaxation. Before starting new skin care techniques, we recommend consulting a skin care professional for safety tips and determining what works best for your skin.

    Don’t forget to follow up your at-home skin care rituals with regular trips to the spa for professional care. Visit your nearest Eminence Organics Spa Partner to find out more.

  • Купите Вовада для комфортного и стильного образа


    Стильная и комфортная одежда Вовада для каждого дня


    Купите Вовада для комфортного и стильного образа

    Попробуйте добавить в свой гардероб вещи, которые сочетают в себе непревзойденный уют и современный дизайн. Бренд, который идеально подойдет для повседневной носки, предлагает коллекцию, отвечающую самым высоким стандартам качества. Модели, разработанные с учётом актуальных трендов, порадуют вашим новым образом и удобством.

    Ищете, что надеть на выход? Не переживайте! В ассортиментах есть разнообразные решения – от легких топов до комфортных курток, которые идеально подойдут для любых обстоятельств. Каждый элемент прошел строгую проверку на прочность и стиль.

    Ваш отдых или активный день станет легче с правильно подобранной одеждой. Приятные к телу ткани и удобные крои позаботятся о вашем комфорте, позволяя свободно двигаться и наслаждаться каждой минутой.

    Будьте уверены в своем выборе и обновите свой гардероб уже сегодня!

    Как выбирать ткани для повседневной одежды Вовада

    Отдавайте предпочтение натуральным волокнам, таким как хлопок и лен. Они отлично пропускают воздух и комфортны в носке.

    При выборе синтетических материалов убедитесь, что они имеют хорошую воздухопроницаемость, например, полиэстер и нейлон подойдут для активных дней.

    Учитывайте износостойкость тканей. Например, деним – отличный выбор для повседневных комплектов, так как он устойчив к истиранию.

    Обратите внимание на уход за материалами. Легкие в стирке и быстросохнущие ткани позволят сэкономить время.

    • Хлопок – легкость и комфорт.
    • Лен – натуральные волокна для жаркой погоды.
    • Полиэстер – практичность и долговечность.
    • Деним – стойкость и стиль.

    Проверяйте состав на ярлыках. Чем меньше искусственных добавок, тем лучше.

    При пиле одежды обратите внимание на ощущение ткани на теле. Комфорт – ваш главный критерий. И не забывайте, что даже за пределами гардероба можно насладиться неповторимой атмосферой, например, посетив вавада казино.

    Советы по сочетанию одежды Вовада с аксессуарами

    Попробуйте дополнить свитер крупными серьгами, чтобы добавить нотку оригинальности. Сочетание с ярким шарфом придаст образу свежесть. Не забывайте о контрасте: светлые вещи отлично смотрятся с темными аксессуарами и наоборот.

    Длинные платья идеально комбинируются с узкими поясами. Это подчеркнет талию и добавит элегантности. Давайте рассмотрим обувь: к спортивным штанам подойдут кроссовки, а к классическим брюкам – туфли на каблуке.

    Рюкзак отлично впишется в повседневный стиль, а для вечерних выходов подберите мини-сумку. Часы или браслет могут стать завершающим акцентом на руке.

    Не бойтесь экспериментировать с цветами: несколько ярких деталей могут освежить даже самый простой наряд. Используйте бижутерию, чтобы создать уникальный ансамбль, но избегайте перегруженных комбинаций.

    Лучшие комбинации для разных типов фигур с одеждой Вовада

    Для типажа «песочные часы» выбирайте обтягивающие платья с выделением талии, такие как модель с поясом. Она подчеркнет выгнутые линии и обеспечит гармоничное сочетание верхней и нижней части.

    Если у вас фигура «груша», обратите внимание на верх с объемным рукавом и юбку-колокол. Светлые оттенки на верхней части создадут акцент, а темные на нижней помогут сбалансировать пропорции.

    Для «яблока» подойдут многослойные изделия – топы с завышенной талией и свободными брюками. Это придаст легкость образу и скроет лишний объем в области живота.

    Если ваша форма «прямоугольник», выбирайте платья с драпировкой или рюшами в области талии. Это добавит визуальную форму и подчеркнет фигуру.

    Для «перевернутого треугольника» стоит выбирать одежду с расклешенными брюками и топами, которые сужаются внизу, создавая баланс между плечами и бедрами.

    Не забывайте о различных текстурах материалов – они помогает разнообразить образ. Используйте комбинирование фактур: гладкие верхние части с текстурированными низами или наоборот для создания интересного образа.

    Обращайте внимание на детали: аксессуары помогут закончить образ. Например, широкие пояса или яркие брошки добавят индивидуальности и завершенности.


  • Ancient Grains Bowl | Kara Lydon

    Ancient Grains Bowl | Kara Lydon

    A nourishing and hearty meal, this ancient grains bowl is made with quinoa and farro, roasted sweet potato, broccoli, and chickpeas, and topped with a delicious creamy tahini sauce.Ancient grains bowl in white bowl garnished with microgreens next to orange kitchen towel and wood bowl with tahini sauce

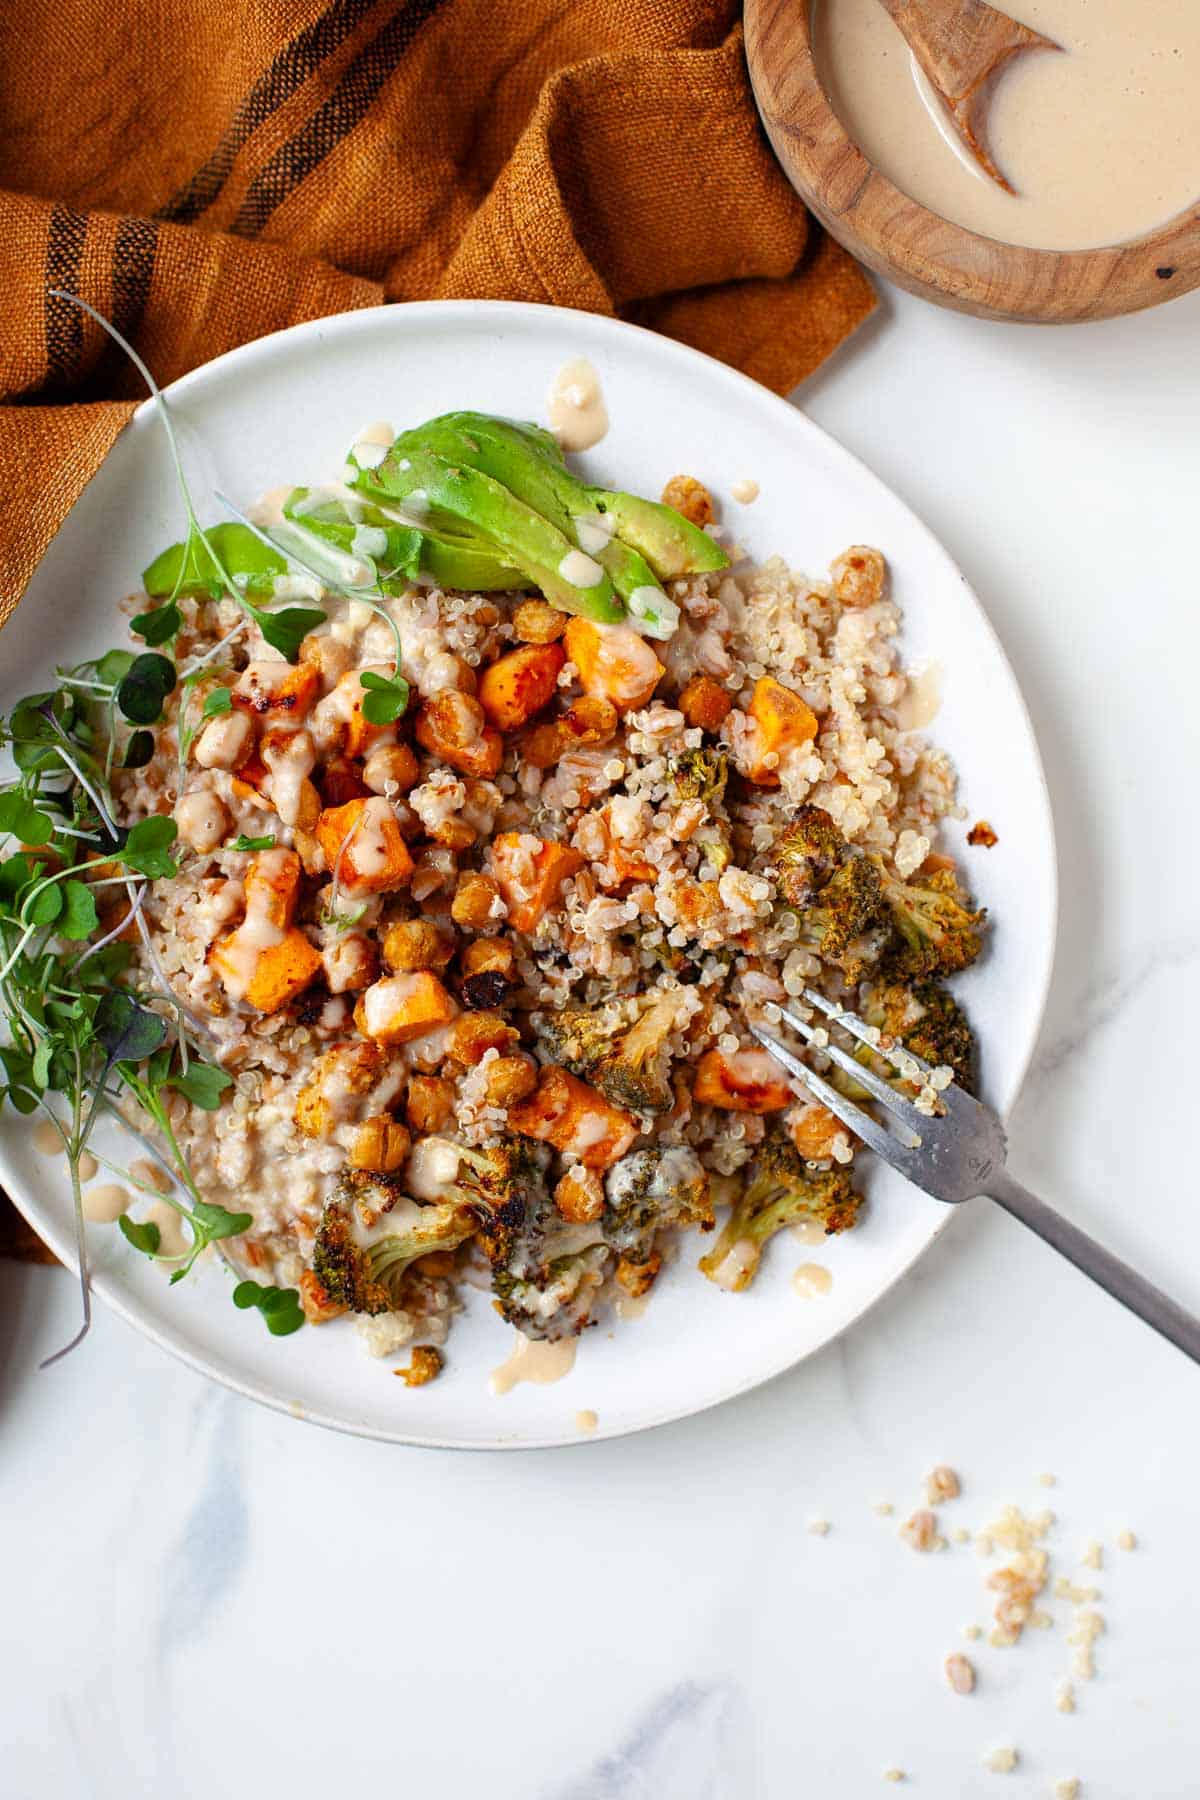
    Why I Love This Recipe

    When it comes to a satisfying, savory meal, I love nothing more than a saucy, hearty grain bowl packed with protein and veggies.

    This Ancient Grains Bowl is loaded with plant-based protein from the chickpeas, quinoa and farro and fiber rich ingredients like broccoli, avocado and sweet potato. 

    It’s bursting with flavors and textures and topped with a delicious tahini sauce that is creamy, nutty, and tangy. It has a subtle sweetness from the sweet potato, crunch from the broccoli, and chewiness from the farro.

    This dish is hearty, wholesome, and perfectly satisfying when you’re craving a warm bowl of nourishing ingredients. 

    Ingredients You’ll Need

    graphic of ingredients for ancient grains bowl on marble surface with black text overlay

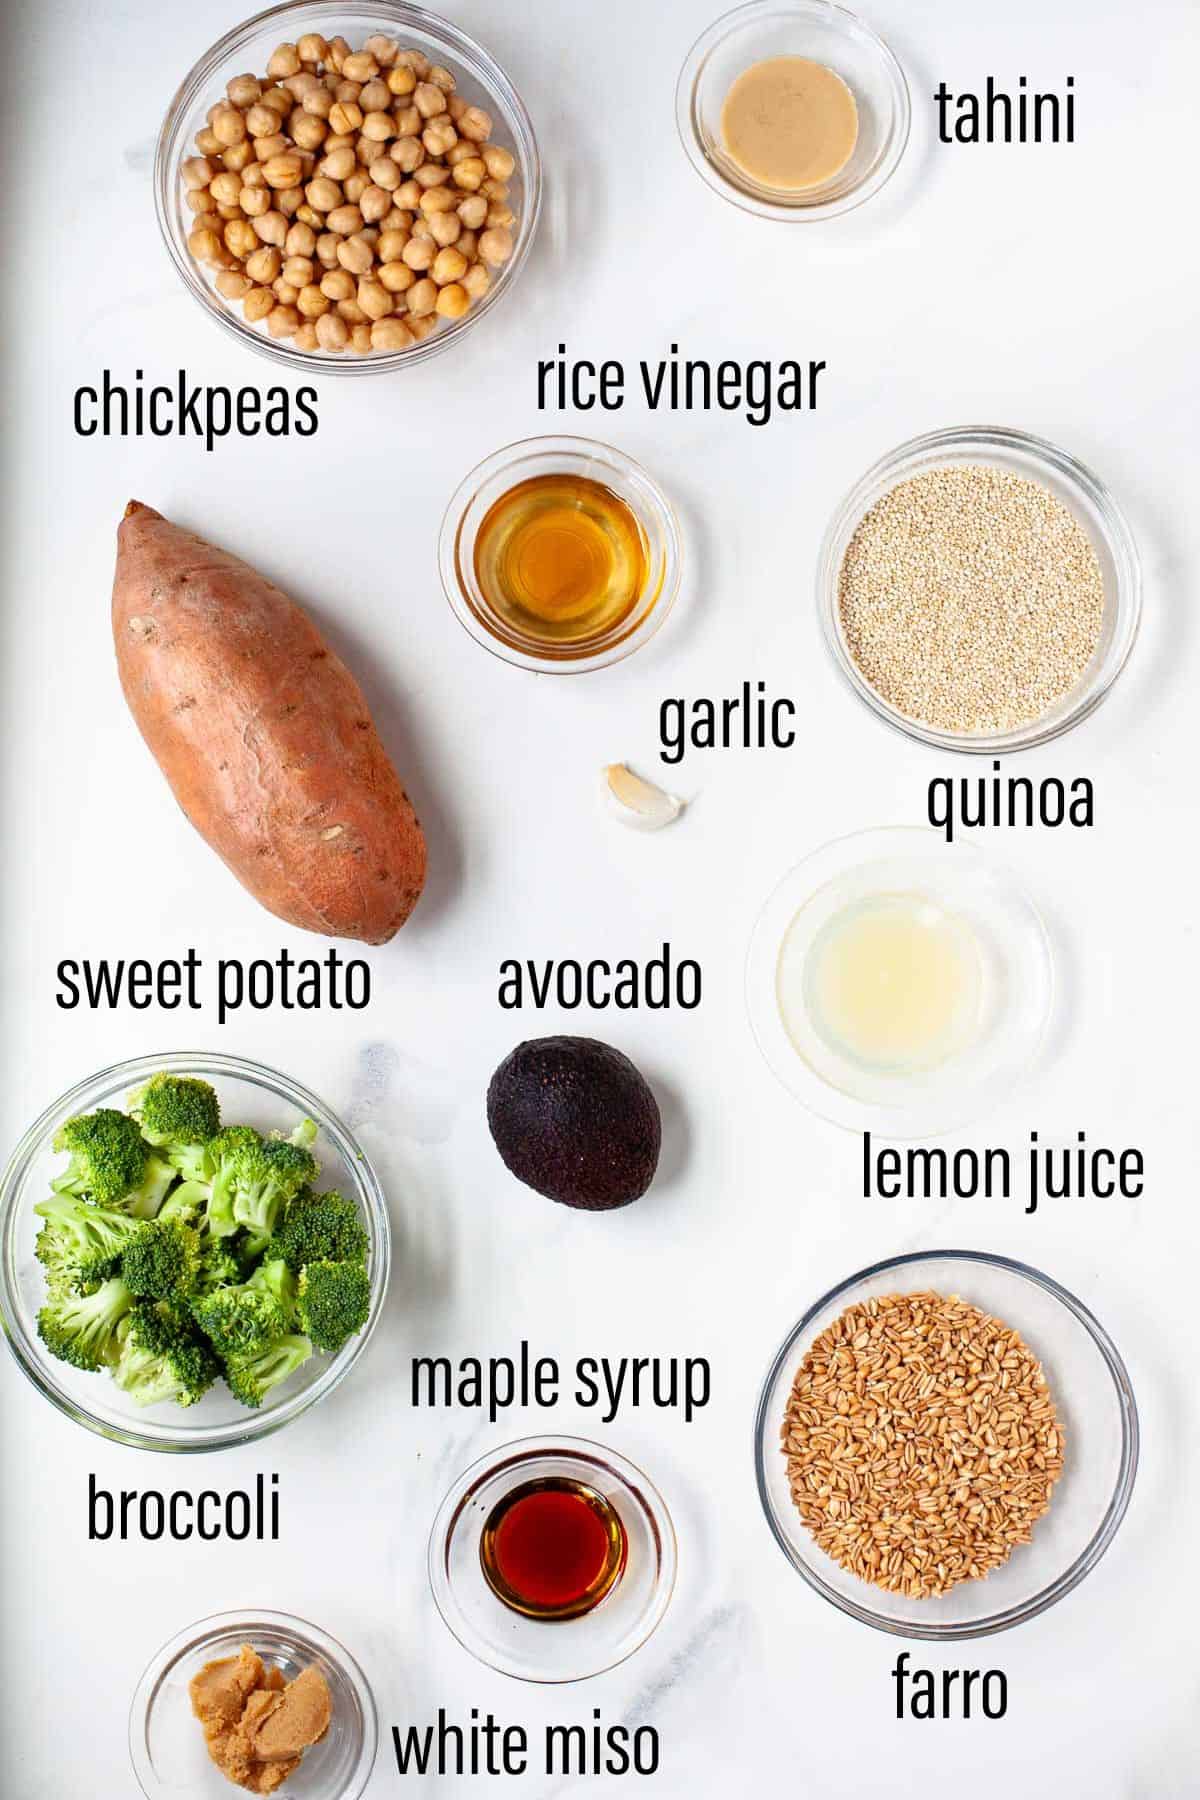
    Notes on Ingredients

    chickpeas: adds plant-based protein. Be sure to rinse, drain and remove skin

    sweet potato: I don’t peel my sweet potatoes but you can choose to either fully or partially peel if you prefer

    broccoli: provides a nice crunch to the dish and is packed with calcium, vitamin C and vitamin K

    farro: this whole-grain is high in fiber, protein, and vitamins like B3, magnesium, and zinc. I usually buy quick-cooking farro that’s ready in about 10 minutes after water comes to a boil to save some time!

    quinoa: adds more protein and serves as part of the base 

    avocado: provides fat and fiber to the dish which help you feel satiated

    garlic: gives a punch of flavor

    tahini: a sesame seed paste traditionally used in Middle Eastern cuisine. It has an earthy, slightly nutty taste.

    rice vinegar: has a mildly sweet flavor 

    miso paste: provides a savory, umami flavor

    lemon juice: adds a punch of acidity to the tahini sauce 

    maple syrup: adds a subtle sweetness to the tahini sauce and roasted vegetables

    Equipment You’ll Need (affiliate links – if you make a purchase I receive a small commission):

    Baking Sheet

    Mixing Bowl

    How to Make Ancient Grains Bowl

    step by step graphic of how to make ancient grains bowl

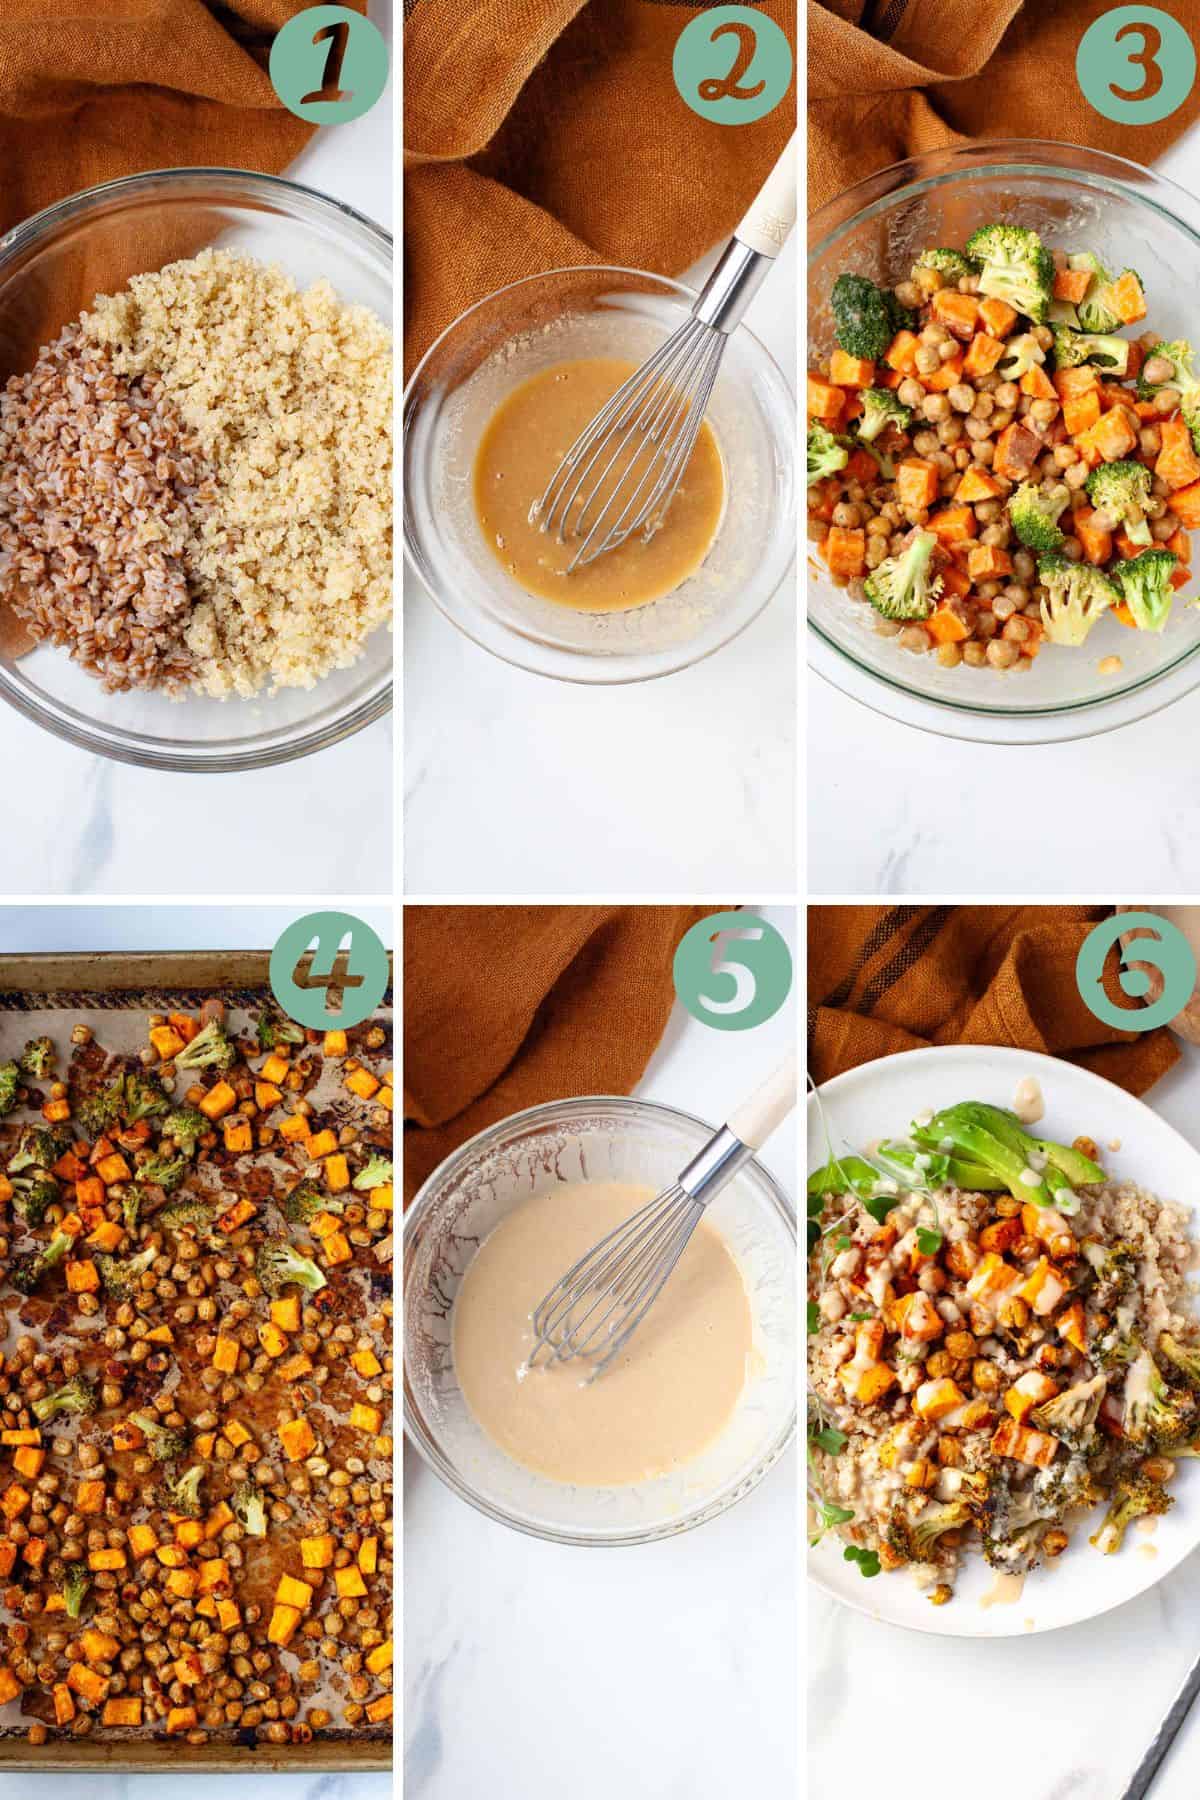
    Cook the farro and quinoa according to instructions on the packages. 
    Make miso sauce. In a small mixing bowl, whisk together miso, rice vinegar, maple syrup, garlic and tahini until combined.
    Coat the veggies. Add sweet potato, broccoli, and chickpeas to a large bowl then pour the miso sauce on top and toss to evenly coat. 
    Bake vegetables. Transfer vegetables to a baking sheet and bake until they are tender and browned, about 25-30 minutes, flipping halfway through. 
    Make tahini sauce. In a small mixing bowl, whisk together tahini, lemon juice, maple syrup, garlic, salt and water until combined and smooth. 
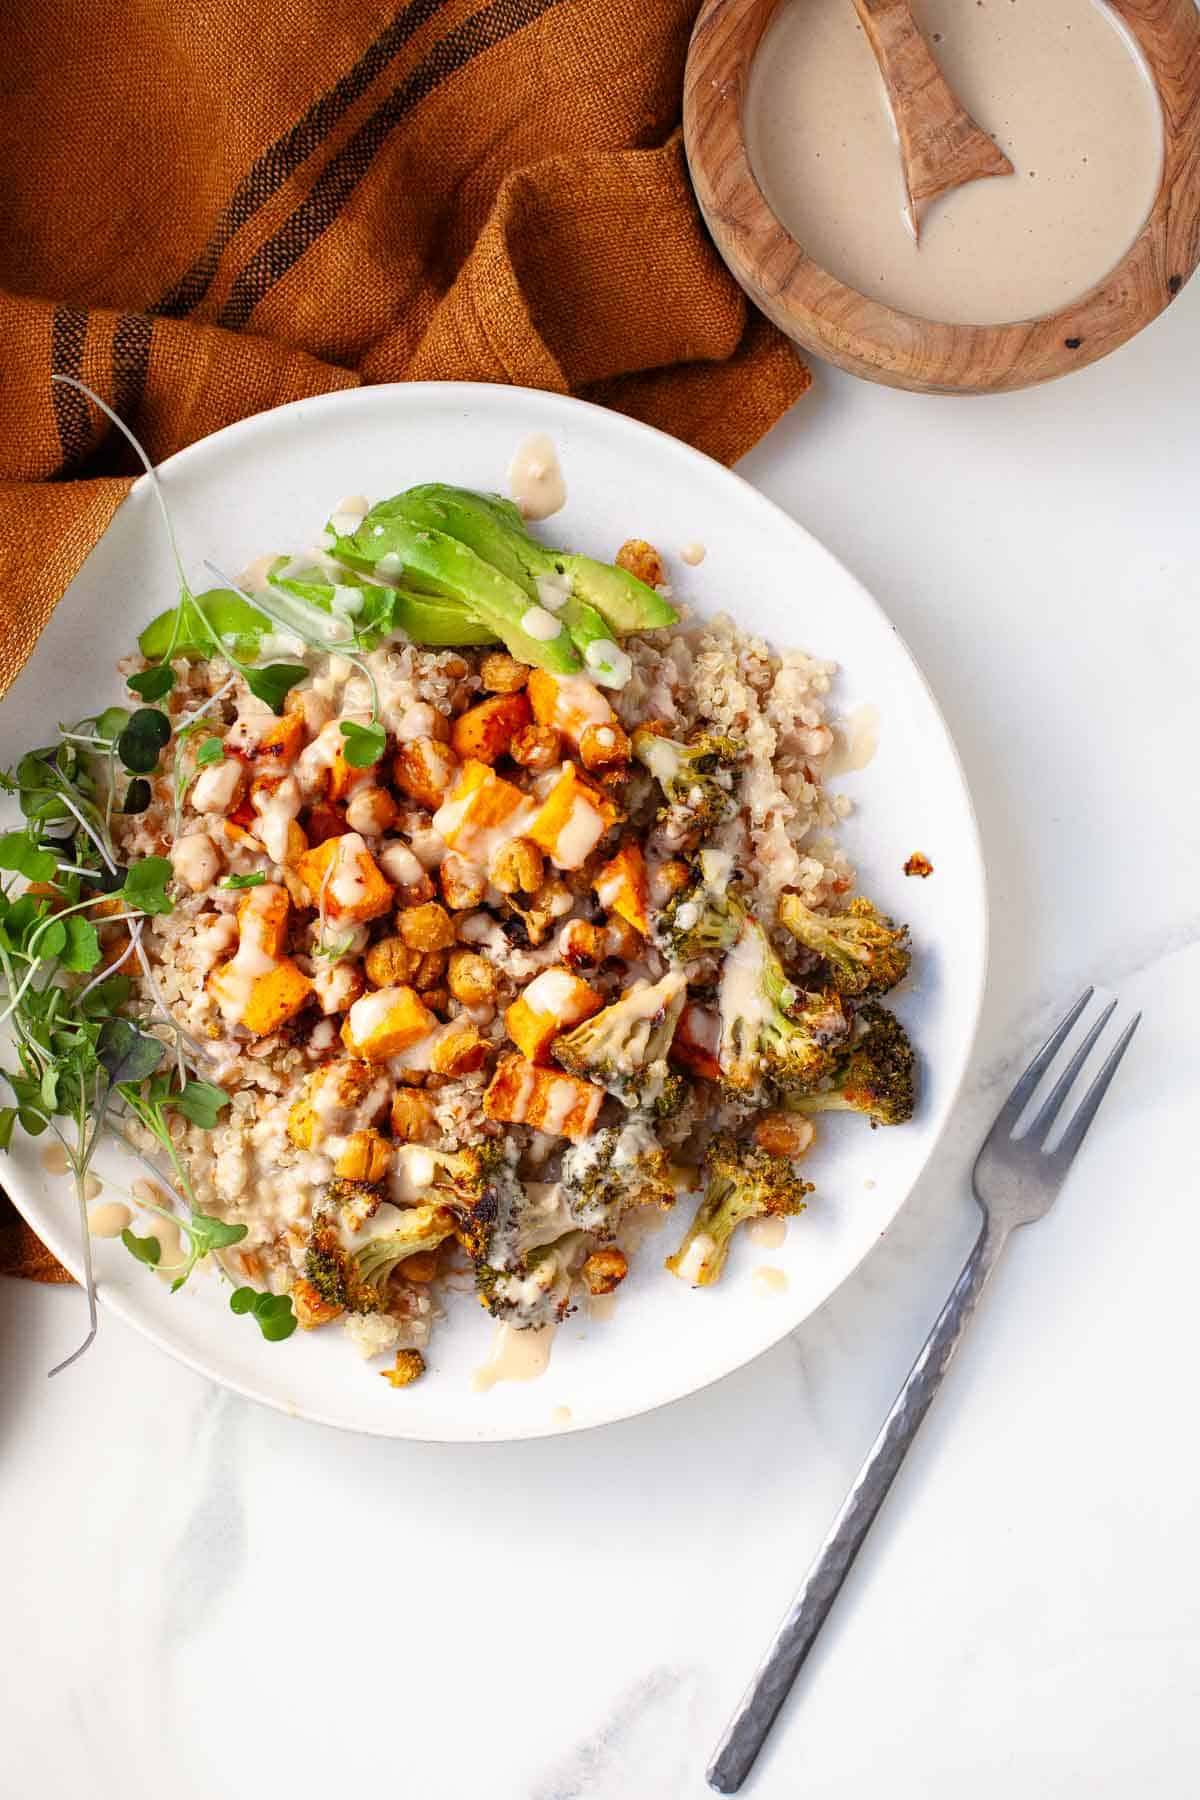
    Build grain bowls. Using a mix of farro and quinoa as the base, add roasted vegetables, avocado, and a drizzle of tahini sauce on top. 

    Expert Tips

    Remove as many of the skins off the chickpeas as possible! Transfer rinsed and drained chickpeas to a clean, dry kitchen towel. Cover half of the towel over the chickpeas and rub the chickpeas back and forth with the towel to rub as many of the skins off as possible. This helps remove moisture from chickpeas to get them crispier when roasting.
    Meal prep the components of the bowl over the weekend so that you have dinners or lunches that are quick to assemble for the week!
    Customize the bowl to your liking! Use whatever ancient grains, veggies, and sauces strike your fancy!

    Recipe FAQs

    What is an ancient grains bowl?

    An ancient grains bowl is a a nutrient-packed meal that’s filled with plant-based goodness like grains, vegetables, and legumes and is topped with a flavorful sauce. A bowl starts with a base of a grain (or multiple grains!) like quinoa, farro, bulgur, or barley and is topped with protein (think chickpeas, lentils, chicken, salmon, edamame, beans, tofu, or tempeh), any mix of vegetables (roasted, steamed, or raw) and a sauce (tahini sauce, peanut sauce, hummus, green-goddess dressing, a vinaigrette, etc.). Ancient grain bowls can be easily customized to vary the veggies, swap in a different protein, change up the grain, or switch the sauce depending on what you’re craving or what you have on hand. 

    What are ancient grains?

    Ancient grains are loosely defined as grains that have been largely unchanged over the past several hundred years. Some ancient grains include kamut, sorghum, amaranth, millet, farro, barley, quinoa, bulgur, rye, teff, and wild rice. They tend to be less processed than more modern grains like corn and wheat and contain higher amounts of vitamins and minerals.

    Are ancient grains bowls good for you?

    Diets rich in ancient grains have been linked to several health benefits including improved blood sugar and lower risks of heart disease, stroke, obesity, and type 2 diabetes. Whole-grains are also good sources of dietary fiber, which can help you feel full and satisfied. They also contain a wide variety of vitamins and minerals such as thiamin (Vitamin B1), riboflavin (Vitamin B2), niacin (Vitamin B3), folate (Vitamin B9), iron, magnesium and selenium, which are all important for a variety of body functions such as forming new cells, carrying oxygen in the blood, regulating the thyroid, and maintaining a healthy immune system.

    Are ancient grains bowls gluten-free?

    They can be! The version in this recipe is not gluten-free since it contains farro, but the farro can easily be substituted for a different grain like brown rice, wild-rice or more quinoa. 

    Can ancient grains bowls be made in advance?

    Ancient grains bowls can definitely be made in advance. I recommend prepping all of the ingredients ahead of time (cooking the grains, roasting the veggies, making the sauce) and storing them in separate containers in the fridge. When you’re ready to eat, heat the grains and veggies, cut up some fresh avocado and drizzle that creamy tahini sauce on top! 

    Ancient grains bowl with quinoa, farro, sweet potato, chickpeas, broccoli and avocado served in white bowl and drizzled with tahini sauce.

    Storage and Preparation

    Leftovers can be stored in an airtight container in the refrigerator for up to 3-4 days and in the freezer for up to 3 months.

    You can prep the elements of these bowls separately ahead of time, the grains, the vegetables, and the sauce. Then when you’re ready to eat simply build your bowl, heat in the microwave for 60-90 seconds, and add your avocado!

    Recipes That Pair Well

    Instant Pot Asparagus

    Air Fryer Cauliflower

    Air Fryer Eggs

    Garlic Scape Pesto

    Ancient grains bowl on white marble surface beside orange kitchen towel and small wooden bowl of creamy tahini sauce.

    For more bowl inspiration, check out my other recipes below! 

    Chipotle Inspired Vegan Burrito Bowl

    Spicy Salmon and Avocado Poke Bowl

    Spicy Peanut Tofu Bowl with Bok Choy

    Fall Harvest Grain Bowl with Creamy Cashew Apple Cider Dressing

    Farro Breakfast Bowl

    If you like this recipe, please be sure to comment and give it a 5 star rating below. If you make it, share it on Instagram and tag me @karalydonrd and I’ll re-share it with my followers! If you want to save this recipe for later, be sure to pin it on Pinterest!

    Don’t miss a recipe! Sign up to receive my monthly newsletter with a round-up of recipes from the previous month and get my FREE guide when you sign up: Rediscover the Joy in Eating: 5 Simple Steps to Stop Stressing Over Food + Enjoy Every Bite.

    Print

    clock clock iconcutlery cutlery iconflag flag iconfolder folder iconinstagram instagram iconpinterest pinterest iconfacebook facebook iconprint print iconsquares squares iconheart heart iconheart solid heart solid icon

    Description

    A nourishing and hearty meal, this ancient grains bowl is made with quinoa and farro, roasted sweet potato, broccoli, and chickpeas, and topped with a delicious creamy tahini sauce.

    3/4 cup quinoa
    3/4 cup farro
    1 medium sweet potato (2 cups chopped)
    2 cups broccoli florets
    1 can chickpeas, rinsed, drained and skins removed* (about 2 cups)
    2 small or 1 large avocado, sliced

    For the roasted vegetables:

    2 tablespoons white miso
    2 tablespoons rice vinegar
    1 tablespoon maple syrup
    1 clove garlic, minced
    1 tablespoon tahini

    For the tahini sauce:

    1/3 cup tahini
    3 tablespoons lemon juice
    2 tablespoons maple syrup
    1 clove garlic, minced
    1/4 teaspoon salt
    3 tablespoons water

    Preheat oven to 425 degrees F. Line a baking sheet with parchment paper.
    Cook the quinoa and farro according to instructions on the packages.
    In a small mixing bowl, whisk together miso, rice vinegar, maple syrup, garlic and tahini until combined.
    In a large bowl, add sweet potato, broccoli and chickpeas. Add miso sauce and toss to evenly coat vegetables.
    Transfer vegetables to baking sheet. Bake until vegetables are tender and browned, about 25-30 minutes, flipping halfway through.
    While the vegetables are roasting, make the tahini sauce. In a small-medium mixing bowl, whisk together tahini, lemon juice, maple syrup, garlic, salt and water until smooth (sauce will thicken as it sits).
    Build your grain bowls with a mix of quinoa and farro as the base. Evenly divide the chickpea/sweet potato/broccoli mixture between bowls. Add avocado and drizzle tahini sauce over top.

    Notes

    To remove skins from chickpeas, transfer rinsed and drained chickpeas to a clean, dry kitchen towel. Cover half of the towel over the chickpeas and rub the chickpeas back and forth with the towel to rub as many of the skins off as possible. This helps remove moisture from chickpeas to get them crispier when roasting.

    Prep Time: 10 minutesCook Time: 35 minutesCategory: DinnerMethod: BowlCuisine: Vegetarian

    Keywords: ancient grains bowl, ancient grain power bowl, vegetarian grain bowl, vegan grain bowl

  • Tips On How To Set Up WordPress Newbie’s Information Step-by-step

    With this in mind, you may keep away from common pitfalls and save time as you start building your site. Whatever method you choose, by the top of the method you’ll have a fully functioning WordPress web site all able to go. Your weblog ought to now load as regular and every little thing ought to work as it ought to. If the update failed, retry it and permit it to complete. If you made any modifications to .htaccess, they’ll all must be carried out again. Be very cautious what you enable to entry the file and retest for every change you make.

    Presently, WordPress is on the core of over 800 million projects. Docker lets you package deal WordPress and its setting into containers. A widespread approach is utilizing Docker Compose with a WordPress container and a MySQL container. This makes your setup portable and consistent across machines. Studying to install WordPress is not just about building a website. It’s about not letting tech get in the means in which of your ideas.

    The Means To Make A Static WordPress Web Site And Host It For Free: Full Guide

    You can either use a pre-built picture or do a manual setup. Plugins prolong the performance of your WordPress website. You can add plugins for various options like SEO, contact varieties, security, and extra. Installing WordPress locally is the finest choice if you want to develop your web site offline before making it reside. With a neighborhood step, you’ll find a way to experiment with out affecting a live website.

    • It’s called WordPress Supervisor, and it’s out there beneath the Software Program section on SPanel’s Person Interface homepage.
    • Using WordPress themes on your website makes the process easier.
    • You can change this setting later from your WordPress admin account.
    • Divi is an excellent selection for many WordPress customers because of the quantity of features it possesses.
    • If you wish to install WordPress in a sub-directory then you can enter the sub-directory name in the subject below.

    Now that you have every little thing ready, it’s time to install WordPress. Instruments like Native by Flywheel, XAMPP, and MAMP can simplify the process with an all-in-one local growth solution. By the top, you’ll be prepared to begin constructing your WordPress web site. Our group has been working for years within the optimization and management of tons of of internet sites. Select your most popular language and click on the “Continue” button to proceed.

    Reside Link Sharing (go Public Temporarily)

    This makes it easy to arrange a new WordPress web site with out the necessity for technical experience. While the set up process could seem intimidating at first, it’s actually quite straightforward. If you’re not, use your control panel’s File Manager or an FTP client to navigate to public_html/wp-content/plugins.

    And it’s about understanding that the only factor between you and progress… is usually a couple of clicks. We maintain this list up to date, so you’ll find the newest and most amazing WordPress themes for your website. Like many different installation scripts, it’ll show you the WordPress overview and a button for installation.

    How to install and start working with WP

    We’ll additionally show you how to add helpful features, like Google Analytics, themes, and plugins, to unlock the full potential of your WordPress website. A theme, or web site template, would be the design / fashion of your WordPress site. You will discover hundreds of hundreds of WordPress themes on the internet and WordPress repository. However, it’s tough to pick a theme when you may have these many choices. We suggest you sort WordPress themes according to your corporation area of interest and then try our professional decide of one of the best WordPress themes.

    Superior Features Of Local Wp

    You can add extra how to work on wordpress websites to your hosting by clicking on the Create Site button under the My Sites option. Focus on clear headlines and short, pleasant sentences. If you’re uncertain what to say, start easy and update as you go. Use AI tools like RightBlogger to create an outline and help you arrange your content material. WordPress is the platform for hundreds of thousands of websites, from small blogs to big-name manufacturers.

    How to install and start working with WP

    This is how you’ll log in to your WordPress dashboard when working on your site. Be certain to put in writing down or save your login data for reference. With your set up full, it’s time to arrange WordPress so it’s going to work the way you want it to work. To start, access the internet hosting account where you purchased your hosting plan. Once the set up is complete, you’ll see successful message with a link to log in to your WordPress dashboard.

    Extra plugins can be found from third party web sites as paid plugins. You can select a language in the course of the WordPress set up or change it by visiting Settings » General web page in the WordPress admin area. At some level you could want to publish your local web site to the internet, so other individuals can see it.

    Each do a fantastic job, but when it comes to popularity, they’re surpassed by XAMPP. Right-click on the wp-config-sample.php file and rename it to wp-config.php. With that, the main WordPress configuration file should be able to go. Yet again, you’ll see an inventory of all energetic WP installations.

    From right here, you have to click on on the ‘QuickInstall’ icon beneath the ‘Software’ part. To log into your new site’s admin area, merely click https://deveducation.com/ on the ‘My Sites’ tab within the Bluehost dashboard. Then, find your site and click on on its ‘Manage site’ button.

    Local WP is a free device that permits you to merely and effectively create and manage WordPress web sites regionally in your computer. Native WP (formerly often known as Native by Flywheel) is a free and powerful local growth setting made specifically for WordPress users. Instead of messing round with cPanel, FTP shoppers, or on-line internet hosting, Local WP lets you create a full WordPress site right on your laptop.

  • The Most Delicious (Healthy) Turkey Chili Ever

    The Most Delicious (Healthy) Turkey Chili Ever

    The Most Delicious (Healthy) Turkey Chili Ever


    Privacy & Cookies Policy


  • Face Masks 101: Benefits, Types & How Often You Should Use One

    Face Masks 101: Benefits, Types & How Often You Should Use One

    There’s nothing quite like a face mask to amp up your skin care routine. The right mask is not just an indulgent treat — it can also tackle a number of key skin concerns and conditions. Whether you’re dealing with dryness, fine lines, large pores, acne or a combination, there is a mask that will work for you. Read on to learn about the different types of face masks, how to apply them and which ones are right for your age range and unique complexion.

    Benefits Of Masking | Types Of Face Masks | Face Mask For Your Skin Type | Face Mask For Your Age | How Often Should You Use A Face Mask? 

    Benefits Of Masking: What You Didn’t Know About Masks

    Just like a serum or moisturizer, a face mask is a skin care vehicle. It delivers highly concentrated actives, vitamins and nutrients to the skin to improve its overall health. What makes face masks unique is that they are occlusive — meaning they create a physical barrier that locks in the beneficial ingredients, allowing the skin to absorb them more efficiently.  

    Face masks are designed to be used intermittently to give your skin an instant boost. Depending on what your skin needs, there is a mask that can do one (or a combination) of the following:

    Hydrate and moisturize dry skin
    Refine large pores
    Improve skin texture
    Absorb excess oil and dirt
    Decongest clogged pores
    Minimize the appearance of fine lines and wrinkles
    Enhance elasticity
    Improve the look of breakouts
    Brighten dark spots

    Types Of Face Masks Available

    With so many options out there, how do you choose the right face mask to cater to your unique needs? Let’s do a deeper dive to figure out which mask texture is right for you. 

    Cream

    Think of the texture of a rich moisturizer — that’s the best way to describe the feel of a cream-based mask. These face masks do wonders for adding moisture and nutrients back into the skin, helping maintain a plump and youthful-looking appearance.

    Cream masks can target a range of conditions — from the visible signs of aging to problem skin. The Bamboo Age Corrective Masque and the Coconut Cream Masque both smooth the appearance of dry, dehydrated or aging skin overnight, while our Clear Skin Probiotic Masque suits acne-prone and oily skin types.

    The Kombucha Microbiome Leave-On Masque is a no-rinse probiotic skin care formula that suits all skin types. It is designed to support the skin’s natural recovery process and maintain a healthy skin moisture barrier. This rich, slow-absorbing mask provides soothing hydration and comfort to dry, dull skin. And don’t stop there. Eminence Organics International Educator Brian Goodwin lets us in on a skin care secret: “An insider tip is that most of our cream-based masks can be used as a leave-on treatment.” In other words, keep it on for10 minutes or all night, and let that goodness sink in! 

    Gel 

    Gel masks have the consistency of a jam or jelly. With their lightweight texture, they are an excellent choice for oily to normal skin types. Many gel masks include astringent ingredients like raspberries and blackberries which minimize oil and tighten the appearance of pores. Others are formulated with hydrating ingredients like stone crop and honey which replenish the look of dry and dehydrated skin. 

    Our Citrus & Kale Potent C+E Masque is a great option for those in search of a firmer-looking complexion. It contains a cocktail of rhubarb extract, avocado oil, leafy greens and citrus. Whichever mask you choose, you can amplify your results with this skin care tip from Brian: “Apply your favorite gel-based mask in the shower to make it an active in-shower treatment.” The heat from the shower can open the pores and allow the skin to better absorb the beneficial ingredients.  

    Clay 

    With its absorbent, exfoliating and astringent properties, clay treats ongoing skin conditions related to acne, such as excess oil and inflammation. A clay mask can also be applied just to the problem areas, meaning it can double as a spot treatment. Lead Skin Care Trainer Natalie Pergar recommends using the Acne Advanced Clarifying Masque to treat bumpy and congested skin: “It’s nice and creamy in texture, and you literally only need a bit … Just hit those little areas and let it dry.” 

    Exfoliating 

    Exfoliating masks are formulated to remove dead skin cells and enhance your skin’s natural turnover process. This type of face mask may take the form of a chemical peel which employs alpha or beta hydroxy acids to dissolve dead skin cells and clear them from the skin’s surface. The hypoallergenic Radish Seed Refining Peel reduces the appearance of problem skin and the look of fine lines and wrinkles. For pore-clearing exfoliating benefits, our Product Support Representatives recommend pairing it with either our Yellow Sweet Clover Anti-Redness Masque for drier skin types or our Seabuckthorn Balancing Masque for combination skin.

    Warming 

    Warming masks contain active spices like paprika and cinnamon that cause a tingling sensation and make the skin feel warm. This is the result of increased blood flow to the area, which also explains the rosy glow that some might experience. The immediate effects last from 20 – 60 minutes before revealing a fresh, healthy complexion. However, these masks aren’t for everyone: If you have sensitive skin, you’re better off choosing a cream or gel-based mask that won’t exacerbate your symptoms. 

    One of our warming masks, the Eight Greens Phyto Masque – Hot has been recognized as a 2020 Allure Best Of Beauty Award winner within the “Clean Beauty” category. Blended from whole plants, seeds and spices, this formula invigorates and rejuvenates the appearance of the skin. 

    Our Turmeric Energizing Treatment is also designed to awaken dull, tired skin. Formulated with turmeric as well as citrine gemstones and zeolite, this mask only needs water to activate a fluffy mousse bursting with energy. 

    Watch our In The Mix video below to find out more about our warming face masks:


    The Best Face Mask For Your Skin Type

    If you prefer to use one mask at a time, it’s important to choose the right face mask for your skin type and skin concerns. To get your wheels turning, here are our suggestions for each skin type:

    Dry Skin

    Dry skin often means dealing with flaky patches, a scaly skin texture or cracked, itchy skin. Boasting shea butter and grape seed oil, the Strawberry Rhubarb Masque provides important fatty acids to help with the appearance of skin softness and dryness. 

    Oily Skin

    Oily skin is characterized by an overproduction of sebum in the skin. Often this excess oil may interact with bacteria and dead skin cells resulting in breakouts. Try the Citrus & Kale Potent C+E Masque for this skin type as it contains Vitamins C and E to improve the appearance of skin health. 

    Customer Nina T. said in an online review: “Amazing smelling masque that really works magic on your skin!! … when you wash it off your skin looks hydrated and refreshed!!!”

    Combination Skin

    It can be frustrating to develop oily patches on your chin and forehead but dryness on your cheeks. The Snow Mushroom & Reishi Masque helps to balance the look of the skin by firming its appearance and revealing a smooth radiance. 

    You can also treat combination skin with more than one mask. Spot masking (or multi-masking) is done by applying different masks to different parts of the face all at once. For example, if your T-zone is oily, but your cheeks are dry, applying masks that address the specific issue in each area of the face can provide a super customized treatment that targets the issue without aggravating the rest of your combination skin. 

    Sensitive Skin

    Those with sensitive skin should carefully read labels and conduct patch tests for any new product before applying it all over the face. If you do have a reaction, you can apply the Calm Skin Arnica Masque to improve the look of redness caused by dryness and other irritation. 

    Normal Skin

    If you have normal skin, then your goal is to maintain your skin’s health. The Stone Crop Masque contains hydrating stone crop, antioxidant-rich lemon and other ingredients that reduce the appearance of wrinkles and improve the overall look of the skin. 

    If you’re looking to address particular skin concerns and conditions, here are some recommendations:

    The Best Type Of Face Mask For Your Age

    Now that you know what product suits you by skin concern, you can also filter based on ingredients suited to your age bracket.

    Still not sure which mask is right for you? A great way to test out some of our best-selling masks is with our limited edition Mix & Masque Trio Gift Set. Enjoy three of our most popular masks, designed to be mixed, layered together or explored individually to bring out refreshed and visibly rejuvenated skin. These three potent masks can be paired however you like to target your skin’s unique needs. Use each mask individually to reap its benefits or match in multiple ways to create your perfect masking ritual. Perfect for gifting to a loved one or to yourself!

    How Often Should You Use A Face Mask?

    Now that you know which masks are right for your skin, the next question is: How often should you apply a face mask? We recommend adding a face mask to your skin care routine once or twice a week. Masking should follow cleansing and toning. These steps clear impurities and excess oil, provide a base layer of hydration and prep your skin to better absorb the benefits of your face mask.

    Once you’re ready, follow these skin care tips to apply a face mask properly:

    1. Apply Mask Evenly

    It may be tempting to slather on an inch-thick layer of product, but more isn’t necessarily better. A cherry-sized amount is plenty to achieve the results you’re looking for. Natalie advises evenly applying this amount in a “pantyhose-thin” layer over the entire face. Pro tip: Use facial massage techniques to amp up the benefits of this part of your routine!

    Remember, Eminence Organics face masks contain concentrated amounts of beneficial vitamins and nutrients. We recommend adding two to three drops of water to your product and warming it between your hands before massaging it into your face — especially if the product is gel-based. This will allow for more slip, easier application and (bonus!) less product waste.

    2. Remember To Include Your Neck & Décolleté

    That cherry-sized amount is just enough to also include your neck and chest. These areas take on the visible signs of age much earlier than the face due to their exposure to environmental stress — and they’re easily forgotten in a skin care routine. Pay these areas a bit of extra attention by including them in your mask application.

    3. Leave On For 5 – 10 Minutes

    Most masks can be kept on for 5 – 10 minutes, but the duration can vary from mask to mask. Some face masks act quickly and can be removed after a short period of time, while others can be left on as an overnight treatment to deeply hydrate your skin while you sleep. We always advise reviewing the label directions to apply your particular product so you get the most out of it without overdoing it!

    4. Remove Gently With A Damp Cloth

    Don’t undo the benefits of your face mask by aggressively scrubbing it off. Instead, be delicate with your complexion. Use lukewarm water to gently remove the mask from your face. If you choose to use a washcloth, ensure it’s clean and has soft fibers that won’t irritate your skin.

    Watch this video for a step-by-step guide on how to apply a face mask:


    Are you wondering which masks to add to your skin care routine? Visit an Eminence Organics Spa Partner for recommendations.

    This article was originally written in September 2019.

  • Slow Cooker Vegan Italian Wedding Soup – The Foodie Dietitian

    Slow Cooker Vegan Italian Wedding Soup – The Foodie Dietitian

    Slow Cooker Vegan Italian Wedding Soup is a delicious and satisfying plant-based alternative to this classic comfort food. Plus, it’s super easy to make in the slow cooker.Slow Cooker Vegan Italian Wedding Soup is a delicious and satisfying plant-based alternative to this classic comfort food. Plus, it's super easy to make in the slow cooker.

    Steve and I have gotten into a nice pattern these past few weeks – it’s called slow cooker Sundays. Every Sunday morning/afternoon, we throw ingredients in the slow cooker, move on with our day and then have dinner ready for us in the evening as well as plenty of leftovers for the week ahead. As much as I enjoy cooking, I certainly don’t enjoy cooking everyday. That’s why I love batch cooking – making large quantities of meals to have leftovers for lunch or dinner for the week or to freeze for another time when we’re in a dinner pinch.

    I’m really looking forward to spring-like temperatures around the corner but I’m going to shed a tear when it comes time to bid adieu to the slow cooker until next winter (not saying you can’t use the slow cooker all year round but I tend to use it more during the winter months).

    I’m noticing another pattern too with my recipes on the blog – making all the plant-based versions of recipes I used to enjoy way back in the day before I stopped eating meat. Like my Vegetarian Buffalo Cauliflower Wing Dip that was a HUGE hit (oh, god I sound like Trump – HELP) for the Super Bowl this year and now this vegan version of Italian Wedding Soup.

    Slow Cooker Vegan Italian Wedding Soup

    I have vague memories of eating Italian Wedding Soup as a kid but what I do remember is being psyched that there was pasta and meatballs in a bowl of soup! Speaking of pasta, this recipe calls for acini di pepe pasta and when I told my husband what kind of pasta we needed, he said “oh yeah, pee pee pasta.” Still learning things about my husband after oh, 14 years of knowing the guy.

    I was reeeeeeeeallly satisfied with this recipe. It took two tests but I think we nailed it. Carnivore husband approved AND meat-eating friend who came over to watch the Oscars with us approved. So, there’s that. Did I mention that this soup is ultra satisfying? My mother recently called me the soup lady when I told her we were having this recipe for dinner (apparently she thinks we make a lot of soup…we do). But she doesn’t understand how we can just eat soup for dinner…which I always correct her that we’re having soup AND bread :). But when the soup you make is loaded with pasta, veggies and protein, it’s totally satiating. At least to my body it is. 

    Crock Pot Vegan Italian Wedding Soup

    I made chickpea meatballs for this soup recipe – so easy to make in the food processor and then sautéed ’em to brown ’em and finished them off in the oven. Really delicious flavor with the dried basil and parsley and umami flavor from the vegan parm cheese. Coupled with the savory flavor of the soup, I could eat bowls on bowls on bowls of this.

    So, before winter is over, bust out the slow cooker and make this soup! It’s comforting, satisfying and VEGAN!

    Print

    clock clock iconcutlery cutlery iconflag flag iconfolder folder iconinstagram instagram iconpinterest pinterest iconfacebook facebook iconprint print iconsquares squares iconheart heart iconheart solid heart solid icon

    For the soup:

    1 medium yellow onion, diced
    2 celery stalks, diced
    3 carrots, diced
    2 cloves garlic, minced
    10 cups vegetable broth
    10 ounces baby spinach
    1 cup acini di pepe pasta (or pastina/stars pasta)
    1 tablespoon lemon juice
    2 teaspoons salt
    1/4 teaspoon black pepper
    Extra freshly ground black pepper and vegan parmesan cheese for serving

    For the vegan “meatballs”:

    1 flax egg (1 tablespoon ground flaxseed and 2 1/2 tablespoons water)
    1 can chickpeas, drained and rinsed
    1/2 cup breadcrumbs + 2 tablespoons, divided (both panko and regular work fine)
    1/4 cup + 2 tablespoons vegan parmesan cheese, divided
    1 teaspoon dried parsley
    1 teaspoon dried basil
    1/2 teaspoon onion powder
    1/2 teaspoon garlic salt
    2 tablespoons olive oil

    For the soup:

    In the slow cooker, add onion, celery, carrot, garlic and vegetable broth. Cook on low for 5 hours.
    With 20 minutes left in cooking time, stir in the baby spinach and pasta. After 20 minutes, turn off the slow cooker, add lemon juice, salt and pepper. Serve with vegan meatballs and freshly ground black pepper and vegan parmesan cheese.

    For the vegan “meatballs”:

    Preheat oven to 375 degrees F.
    To make a flax egg, stir flaxseed with water and let sit in the fridge for 15 minutes, or until thickened.
    In a food processor, add chickpeas, 1/2 cup breadcrumbs, 1/4 cup vegan parmesan cheese, parsley, basil, onion powder, garlic salt and flax egg. Pulse to combine.
    Mix 2 tablespoons breadcrumbs and 2 tablespoons vegan parmesan cheese in a small bowl.
    Roll chickpea mixture into small balls (about 1 tablespoon mixture each) and roll in the breadcrumb/cheese to coat.
    In two batches, heat 1 tablespoon olive oil in a nonstick pan over medium high heat. Saute balls for 5-7 minutes, or until browned.
    Transfer sautéed balls to a parchment-lined baking sheet and bake for 15 minutes.
    Serve vegan meatballs on top of soup.

    Slow Cooker Vegan Italian Wedding Soup is a delicious and satisfying plant-based alternative to this classic comfort food. Plus, it's super easy to make in the slow cooker.

    Also, I just wanted to thank you guys from the bottom of my heart for the prayers and good vibes and well wishes for my Dad. They helped! His surgery and recovery went well and his path reports are clear! Thank you for the support and love. xoxoSt Patricks Day Giveaway Rect-1And now for the super exciting news! I’m partnering with a group of amazing bloggers this month to give away a $700 gift card to Amazon! Think about ALL THE THINGS you can buy with $700! Here’s to hoping that Irish luck is on your side for this St. Pat’s Amazon giveaway! The giveaway runs through March 15th (11:30 PM) so you’ve got about two weeks to enter. Good luck!
    a Rafflecopter giveaway

  • Dietitians’ Review Of These Kids’ Vitamins

    Dietitians’ Review Of These Kids’ Vitamins

    Hiya Vitamins: Dietitians’ Review Of These Kids’ Vitamins


    Privacy & Cookies Policy


  • What To Do About Your Aging Neck

    What To Do About Your Aging Neck

    We are all guilty of giving our face most of the attention during our skin care routines. We carefully apply masks, serums and moisturizers to the space between our hairlines and our jawlines, neglecting the delicate skin around our necks. Not to be ignored, the neck has thinner, more fragile skin than the face, making it especially vulnerable to signs of aging. Luckily, there are a few things you can do to minimize and prevent the appearance of fine lines, wrinkles and sagging around this delicate area.

    How To Get Rid Of Neck Wrinkles

    Like other body parts that can develop wrinkles and age faster than your face (knees, elbows and hands, we’re looking at you) the neck is often an afterthought when it comes to skin care. Whether the wrinkles or lines that crop up around our neck are the result of too much sun or too much screen time, aka “tech neck,” we’ve gathered some easy solutions for you to treat signs of aging on your neck. First up, gua sha techniques! 

    Gua Sha For Neck and Face  

    Eminence Organic Skin Care International Educator, Brian Goodwin, tells Skin Inc.: “Gua sha is designed to minimize the appearance of fine lines and wrinkles, reduce inflammation and sculpt the face and neck, which is why it has become such a popular addition to daily skin care routines. In addition to helping reduce deep-set neck lines, gua sha can also be used to reduce tension in our necks, while relieving puffiness by moving fluids and improving lymphatic flow. This is a great technique for targeting the fine lines and wrinkles on the neck and chest, as it can easily be incorporated in the treatment room or in an at-home routine.”

    Watch Lead Skin Care Trainer Natalie Pergar demonstrate how to use a gua sha tool to massage the face and neck here: 

    You can also follow these steps:

    Start by cleansing your face and neck
    Apply 4–10 drops of your preferred facial oil
    Scrape the tool up your neck on both sides
    Next, sweep from the middle of your chin up your jawline
    After this, sweep over your cheeks finishing at the hairline
    Sweep over your eyebrow and up towards your hairline
    Sweep from between the eyebrows up towards the hairline
    Finally, sweep from the middle of your forehead to the hairline
    Repeat on the other side of your face
    Make sure to sweep each area between 3–10 times before moving on to the next part of the face

    Our intensely hydrating and skin-protecting Rosehip Triple C+E Firming Oil boasts three of gua sha’s favorite oils: jojoba, rosehip and seabuckthorn. Rich in essential fatty acids that help problem skin and promote hydration and elasticity, Rosehip Triple C+E Firming Oil not only feels good, it’s good for your skin. And if you’re thinking about trying the oil, now is a great time. The limited edition Rosehip Oil & Gua Sha Gift Set includes a full-size Rosehip Triple C+E Firming Oil, plus a gua sha tool. Made from natural aventurine, each Eminence Organics gua sha tool has its own unique shade, markings and beauty. Makes a great gift for your beauty-obsessed friends or yourself this holiday season!

    Moisturize For Hydration

    Hydration is key to preventing and reducing the appearance of fine lines and wrinkles. We suggest using our Monoi Age Corrective Night Cream for Face & Neck before heading to bed. After cleansing, apply this luxurious night cream to the skin, starting from the collarbone and working your way to the jawline in fluid, upward motions. Enriched with monoi, shea butter and our exclusive Argan Stem Cell Complex, this deeply hydrating moisturizer nourishes and replenishes the area overnight, leaving you with skin that appears smoother, softer and more youthful.

    Happy customer Gwen called it a “Winner!” in her online review, saying: “I use it nightly and the results are clearly visible, particularly under my chin where my skin is a little loose and starting to look crepey. It smells lovely and feels great … this will be my go-to moisturizer from now on!”

    Give Your Skin An Instant Lift

    Some days, your skin needs an extra boost. For results you can see instantly, we suggest using our Hibiscus Ultra Lift Neck Cream. Apply it under your usual daytime moisturizer to tighten the look of the skin in the neck and décolletage area. A blend of hibiscus and botanical hyaluronic acid enriches and hydrates the skin, while all-natural active ingredients like paprika and edelweiss revitalize sagging skin, smoothing away the appearance of wrinkles.

    Another ingredient that Brian recommends is bamboo, saying: “Products rich in bamboo can also benefit clients concerned about collagen loss and sagging skin, as the naturally occurring silica found in bamboo is packed with healing and regenerative ingredients like fiber, minerals and proteins that protect against common factors that contribute to aging skin.” Applying our Bamboo Firming Fluid down the neck and décolletage can help the skin to appear firmer and tighter, as can adding the Bamboo Age Corrective Masque to your routine 2–3 times a week. 

    Stretch It Out

    Stretch your neck daily to tighten weak muscles, stimulate blood circulation and allow greater oxygen flow and nourishment into your skin cells. Try these simple stretches to keep the skin around your neck looking smooth and wrinkle-free:

    Tilt your head back. Press the tip of your tongue to the roof of your mouth and swallow. Repeat with your head tilted to the right, then with your head tilted to the left.
    Place your fingertips at the base of the neck and lightly pull the skin downwards while slowly tilting your head back. Hold for a few seconds, tilt your head back towards your chest and repeat.

    Are you looking to help improve the appearance of the skin on your neck? Visit your nearest Eminence Organics Spa Partner to find out how. 

    This article was originally written in September 2016.

Padişahbet Giriş
Crypto Casino
Padişahbet Güncel Giriş
Betnano Giriş
Padişahbet
new online casino
Padişahbet Giriş