Category: Latest Articles

  • OMG! Find Out Why This Skin Sin Is Now Trending

    OMG! Find Out Why This Skin Sin Is Now Trending

    Sleeping in makeup?! No way, we all know better, right? But at one point or another, we’ve all been there – including yours truly. After a late night out, a long work day, or just flat-out forgetfulness, falling asleep with makeup on is something we’ve all come to know. But what if I told you that this age-old skin sin is now something not only trending but even encouraged? As we make our way into 2024, I expect we will be seeing a surge in what they say is lightweight, “sleep-safe” makeup products that are “infused with skincare ingredients.” Now, are these actually safe for your skin? I’ve got thoughts!

    So, What Does Sleep-Safe Makeup Entail?

    Tinted sunscreens have been around for a while now and, when applied correctly, are a popular way of obtaining both even-toned skin (from the tint given off by makeup) AND sun protection with skin-safe ingredients. So, it’s no surprise that brands started looking for ways to make all makeup products like this. From color-correcting balms to hydrating blushes, and even skin tint serums, it’s hard not to find interest in a beauty routine entirely composed of potential skincare benefits. 

    The downside is that you can’t be sure that your skin isn’t going to still face reactions to extended wear of these products. I also think it’s important to be cautious that the term “sleep safe” or some other variant might be more of a marketing tactic rather than a scientifically proven concept (this is where common sense comes in!).

    The Reality Of Sleeping In Makeup

    We’ve all been told countless times (from me and most all skincare experts!) that sleeping in makeup can bring on an array of skin concerns. The thing is, the issue isn’t technically the makeup formula, but rather the length of time that makeup is on the skin without washing. When your skin is unwashed for 24 hours, that leaves a lot of oil and debris build-up that can clog your pores and lead to bumps and breakouts. This is why it is critical to wash your face morning and night, whether you wear makeup or not. 

    What’s a good solution? As I talk all about in this blog post, If you wash your skin and do your routine right before you go out at night, then sleep with your makeup on but wash it again first thing when you wake up, then wearing makeup for 12 hours (the same general length of time you do during the daytime) should be fine. Of course, I wouldn’t do this all the time but this is a strategic way of going about it if you think you’ll be too tired when you get home after a late night.

    And of course, you absolutely need to be using a well-formulated makeup-removing cleanser

    Next up, how a Skin Hiit will transform your skin!

  • Crockpot French Toast Casserole (Gluten-Free Option)

    Crockpot French Toast Casserole (Gluten-Free Option)

    Crockpot French Toast Casserole (Gluten-Free Option) – The Real Food Dietitians


    Privacy & Cookies Policy


  • I Tried Facial Cupping And Here’s How It Went

    I Tried Facial Cupping And Here’s How It Went

    As a beauty writer, I’ve never met a facial gadget or treatment that I wasn’t game to try. I’m always down to test out the newest and most viral beauty trends, tools and ingredients. And while there seems to be a buzz-worthy new product or device introduced every day, sometimes it’s the ancient tools and methods that come back into the spotlight and remind us why they’re still around. So when I was tasked with testing out the centuries-old art of facial cupping, I was excited to see what all the buzz was about.

    What Is Cupping? 

    Cupping is a form of therapy that uses suction to stimulate skin, muscles and blood flow. Dating back hundreds of years, it is a practice that is deeply ingrained in Traditional Chinese Medicine but has also been traced back to ancient Egypt. It can be done on the face and the body to treat pain, relieve muscle tension and reduce swelling and water retention. According to Traditional Chinese Medicine practices, cupping improves the flow of “Qi,” the Chinese word meaning “circulating life force” or “energy.” In other words, it’s a revitalizing treatment that can reduce pain and swelling (puffiness) by stimulating the tissue just below the skin to help move excess lymphatic fluids and toxins.

    How Is Cupping Performed? 

    My first introduction to cupping therapy was in the early 2000s when photos of celebrities walking red carpets with big, circular red marks exposed on the skin of their backs went viral. While these circles looked like the result of something mysterious (and painful), word quickly spread that these were in fact the result of an ancient form of therapy called cupping. 

    The body treatment uses glass cups suctioned to the skin by negative pressure created with an ignited material. In other words, a tiny fire is lit inside the opening of a round glass cup and the partial vacuum created by the removal of oxygen from the cup draws (sucks) the skin tissue into the cup, and the cup is left to sit for several minutes. The cupping method works by stimulating and promoting the free flow of Qi in the meridians (energy highways). This creates blood flow, thus eliminating the stagnation that may be causing pain from a deeper layer in the muscle. By creating this suction and negative pressure, cupping may drain excess fluids and toxins, loosen adhesions, lift connective tissue, bring blood flow to sluggish skin and muscles and stimulate the peripheral nervous system.

    With that in mind, I was a little nervous about performing facial cupping on myself. What if I ended up with big red welts all over my face? Fortunately, the possibility that I would end up with bouncier, brighter, more glowy skin outweighed any of my trepidation. 

    Facial Cupping 

    While the concept is the same, facial cupping is done with silicone cups that suction to the skin with no heat or glass involved. The treatment is said to have a powerful effect on microcirculation, detox and lymphatic drainage. In other words, my dark circles and puffy undereyes will be replaced by soft, glowy and smooth skin if all goes well. The motion of the cup is said to circulate and drain toxins that build up under the skin — in the same way lymphatic massage and gua sha can stimulate the detoxing of stagnant fluids (aka puffiness). 

    As facial cupping is becoming more popular, it’s definitely easier to find a practitioner who performs it. My Chinese Medicine doctor has been doing it for years and sees benefits with her patients who “want to try more natural treatments to help revitalize their skin and … maybe soften lines and wrinkles.” Because it’s non-invasive, many patients like the idea of trying it since it’s more gentle than, say, injectables and laser treatments. One quick warning, though, whether you’re doing it at home or at a spa, wait four to six weeks post Botox or filler. 

    DIY Facial Cupping

    Always consult a professional before starting any new skin care treatments or techniques.

    I ordered a set of rubber cups online. The package included two large cups and two small ones — more like a cone shape than a “cup” and thick but pliable — in other words, very different from the glass balls I’d seen used on the body. The large cones were designed for the majority of the face — like the cheeks, forehead and jawline — and the small ones for the more delicate skin around the eyes. I watched a few YouTube videos to get a feel for the process and felt ready to give it a try. 

    I started with a cleansed face. Next, I applied a light layer of face oil. I decided to go with the Facial Recovery Oil, which is one of my favorites and a texture that I thought would work — not too thick, not too thin, just the right amount of glide. The big caution I gleaned from my research was that the cup is never to stay in one place, but rather to be moved (slid) from start point to end point to avoid creating those red bruise-like marks. This is why it’s important to choose the right oil. Then it was time to start the process. A bit nervous, I stuck the first cup to my cheek, held my breath (not recommended) and got to work. 

    I don’t know what I expected, but I was pleasantly surprised. I squeezed the cone between my thumb and index finger and touched it to my skin. While I felt a tight suction, it wasn’t overwhelming or painful. At the first sensation that the cone was properly adhered to the skin, I started sliding it up the contours of my face. I began at my chin and moved up my jawline to my earlobe, repeating the same motion about 10 times (only moving up, never down). Then I did the same from the outer corner of my lip to the top of my cheekbone and then from the apple of my cheek up to my temple. Next, I switched to the smaller cone and started on the inside corner below my eye and swiped out toward the temple. Again, with slow, repeated motions, concentrating on one area at a time. And finally, I switched back to the bigger cone and slid down from my temple, under my chin to the important chain of lymph nodes on the neck and collarbone. This action may help drain lymphatic fluid. Then I repeated the entire process on the other side. 

    I immediately noticed energy, almost like I could feel the fluids being released and moving through the pathways under my skin. Nothing aggressive or painful at all, just a flow. I guess my Qi was activated. 

    The Results

    When I was done, I took a closer look in the mirror and was pretty impressed by my handiwork. My skin was flushed in a good way — rosy and glowy. And I think my face looked lifted and taut, especially my jawline. But I think the biggest change I noticed was the way the skin under my eyes was plumped and smooth. The bags were gone and I looked refreshed and bright, like I’d had 10 hours of sleep and zero glasses of wine last night!

    Before                                                      After

    Side Effects

    I guess the redness could be considered a side effect, but it’s a welcome one. While the glow and “lift” lasted all day, the rosy hue was gone in about an hour. But I will say that I can see how this DIY treatment could go awry. When my phone rang and threw off my rhythm, I let the cup sit still on my cheek for a few seconds and a faint red circle formed underneath. It wasn’t painful and it faded within minutes. 

    Next Steps

    Many of the YouTube tutorials I watched recommended combining facial cupping with gua sha — another ancient practice that plumps the skin, stimulates lymphatic flow and amps up the detoxification process. The two practices together (on alternate days or one after the other) complement each other nicely and keep the puffy eyes and the look of fine lines and wrinkles to a minimum. 

    My Final Verdict

    Treating puffy eyes, adding plumpness where fine lines existed, giving my skin a rosy glow and achieving a youthful, awake and radiant complexion are the benefits I saw. Not bad for literally five minutes of my morning. I’ve been alternative between the Facial Recovery Oil and the Rosehip Triple C+E Firming Oil, and a few weeks into my new routine, I feel like my skin has a more vibrant appearance and that any dullness is gone. I’m also less puffy, especially under the eyes, which is a big deal. Overall, my face feels reenergized, refreshed and lifted. I’ll take it. I will definitely continue to carve out time in my morning routine to make this happen. 

    Have you tried facial cupping or other treatments that could help lift and revitalize your skin? Let us know in the comments below or tell us on social media.

  • Skin HIIT – A Skin Barrier Breakdown Workout for Your Skin

    Skin HIIT – A Skin Barrier Breakdown Workout for Your Skin

    Skin barrier breakdown? Yep, that’s right – and we want that to happen in the way of fully drying out the skin’s barrier to encourage the peeling process. Let me explain. Since people are continually trying to mimic professional treatments at home, and a favorite of estheticians is a chemical peel, I predict at-home skin peels will be big in 2024 and I’m happy to encourage people how to do so.

    The concept of a HIIT workout (high-intensity interval training) is all about working really, really hard and then recovering. It’s the “no pain, no gain” philosophy. This concept can be applied to driving results for your skin, too! 

    How To Do A #SkinHIIT Workout At Home

    Night #1- Break Down Your Skin’s Barrier

    Step 1: Start by prepping the skin with the application of a chemical exfoliating skin peel (like Triple Berry Smoothing Peel) to dissolve and digest surface dry cells. Leave this on for 10 minutes and then rinse off. 

    Step 2: Next, use a gentle exfoliating facial scrub (like Triple Berry Smoothing Scrub) to physically buff and lift off any remaining dry cells. 

    Step 3: Finally, apply a generous layer of the strongest retinol or retinoid that you have access to. Do not apply moisturizer since the goal is we want to get the maximum skin barrier-breaking benefits. (Remember, no pain no gain!)

    Night #2 – Break Down Your Skin’s Barrier Again

    Repeat the above steps.

    What You Can Expect

    Within two days, your skin should be in full peeling mode (yes, actual dry, peeling skin which is the “no pain, no gain” goal that we are trying to achieve!) to shed dry, pigmented skin cells. Then, go easy on your skin for a few days and let your skin repair and recover.

    If you want a guided video tutorial from me on how to do a full-on 7-day SkinHIIT, I highly recommend you do my 7-Day #ObeyRenee Challenge! This is a lengthier, more extensive version of the above SkinHIIT that is designed to give your skin a complete reset and bring you your best glow yet!

    I predict at-home treatments are going to be big in 2024, and what’s easier than a skin treatment consisting of products you probably already own?

    Next up, could algae be the skincare ingredient your skin has been searching for?

  • Top 2 Ways To Help Manage Type 2 Diabetes

    Top 2 Ways To Help Manage Type 2 Diabetes

    by Caitlin H,

    Nov 27, 2023

    Managing Type 2 Diabetes

    Type 2 diabetes happens when too much sugar in the bloodstream disrupts the body’s ability to process it correctly, leading to immune, nervous, and circulatory conditions like heart disease, nerve damage, eye and hearing impairments, skin conditions, sleep apnea, and long healing times.

    If you are living with Type 2 diabetes, there’s a good chance you know how critical a healthy lifestyle is to manage the condition.


    A Nutritional, Healthy Diet


    Eating a balanced, well-rounded diet is one of the most important ways to manage the condition. Several studies point to how a poor diet consisting of refined sugars and unhealthy fats is directly correlated with a significant rise in people with Type 2 diabetes.

    Unfortunately, getting proper nutrition can be challenging, particularly since your diet is likely one of the factors that led to your Type 2 diagnosis. Thankfully, Diet-to-Go can help with the eating part! Our Balance-Diabetes menu aims to help you control blood sugar naturally with meals that are:


    Calorie-controlled and nutritionally balanced
    Heart-healthy — controlled for sodium, carbs, fat and cholesterol


    In fact, U.S. News & World Report named us on its list of the Best Diabetic Meal Delivery Services for 2023, saying our “Balance-Diabetes plan…is designed for people who have diabetes or prediabetes and are using food to help control their condition. It suits most diabetics and follows the American Diabetes Association’s recommendations.”

    If you know you want to eat better but aren’t sure where to begin, many of our customers have found success with losing weight* and managing their diabetes with our meal plans.


    Regular Exercise (Particularly in the Afternoon)


    Activity is helpful for everyone, but you really need to make it an essential part of your life if you want to manage your Type 2 diabetes better.

    While getting 20-30 minutes (or more!) of fitness is a good idea any time of day, you may be among the many people who find it nearly impossible to fit a workout into your busy mornings.

    That may be even less of a bad thing than you realize. In fact, a recent study published in Diabetes Care found that afternoon exercise elicits the most prominent results for controlling blood glucose levels. In addition, the researchers found that of the 2,400 study participants (people who were considered overweight or obese and had Type 2 diabetes), those who regularly exercised in the afternoon were also more likely to stop having to take their medications.

    So, if waking up at the crack of dawn to work out isn’t your particular cup of tea, that’s more than okay. Here are some fun afternoon exercise ideas, the kinds of activities perfect for doing after work or early in the evening:


    Go for an hour-long walk: Choose a different path or park and prioritize going at least four days a week. Making it into a meditation walk has the added benefit of helping you manage stress, another essential lifestyle factor for people with Type 2 diabetes. If you go right after leaving work, you can use the time to miss rush hour!
    Sign up for an evening fitness class: You’ll likely be in good company at any number of evening fitness classes, whether it’s yoga, cycling, dancing, or kickboxing. Most fitness classes tend to be busier in the evenings, allowing you to make new friends and stay motivated!
    Do a water activity: If you live near a lake or reservoir and the weather is suitable for it, things like kayaking, paddle boarding, wake-boarding, canoeing or swimming are an exciting, fun way to get in a fitness session — often without even thinking about it!
    Turn on a YouTube video at home: Whether you just walked in the door after a day at the office or shut down your computer in your home office, a YouTube video workout is an excellent way to unwind and transition from work mode to relaxing mode.

    Need more inspiration? You can find many other fitness ideas and insights in the Exercise Tips section of our blog.

    When you take steps toward improving your eating and exercise habits, you’ll likely see the effects of your diabetes taper down, too. Be sure to schedule regular checkups with your doctor and learn how to track your A1c levels. You should also manage your stress levels, avoid nicotine products, and limit alcohol.

    With a positive mindset and a sprinkle of determination, you can make these high-priority tasks a regular part of your life — and will likely see your health improve as a result!

    ————————————————————————————

    Author: Caitlin H
    Diet-to-Go Community Manager

    Caitlin is the Diet-to-Go community manager and an avid runner. She is passionate about engaging with others online and maintaining a healthy, active lifestyle. She believes moderation is key, and people will have the most weight loss success if they engage in common-sense healthy eating and fitness.

    Lifestyle/Wellness

  • Gingerbread Oatmeal | Kara Lydon

    Gingerbread Oatmeal | Kara Lydon

    This gingerbread oatmeal is a perfect cozy breakfast for the holidays! Made on the stovetop with quick steel cut oats, cinnamon, ginger, and molasses for a delightful (but not too sweet!) gingerbread taste.Gingerbread Oatmeal in a white speckled bowl garnished with pecans, yogurt, and cinnamon, with a silver spoon and tan coffee mug

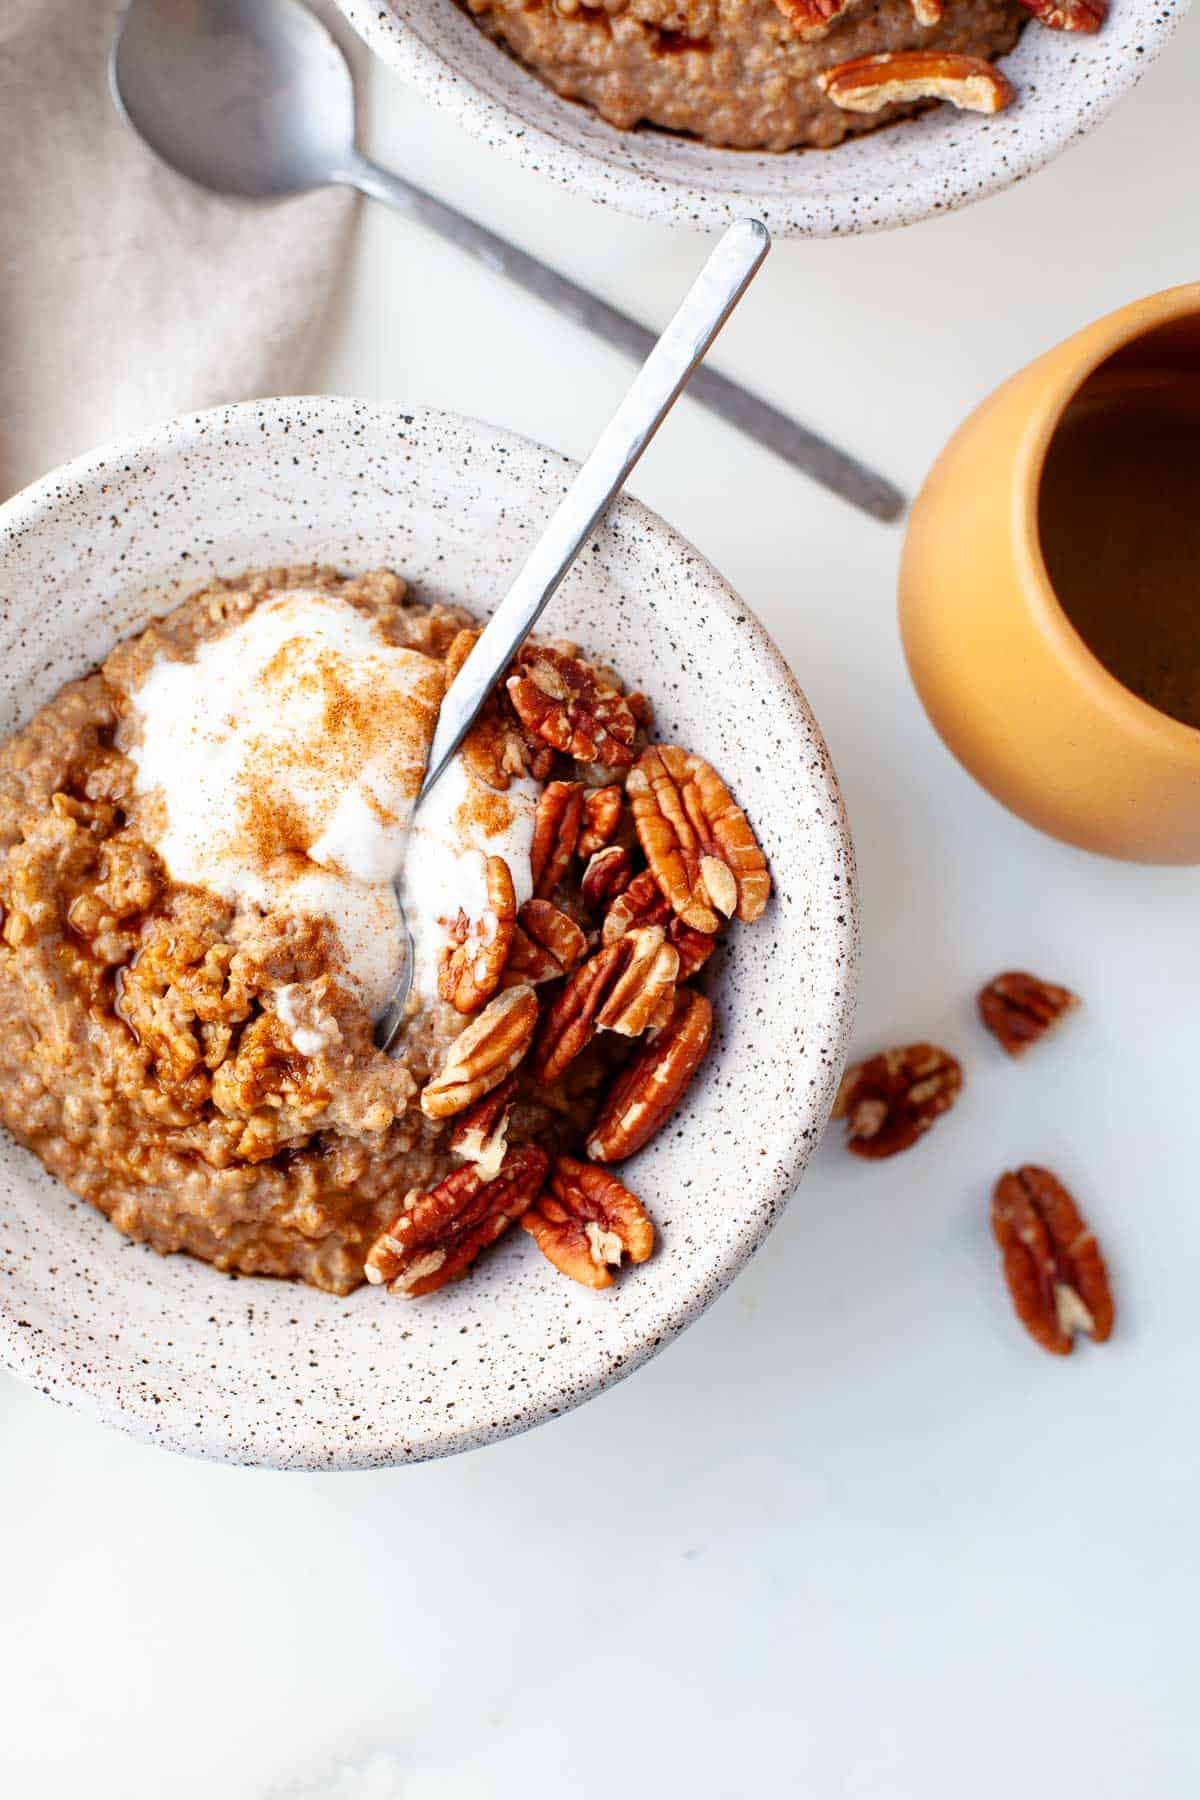
    Why I Love This Recipe

    I love gingerbread during the holiday season. I just can’t get enough of those delicious warming spices like cinnamon, nutmeg, allspice, cloves, and ginger this time of year. 

    I also adore oatmeal and find that it’s a perfectly satisfying and cozy breakfast. Plus, it’s so easy and quick to make. This Gingerbread Oatmeal is no exception.

    Ready is less than 15 minutes, this oatmeal is sure to give you all the wintery, holiday, cozy feels. Its sweet and spicy flavor profile reminds me of fresh gingerbread cookies but in a creamy, breakfast form. Think warm winter spices and a perfect balance of spicy ginger and sweet molasses.

    It’s also got juuuust the right amount of flavor and sweetness – enough that you notice and enjoy it but not too much that it overpowers the dish and you can’t even finish the bowl! 

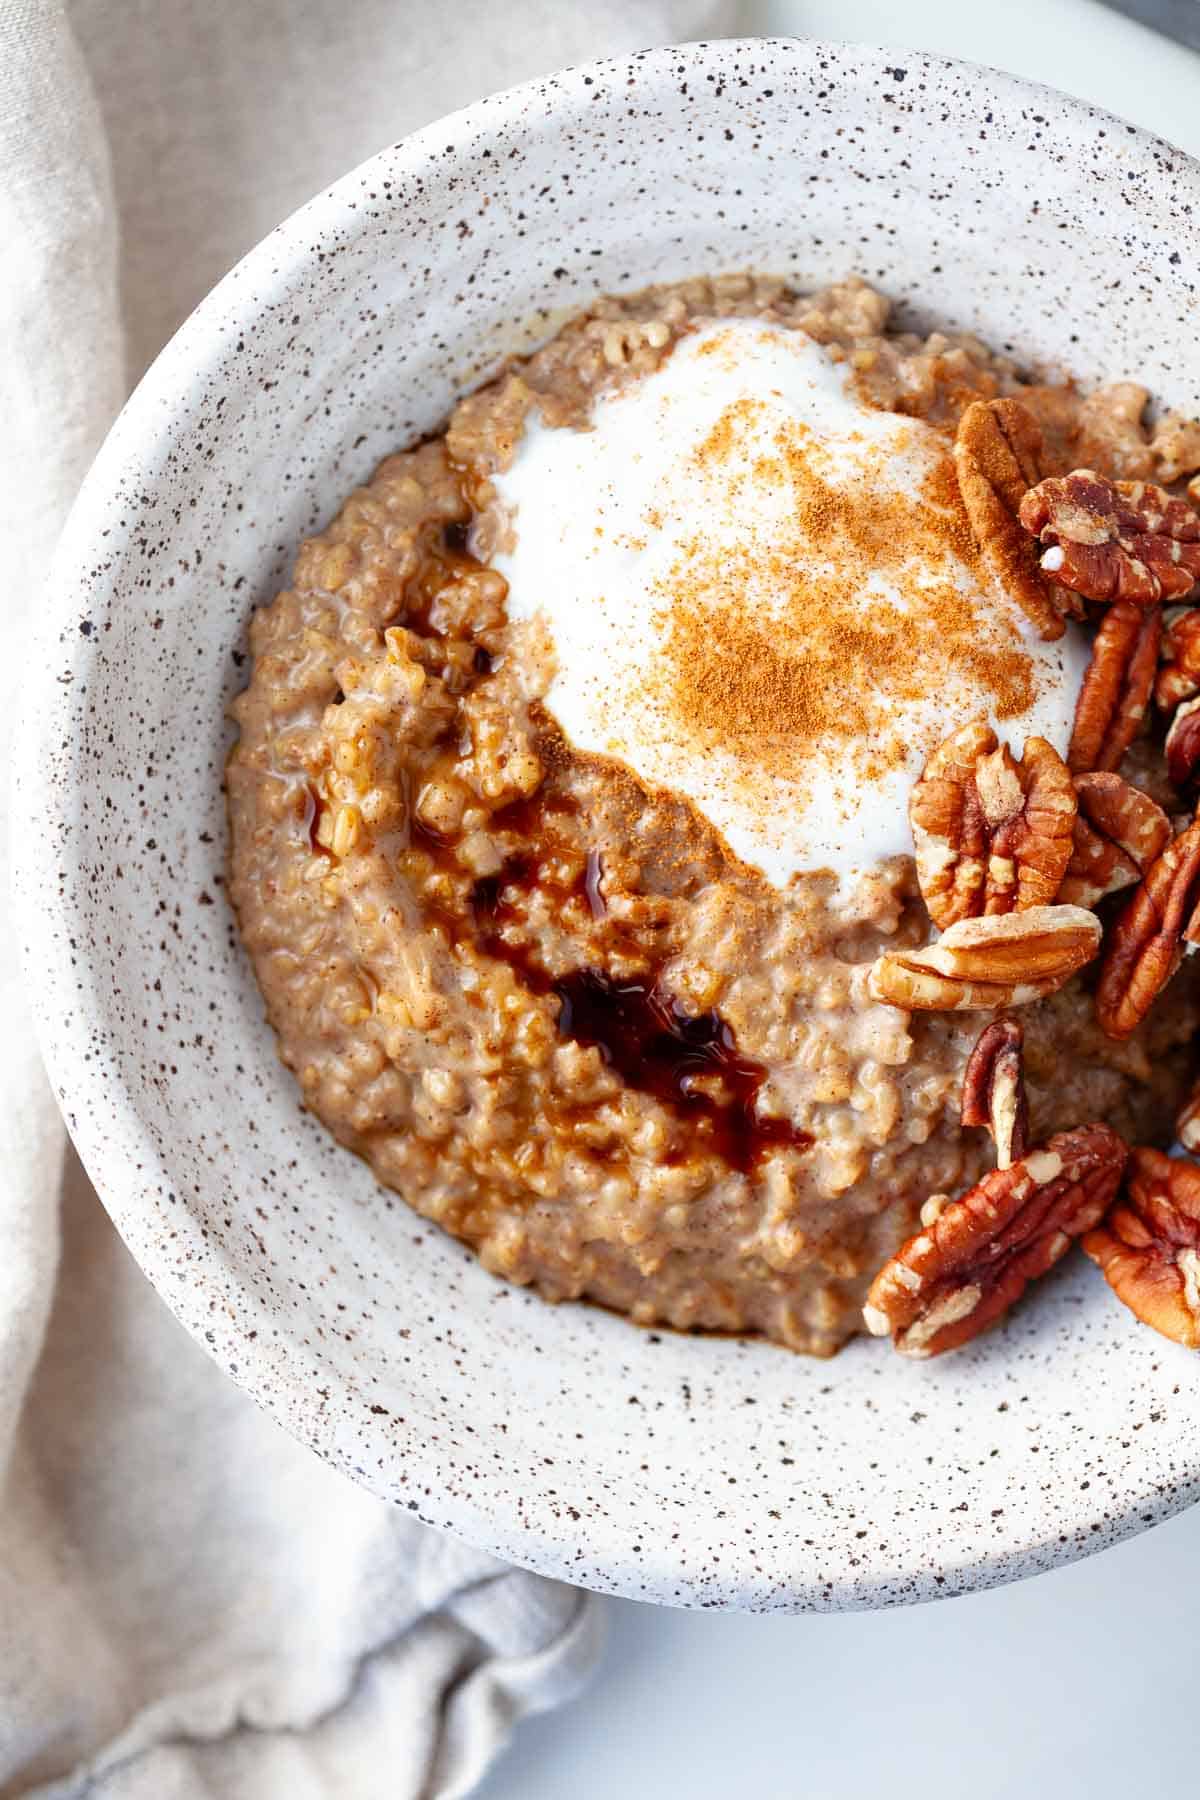
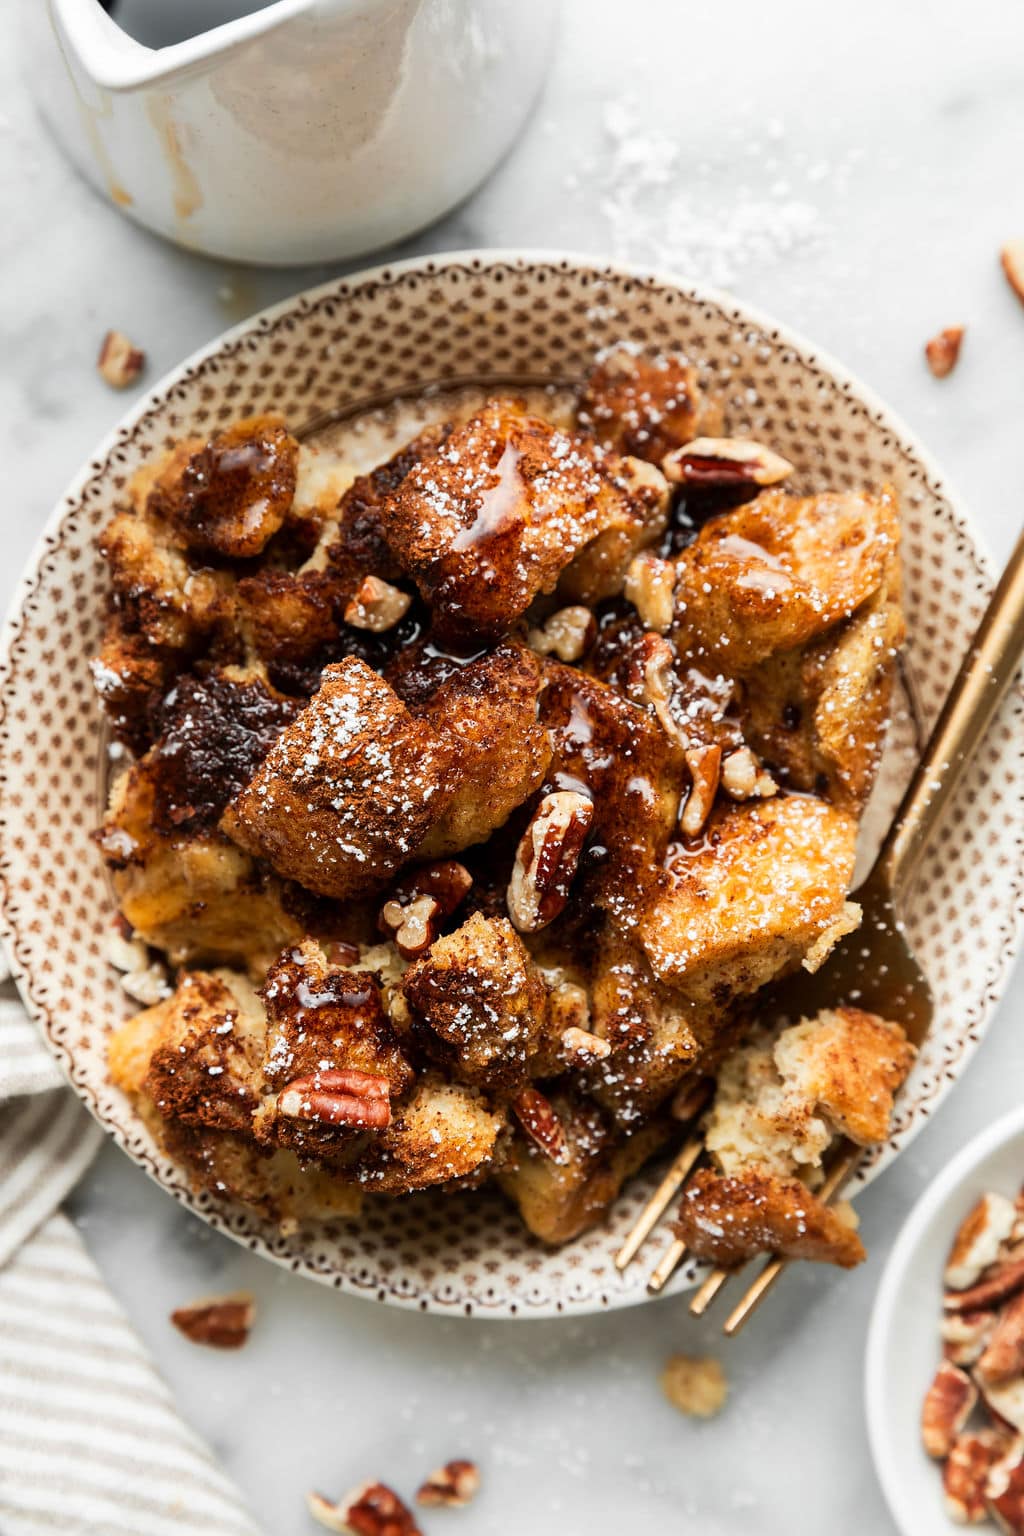
    It’s both hearty and filling, and I like to top it off with yogurt and/or chopped pecans to make it even more satiating. 

    If you love gingerbread as much as I do and dig make-ahead breakfasts, I suggest you also check out my Gingerbread Baked Oatmeal!

    Ingredients You’ll Need

    graphic of ingredients for Gingerbread Oatmeal on marble surface with black text overlay

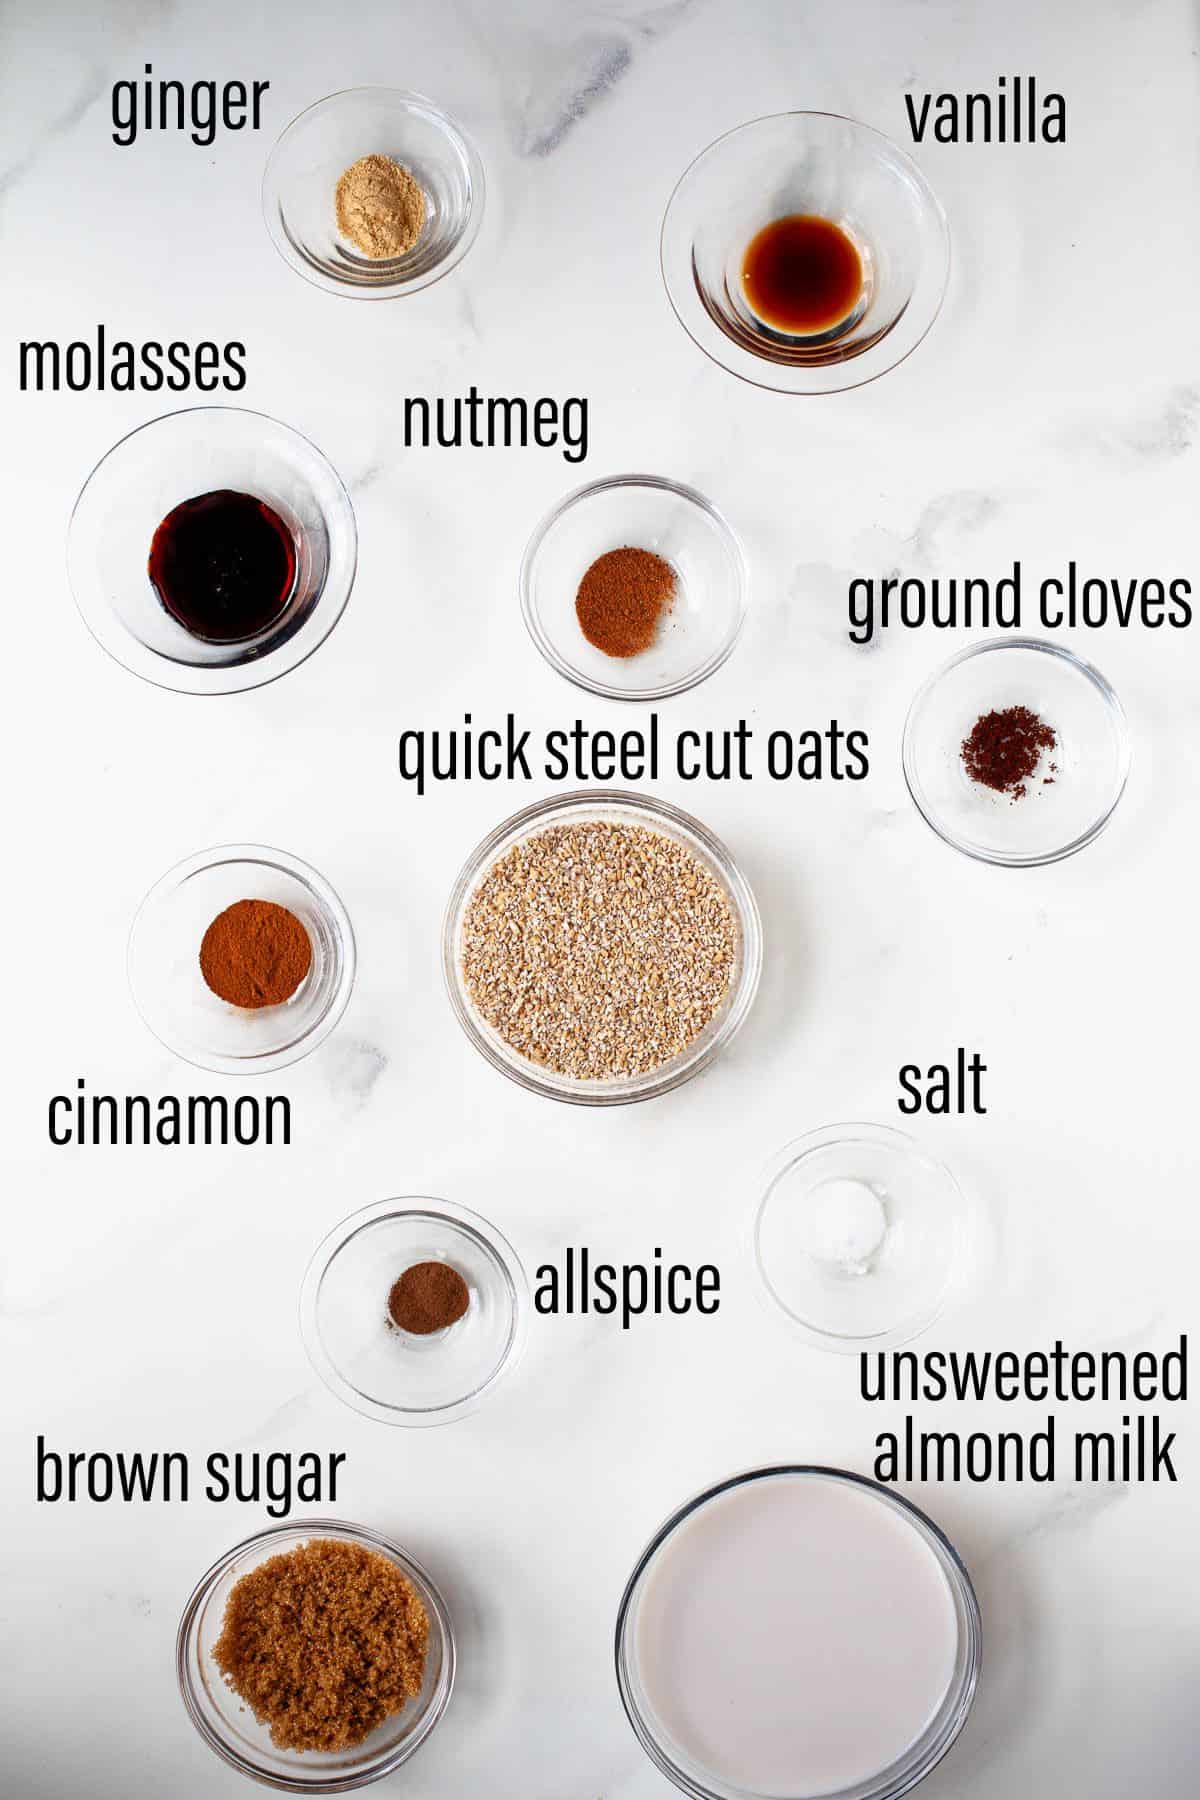
    Notes on Ingredients

    unsweetened almond milk: I use almond milk for its mild, neutral taste when cooking and baking, but you can use any type of regular dairy or non-dairy alternative in this recipe.

    quick steel cut oats: I use quick steel cut oats in this recipe but you can also use any type of oats – steel cut are my favorite for their creamy texture but you can use regular steel cut oats or rolled oats too. Steel cut oats will take about 30 minutes to cook.

    cinnamon: the perfect warm, cozy flavor 

    ginger: mildly spicy yet sweet

    allspice: slightly earthy, bitter, and fruity 

    ground cloves: adds a subtly sweet flavor and warmth

    nutmeg: provides a nutty, slightly sweet and woody flavor

    salt: flavor enhancer

    vanilla extract: adds a touch of sweetness

    molasses: contributes to the classic gingerbread flavor! You can always add more molasses if you like your oatmeal sweeter

    brown sugar: sweetens up the oatmeal. Feel free to substitute with coconut sugar or maple syrup depending on what you have on hand

    Equipment You’ll Need (affiliate links – if you make a purchase I receive a small commission)

    Medium pot

    How to Make Gingerbread Oatmeal

    step by step graphic of how to make Gingerbread Oatmeal

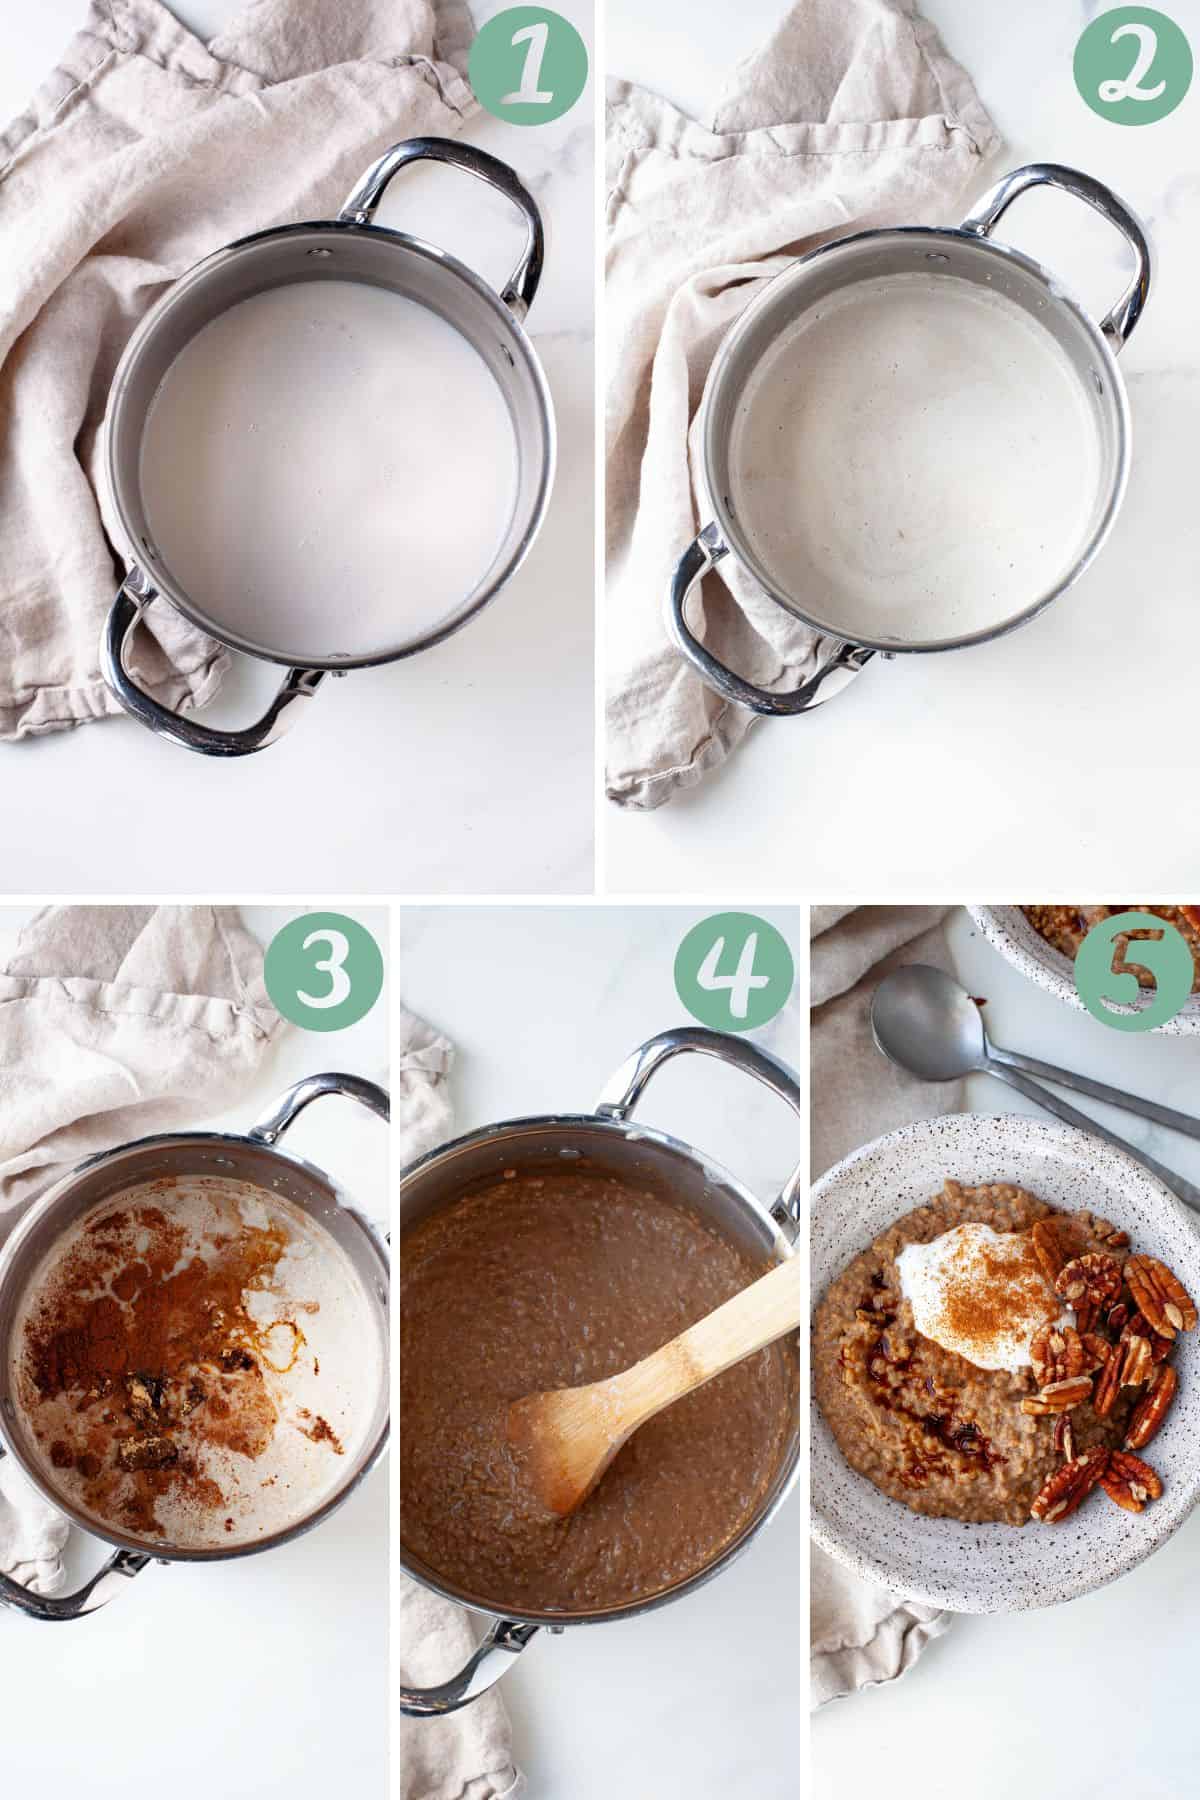
    Heat milk. Pour milk in medium pot and bring to a boil.
    Stir in oats. Once the milk has boiled, lower heat to medium-low and stir in oats. Cook until mixture begins to thicken, about 3-4 minutes.
    Add spices and other ingredients. Stir in cinnamon, ginger, allspice, ground cloves, nutmeg, salt, vanilla, molasses, and brown sugar, until combined with oats.
    Cook oats. Continue cooking until oats reach desired texture, about 7-10 minutes.
    Top off and enjoy! Top with pecans, yogurt, or other desired toppings and enjoy!

    Expert Tips

    Quick steel oats can be replaced with regular steel cut oats or even old-fashioned oats if you prefer. Note that cooking times may vary. Regular steel cut oats will take about 30 minutes to cook.
    Oats are naturally gluten-free but may contain traces of gluten from cross-contamination in the manufacturing facility. Be sure to use certified gluten-free oats if you have a gluten allergy.

    Recipe FAQs

    How do you sweeten oatmeal without sugar?

    Oatmeal can be sweetened with maple syrup, honey, extracts, spices like cinnamon and nutmeg, nut butters, fresh fruit, and in this case molasses! 

    Why is my oatmeal not creamy?

    Be sure to stir your oatmeal often as its cooking and don’t keep the heat too high. If the heat is too high, the oatmeal will thicken up quickly and burn, sticking to the bottom of the pot.

    If you find that your oatmeal is too watery, chances are you added too much liquid or aren’t letting it cook long enough

    I find that bringing the liquid to a boil first, then adding the oats and lowering the heat helps achieve a creamy consistency. 

    What’s the difference between quick oats and old-fashioned oats?

    Quick oats are very similar to old-fashioned oats but are cut into smaller pieces to allow them to cook faster. Feel free to use any type of oats you have on hand in this recipe but note that cooking times may vary, and you may want to add more or less almond milk accordingly.

    Two white speckled bowls filled with Gingerbread Oatmeal topped with yogurt, pecans and cinnamon, beside two orange coffee mugs, a small bowl of pecans, and a kitchen dish towel

    Storage and Preparation

    Gingerbread Oatmeal leftovers can be stored in an airtight container in the refrigerator for up to 3-4 days and in the freezer for up to 3 months.

    To reheat leftovers, heat in the microwave for 60-90 seconds with a splash of almond milk (or milk of preference).

    Recipes That Pair Well

    Air Fryer Eggs

    Pomegranate Smoothie

    Asparagus Leek Quiche

    Chocolate Peanut Butter Oatmeal Smoothie

    Veggie Egg Bites

    Gingerbread Oatmeal in white speckled bowl topped with yogurt, pecans, molasses, and cinnamon.

    For more gingerbread inspiration, check out my other recipes below! 

    Gingerbread Pancakes

    Gingerbread Baked Oatmeal

    Gingerbread Granola Bars

    Gingerbread Bread Pudding with Eggnog Sauce

    Raw Vegan Gingerbread Truffles

    No Bake Mini Gingerbread Cheesecakes

    If you like this recipe, please be sure to comment and give it a 5 star rating below. If you make it, share it on Instagram and tag me @karalydonrd and I’ll re-share it with my followers! If you want to save this recipe for later, be sure to pin it on Pinterest!

    Don’t ever miss a recipe! Sign up to receive my monthly newsletter with a round-up of recipes from the previous month and get my FREE guide when you sign up: Rediscover the Joy in Eating: 5 Simple Steps to Stop Stressing Over Food + Enjoy Every Bite

    Print

    clock clock iconcutlery cutlery iconflag flag iconfolder folder iconinstagram instagram iconpinterest pinterest iconfacebook facebook iconprint print iconsquares squares iconheart heart iconheart solid heart solid icon

    Description

    This gingerbread oatmeal is a perfect cozy breakfast for the holidays! Made on the stovetop with quick steel cut oats, cinnamon, ginger, and molasses for a delightful (but not too sweet!) gingerbread taste.

    4 cups unsweetened almond milk (or any milk / non-dairy milk alternative of choice)
    1 cup quick steel cut oats
    1 1/2 teaspoons cinnamon
    1 teaspoon ginger
    1/4 teaspoon allspice
    1/4 teaspoon ground cloves
    1/4 teaspoon nutmeg
    1/2 teaspoon salt
    1 teaspoon vanilla extract
    1 tablespoon molasses
    3 tablespoons brown sugar
    Optional: pecans and/or yogurt for garnish

    In a medium pot, bring milk to a boil.
    Lower heat to medium-low, stir in oats and cook until begins to thicken, about 3-4 minutes.
    Stir in cinnamon, ginger, allspice, ground cloves, nutmeg, salt, vanilla, molasses, and brown sugar, until combined with oats.
    Continue cooking until oats reach desired texture, about 7-10 minutes.
    Optional: Top with pecans, yogurt, or other desired toppings.

    Notes

    Regular steel cut oats will take longer to cook, about 30 minutes.

    Prep Time: 0 minutesCook Time: 15 minutesCategory: BreakfastMethod: StovetopCuisine: Holiday

    Keywords: gingerbread oatmeal, gingerbread oatmeal stovetop

  • Cheesy Chicken Skillet With Broccoli And Rice

    Cheesy Chicken Skillet With Broccoli And Rice

    Cheesy Chicken Skillet With Broccoli And Rice – The Real Food Dietitians


    Privacy & Cookies Policy


  • How To Find the Perfect Facial Cleanser for Your Skin Type

    How To Find the Perfect Facial Cleanser for Your Skin Type

    Cleansing is an important step in your skin care routine, but it can be confusing when it comes to choosing the right type that will work best for your needs and specific complexion. To minimize the time spent determining the right choice, we’re sharing how to find the best facial cleansers for your skin type. 

    Cleansers For Sensitive Skin | Oily Skin | Dry Skin | Combination Skin | Normal Skin

    Why Use A Facial Cleanser?

    Imagine a day’s worth of dirt, oil and leftover makeup merging into an invisible mask of pollutants on your skin. This is where the magic of a good cleanser shines, sweeping away these impurities. If neglected, applying products over this unwashed layer only traps the dirt and oil, leading to clogged pores. These clogged pores, filled with a mix of oil, bacteria and grime, become the perfect breeding ground for breakouts. You can learn even more about the purpose of cleansing in this cleansers 101 guide.

    Cleansers For Sensitive Skin

    Understanding your skin type is crucial in selecting the right facial cleanser, especially if you have sensitive skin. So, how do you know if you have sensitive skin? When exposed to irritants, sensitive skin frequently responds with a rash that may appear red, flaky or bumpy.  You may notice these reactions from certain chemicals, ingredients or perfumes as well as leave-on topical products, such as facial serums and moisturizers, that are designed to stay on the skin instead of being washed off. You may also notice that you react to a change in diet or when you have hormonal imbalances. In addition to rashes and bumps, sensitive skin may feel itchy and tight — particularly after cleansing with products that contain harsh chemicals or artificial fragrances. Sensitive skin is also often accompanied by dryness or dehydration, which can also leave skin feeling prickly and parched.

    Given these challenges, it’s important to choose a cleanser that is gentle yet effective. When your skin is on the sensitive side, cream cleansers are a great choice as they help lock in moisture while removing impurities. One of our top picks? The Lemon Grass Cleanser, which contains olive oil to soothe dry skin and sunflower oil, rich in vitamins to reduce the visible signs of aging. This hypoallergenic cleanser also contains wheat extract for hydration.  

    Cleansers For Oily Skin

    For those dealing with oily skin, the approach and choice of products will differ significantly. If you’re unsure whether you have oily skin, here are a few signs that you may have this skin type:

    Greasy to the touch
    Visible, large pores
    Prone to breakouts 
    Makeup gets soaked up quickly but also slides off easily 
    Shiny looking 

    If you do have this skin type, your goal should be to control the buildup of oil or debris and prevent breakouts. Our Lead Skin Care Trainer Natalie Pergar recommends the Charcoal Exfoliating Gel Cleanser to combat oily skin. Rich in antioxidants, this gel lather unclogs and deep cleans pores thanks to its star ingredient — charcoal. This may sound odd, but charcoal actually draws out dirt and oil to help prevent clogged pores. Another antioxidant-rich ingredient in this formulation is blue matcha, which is known to improve the visible signs of aging (think fine lines and wrinkles). You can watch Natalie go into more detail about this cleanser in this In The Mix video.

    Cleansers For Dry Skin

    If your skin is rough, flaky or peeling, you probably have dry skin. Ask yourself these questions: Does your skin feel unusually tight, almost stretched, after showering, swimming or cleansing? Is the overall texture of your skin more on the rough side? Have you observed the emergence of fine lines or deeper cracks in your skin? You most likely have dry skin. Both genetics and environmental factors like heating or winter can exacerbate your symptoms.

    To effectively tackle dry skin issues, it’s essential to choose the right skin care products. Dry skin can benefit from gentle cleansers including foaming products like our Kombucha Microbiome Foaming Cleanser. It features micellar technology and actives that help balance the skin microbiome and protect the skin barrier, an essential for sensitive skin. A blend of pre, pro* and postbiotics improves the skin barrier while kombucha, jasmine, white tea and ginger combine to refresh and balance the microbiome.

    Cleansers For Combination Skin

    Combination skin is characterized by oily and dry skin in one complexion. Your T-zone and chin feel extra oily while your cheeks or other parts of your face get dry. The skin’s oiliness and dryness can fluctuate with changes in weather. Humidity might increase oiliness, while cold weather could enhance dryness. The goal for combination skin is to treat both oily and dry areas for a clear, balanced complexion. You will most benefit from using different products on different areas of your face. You can visit an Eminence Organics Spa to receive a tailored routine for your skin type. 

    For those with combination skin, we recommend the Mangosteen Daily Resurfacing Cleanser which has a Lactic Acid Complex to remove buildup, gently remove dead skin cells and buff the skin to look smooth and polished. Mangosteen, a superfruit, defends your complexion from pollution and other environmental stressors that could dry out the skin.

    Cleansers For Normal Skin 

    Normal skin types simply need to maintain their balanced and healthy skin. You don’t notice dry or oily patches, nor do you suffer redness or itchiness from trying new products. You might occasionally notice breakouts related to hormones or infrequent cleansing, but your skin is generally balanced. While normal skin is typically well-balanced and less prone to issues, it’s not completely immune to the occasional changes or breakouts caused by environmental factors. To help maintain this balance and counteract these effects, the Stone Crop Gel Wash is an excellent choice for normal skin. This gentle cleanser provides a light foam, refreshing and cleansing the skin, while ingredients like stone crop and chamomile work to hydrate and soothe.

    Have you found a cleanser that suits your complexion? To narrow your selection down, view the full lineup of Eminence Organics cleansers here or visit an Eminence Organic Spa for a consultation. 

    *This formula does not contain live probiotic cultures. 

  • Обзор зеркал казино Вавада для игроков на 2023 год


    Обзор зеркал казино Вавада для игроков в 2023 году


    Обзор зеркал казино Вавада для игроков на 2023 год

    Если вам нужно попасть на ресурс Вавада, но он недоступен, не отчаивайтесь. Варианты обхода блокировок существуют, и один из лучших способов – использовать альтернативные ссылки. Эти адреса позволяют получить доступ к платформе, минуя ограничения. Некоторые из них актуальны и работают стабильно, поэтому не стесняйтесь их искать. Если хотите упростить себе задачу, воспользуйтесь vavada казино официальный сайт, чтобы не потерять время на поиски.

    Важно помнить, что альтернативные адреса могут изменяться, так как они подвержены блокировкам. Регулярная проверка актуальности таких ссылок поможет вам не потерять возможность участвовать в играх. Прежде чем начать, рекомендуется ознакомиться с правилами и условиями, чтобы избежать неприятностей.

    Также стоит учитывать, что использование VPN – еще один вариант, позволяющий обойти региональные ограничения. Этот способ добавляет уровень безопасности, при этом обеспечивая стабильный доступ к желаемым ресурсам. Применяйте эти методы с умом и оставайтесь в курсе изменений, чтобы ваша игровая активность была комфортной и безопасной.

    Как найти актуальные зеркала Вавада для безопасного доступа

    Также можно подписаться на официальные каналы в социальных сетях. Администрация часто публикует актуальные адреса на своих страницах. Это не только поможет получить нужную информацию, но и защитит вас от мошеннических сайтов, которые могут выдавать себя за оригинал.

    Не забывайте о специализированных агрегаторах, которые собирают рабочие ссылки. Такие ресурсы могут предоставлять аналитику по потерям и новым адресам, что будет полезно для отслеживания изменений. Несмотря на скорость обновления информации, проверяйте, чтобы адреса были подтверждены пользователями.

    Сравнивая предлагаемые ссылки, обращайте внимание на отзывы и рекомендации. Прежде чем перейти по новому адресу, убедитесь в его надежности, изучив, как он зарекомендовал себя у других. Совместное использование информации и опыта поможет вам оставаться в безопасности в своём онлайн-развлечении.

    Главные преимущества использования зеркал казино Вавада в 2023 году

    Пользуйтесь нафаршированными версиями сайта, чтобы получить доступ к эксклюзивным предложениям и бонусам, которые недоступны на основном ресурсе. Это подход позволит вам оптимально использовать ваш бюджет и реально увеличит шансы на выигрыши.

    Скорость доступа к ресурсам через альтернативные платформы значительно выше, чем при использовании стандартного URL. Если основной сайт временно недоступен или загружается медленно, специализированные адреса обеспечивают моментальный доступ к играм и услугам.

    Защита пользователя – еще один важный момент. Часто альтернативные ссылки предлагают дополнительные методы шифрования данных, что делает ваши финансовые операции более безопасными. Это особенно актуально для желающих сохранить конфиденциальность своих действий.

    Актуальные версии предоставляют не только привычные развлечения, но и новые продукты, которые могут вас заинтересовать. Это дает возможность быть в курсе последних новинок в области азартных игр и Интерактивного контента.

    Наконец, такие механизмы способствуют активному общению с поддержкой клиентов. Вы сможете легко и быстро связаться с представителями службы помощи для решения возникших вопросов, а это значительно улучшит ваше общее впечатление от работы с платформой.

    Пошаговая инструкция по регистрации и игре через зеркала Вавада

    Сначала перейдите по актуальной ссылке-заменителю и откройте сайт. Обычно ресурс автоматически подстраивается под устройство. Зайдите в раздел регистрации, найдите кнопку с надписью “Зарегистрироваться”. Заполните поля с личными данными: имя, фамилию, дату рождения, адрес электронной почты и номер телефона. Создайте надежный пароль, чтобы ваша учетная запись была защищена.

    После успешной регистрации вам нужно подтвердить электронную почту или номер телефона. Проверьте свою почту или SMS-сообщения на предмет подтверждающего кода. Введите его в специальное поле на платформе. Как только ваша учетная запись активирована, пополните баланс. Обычно это можно сделать несколькими способами: картами, электронными кошельками или криптовалютой. Выберите удобный вариант и следуйте инструкциям на экране.

    Теперь, когда ваши средства на счету, выберите любимую игру. Перейдите в раздел с азартными развлечениями и просмотрите доступные варианты. Вы можете попробовать демо-версию для знакомства с игровым процессом или сразу начать с реальными ставками. Не забывайте контролировать свои лимиты и играть ответственно, чтобы получать удовольствие от каждой сессии.


  • Tips to Stay on Track While You Travel

    Tips to Stay on Track While You Travel

    by Caitlin H,

    Dec 11, 2023

    Travel Tips

    The busy holiday traveling season is right around the corner.

    And, if you’re like the millions of Americans who plan on hopping on a plane and heading home for the holidays or on a vacation, it doesn’t mean you have to give up on your weight loss goals.

    Below, we lay out 7 ways to stay committed to your healthy eating and fitness routine even when the bags are packed and you’re ready to go.

    Kitchen


    1) Book Accommodations with a Kitchen


    Nothing can pack on the calories faster than eating out every meal. In fact, a 2010 study found that the average restaurant serves portion sizes that are 2-3 times what U.S. Dietary Guidelines recommend.

    If you’re not staying with family, get a room or rental that includes a kitchen or kitchenette. That way, you can cook more meals on your own, cutting back on the calories and oversized portions.

    Pack Smart


    2) Pack for Success.


    Amid the gifts for grandma, knit sweaters, snow boots, and winter gloves, make sure you’re also tossing in all the gear you need to keep up your fitness routine. Travel-size yoga mats, gym leggings and shirts, sports bras and sneakers should all make their way into your suitcase.

    In addition, be sure to place healthy snacks and an empty water bottle in your carry-on bag. Having items like individually wrapped almond packs, granola or protein bars or even a piece of fruit will help ensure you bypass all the candy bars, potato chips, and soda pop on display at every airport convenience store. You can fill your water bottle after passing through security.

    Fitness Center


    3) Use that Hotel Pool or Gym


    Most hotels offer a pool and fitness center as amenities. Don’t ignore them. Commit to starting your day off with a 45-minute workout or winding down in the evening with a few laps in the pool.

    Stay Active


    4) Attend Active Outings.


    Traveling for fun doesn’t have to just mean lounging around the poolside. There are plenty of activities that are fun and involve movement. Examples include sightseeing, walking tours, and destination sports.

    Stay Hydrated


    5) Stay Hydrated.


    Drinking plenty of water while traveling is critical to keep you energized and on track. That’s especially true if you’re headed to a place with a drastic change in climate compared to what you’re used to, such as up to the mountains for a ski trip.

    Dine Wisely


    6) Dine Wisely.


    There’s a good chance that you’re going to end up at a restaurant while traveling, even if you do book a place with a kitchen. Be sure to look at the menu online in advance. Try to pick restaurants that include healthy menu items and have a calming atmosphere. When ordering, opt for broth-based soups, salads, and menu items that don’t include words like “loaded” or “fried.” Eat This, Not That offers a comprehensive guide to help you make healthy choices when eating out.

    Have Fun


    7) Have Fun!


    Vacationing is meant to be a blast! Use these tips to stay on track, but don’t become so rigid that you can’t enjoy your trip. If you’ve been on a weight loss plan* for some time, take a moment each evening to celebrate your continued success and all the little wins at the end of each day.


    ————————————————————————————


    Author: Caitlin H
    Diet-to-Go Community Manager

    Caitlin is the Diet-to-Go community manager and an avid runner. She is passionate about engaging with others online and maintaining a healthy, active lifestyle. She believes moderation is key, and people will have the most weight loss success if they engage in common-sense healthy eating and fitness.


    Weight Loss Tips

Crypto Casino
Betnano Giriş
new online casino
Padişahbet Giriş
Padişahbet
Padişahbet Güncel Giriş
Padişahbet Giriş