Category: Latest Articles

  • This Skincare Routine for Acne Can Give You Major Results

    This Skincare Routine for Acne Can Give You Major Results

    If you deal with persistent breakouts, chances are you’ve spent countless hours and countless dollars looking for the holy grail product that would finally clear your skin for good. Unfortunately, the reality is that acne is a disease of the skin for which there is no known cure. While there are many companies that claim otherwise (saying you’ll never have to deal with another breakout again if you just use their products), the truth is that breakouts will continue to come and go. 

    That’s not to say you’re powerless or that the right at-home skincare routine can’t give you results. In fact, as an esthetician with over 30 years of experience, I’ve witnessed thousands of clients see life-changing improvements in their skin! With the right products and the right knowledge, many people can significantly reduce their breakout activity.

    In this post, you’ll meet Priscilla and learn how she got her breakouts under control with an at-home skincare routine I designed for her. You’ll see the awesome progress she’s made since she started the routine back in 2019 (It’s proof that you do have control when it comes to clearing your skin—but it takes patience!). I’ll also discuss the limitations of an at-home routine and share when it’s time to think about professional treatments. Let’s go! 

    Meet Priscilla

    “Hi! I’m Priscilla. I’m 23 years old and I’ve been struggling with acne for about seven years now. I first started experiencing breakouts after getting the Depo-Provera shot for birth control; that was what made it flare up, and I’ve been dealing with it ever since.”

    Q: Have You Found Anything in the Past 7 Years That Has Helped Your Skin?

    A: “Retin-A (a prescription retinoid) is legit the only thing I have ever seen any results from, but I was still getting a lot of breakouts even when using that. I’ve tried a lot of different products, it’s like when people say, ‘I’ve tried everything.’ I feel like I’m in that boat. I’ve never really been able to identify any specific triggers for my breakouts either. I eat super clean, I work out, and I take care of my body, but I haven’t really found anything that works for me perfectly yet.” 

    Note: Priscilla isn’t my first client who has experienced this. So many people feel like they should be able to control their breakouts by cutting out certain foods, taking certain supplements, or living a “clean” lifestyle. While taking care of your overall health is certainly important, I’ve never liked this narrative. It makes people feel like they’re to blame for their breakouts. That’s simply not true! Sometimes, our skin is just wired a certain way, and it’s not a shortcoming. 

    Q: What Were Your Top 3 Skin Concerns Going Into Our Consultation?

    A: “My top three goals were to lessen the number of my active breakouts, reduce redness (post-blemish scarring), and smooth out the texture of my skin.” 

    Priscilla’s At-Home Skincare Routine (and Results)

    After a consultation and skin examination, I identified four main issues that I wanted Priscilla to address in her routine: 

    Active breakoutsRedness Vascular damage (from older, nodular breakouts. Priscilla had V-beam laser treatments that had already improved this.)Pitting and scarring (from nodular breakouts she experienced in her early 20s. Priscilla will likely deal with this for a lifetime. I suggested that once her active breakouts are under control, she use a retinoid to improve her skin texture.)

    With these four main goals in mind, I designed an at-home skincare routine for her, so she would finally see results!

    Priscilla’s Morning Skincare Routine

    Cleanser: Purifying Face WashToner: Elderberry Soothing TonerSerum: Vitamin C&E TreatmentMoisturizer/SPF: Weightless Protection SPF 30

    Priscilla’s Nighttime Skincare Routine

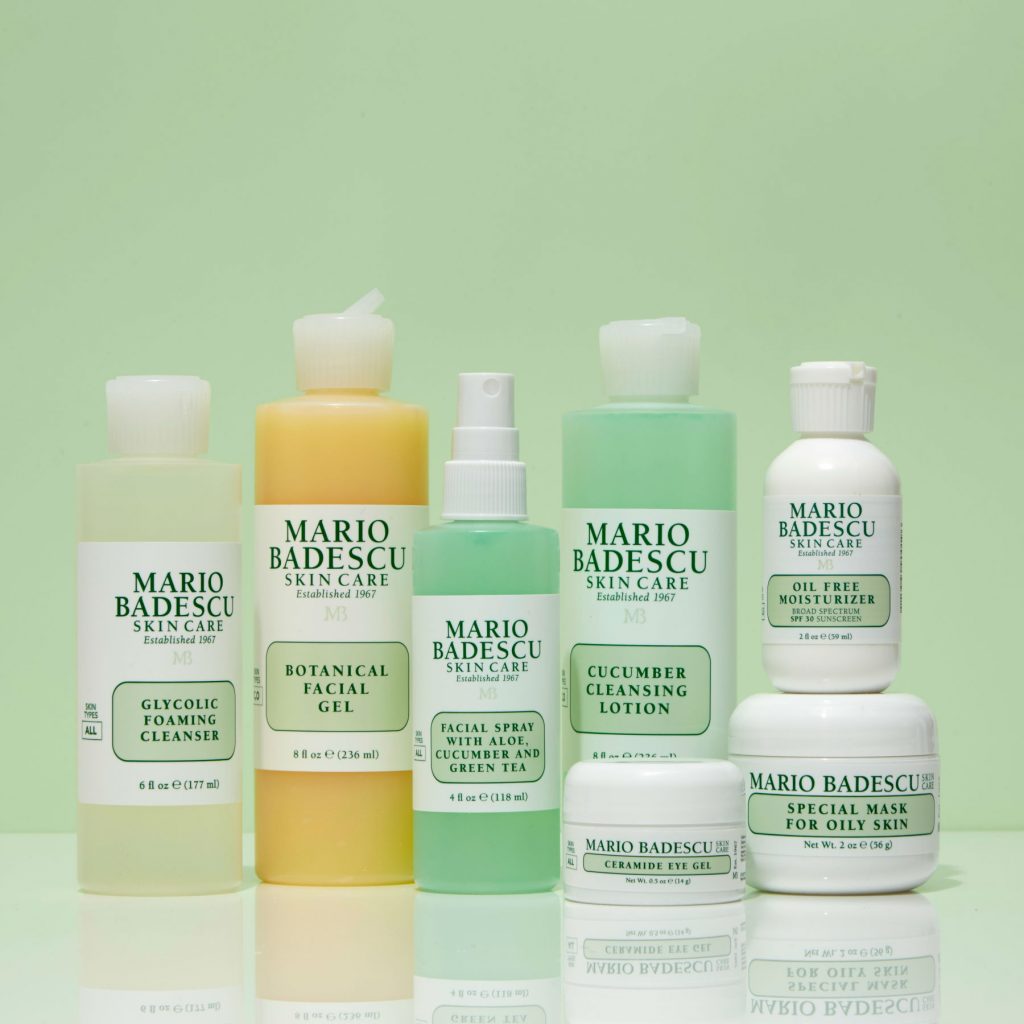
    Cleanser: I had Priscilla use two different cleansers each night. First, she would use the Soothing Aloe Cleansing Milk (I instructed her to rinse it off her skin with water and then wipe her face with a washcloth to ensure proper removal). This is technically a cleansing lotion, meaning it’s better at dissolving makeup and sunscreen than gel cleansers. After she used that, I had her follow up with the AHA/BHA Blemish Control Cleanser. This is a gel cleanser that helps remove excess oil. It also contains ingredients that can penetrate the pore lining to fight breakout-causing bacteria.Mask: Rapid Response Detox Masque (every night for 5 minutes)Toner: Elderberry Soothing TonerSerums: I had Priscilla use a few different serums to give her skin everything it needed. First, I suggested the Pore + Wrinkle Perfecting Serum. I had her alternate that every other night with a combination of the Skin Correcting Serum and the Anti Bump Solution. On Skin Correcting Serum + Anti Bump nights, I instructed her to apply the Skin Correcting Serum first, wait for it to dry, pat on the Anti Bump Solution, wait for that to dry, and then follow up with a moisturizer.Moisturizer: Skin Recovery Lotion

    Note: Anti Bump Solution can be used as a spot treatment for individual cystic breakouts, or it can be used as a preventative treatment against them. To use preventatively, apply a thin layer to the entire affected area 2-3 times a week.

    Priscilla’s Weekly At-Home Facial

    I recommended Priscilla do a weekly facial on a Skin Correcting Serum + Anti Bump Solution night to boost results.

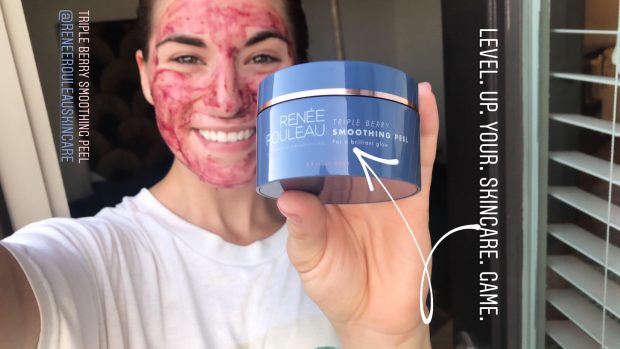
    Double Cleanse: Soothing Aloe Cleansing Milk followed by AHA/BHA Blemish Control CleanserPeel: Triple Berry Smoothing Peel (Leave on for 5-10 minutes. It may tingle but that’s normal.)Mask: Rapid Response Detox Masque (Leave on for 15-30 minutes. Keep it in the fridge for extra cooling benefits!)Toner: Elderberry Soothing TonerHydrating Serum: Skin Correcting SerumTreatment Serum: Anti Bump SolutionMoisturizer: Skin Recovery Lotion

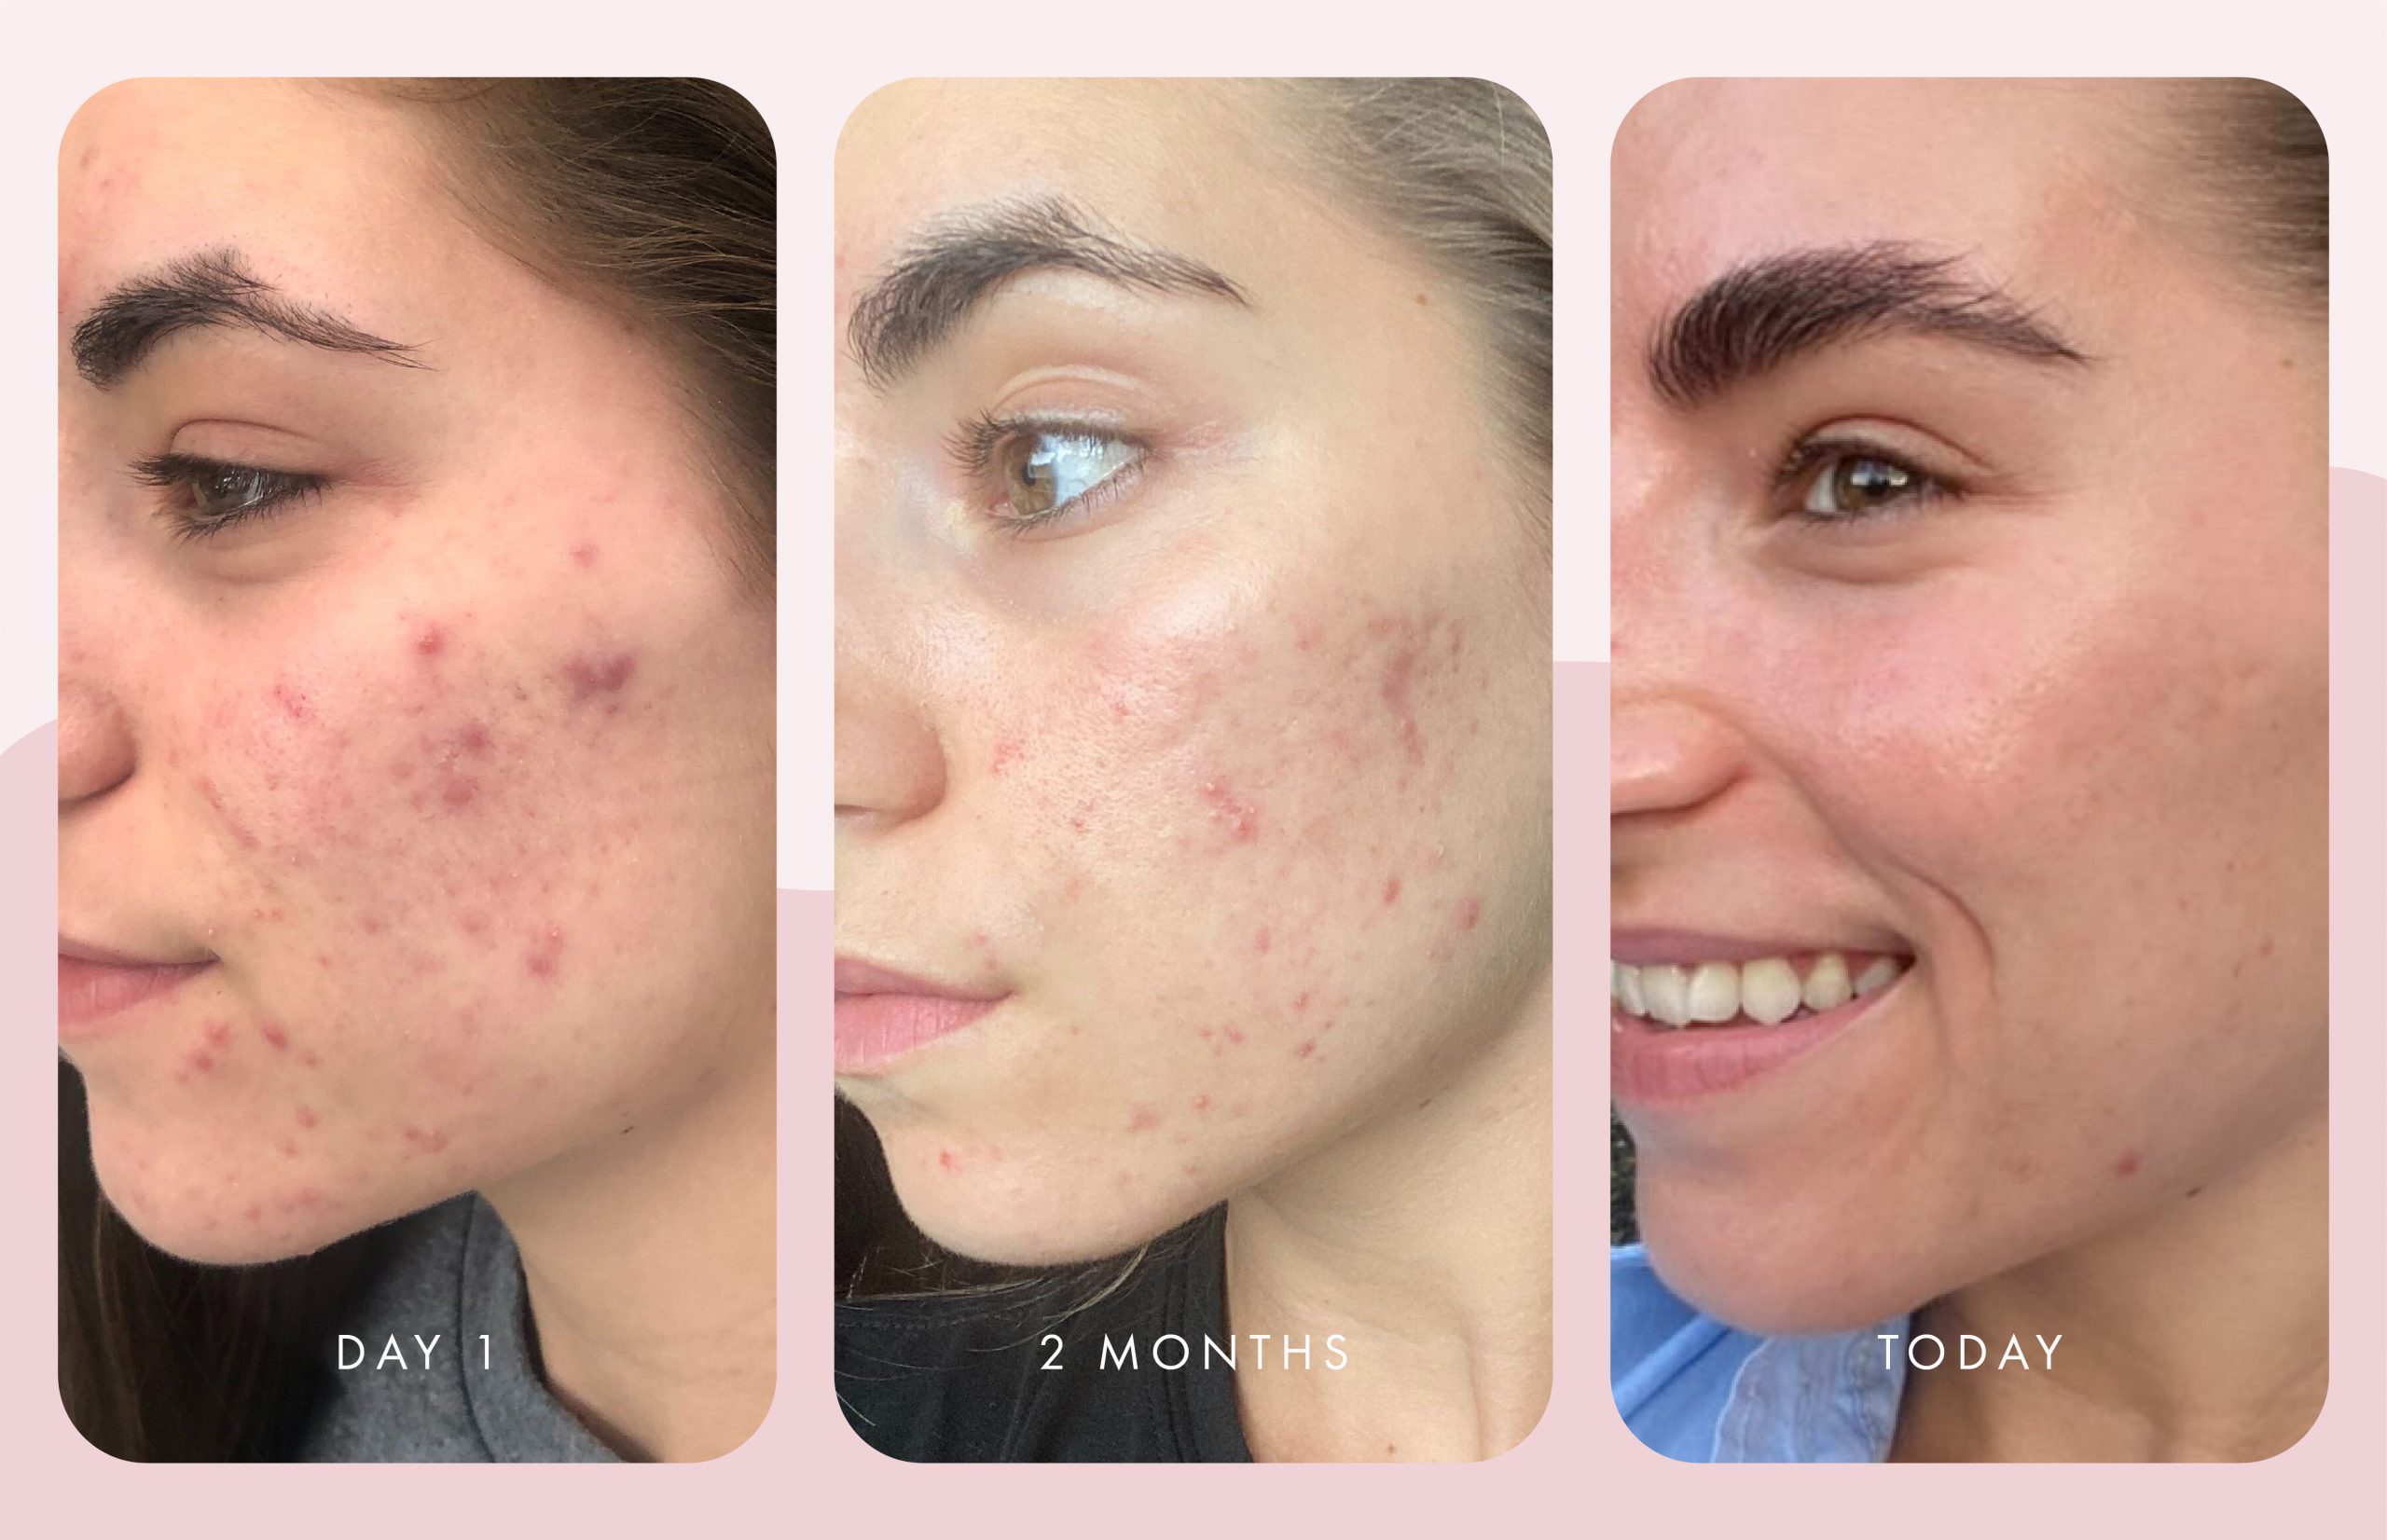
    “It took me about two months to really start seeing a noticeable difference,” Priscilla said. “I was floored by this because I had spent so much time—literally years—on medications and harsh topical creams with no real, lasting results. So after getting results from my regimen after 2 short months of staying consistent and committed to the process, I was hooked and haven’t looked back since. That said, it is all about consistency. Stay the course!” 

    The Products that Made the Biggest Difference

    There were a few products Priscilla felt made the most noticeable difference in her skin.

    Vitamin C&E Treatment: “This makes me feel confident in my skin because it gives me a glowy, plumped feel. I can’t wait to use it every morning!”Skin Correcting Serum: “This serum is everything. I have noticeably fewer bumps and less redness.”AHA/BHA Blemish Control Cleanser: “The gentle exfoliation that this product has is absolutely amazing. It’s not abrasive, it’s just the right amount of gentle scrub to get that good clean feel. It feels like I’m scrubbing the day off which it’s so refreshing after a long day.” 

    Priscilla’s Skin Today

    It’s been two years since Priscilla trusted me to take her on a new skincare journey. With consistency and dedication, her skin has seen major improvements. Even she was surprised when she saw the difference side-by-side!

    “Don’t give up hope,” Priscilla said. “There is a light at the end of the tunnel, and for me, it was Renée Rouleau Skin Care. The investment in her products is worth it. Why spend X amount of money on crappy products that don’t give you results vs using quality, proven product that gives you results (and you only need a small amount of product, so it lasts). If you are on the fence, I say go for it!”

    I’m so happy to see Priscilla’s skincare routine gave her the results she was looking for. Even though I’ve been helping clients address their skin concerns for over 30 years, it’s never any less fulfilling to help them feel more confident in their skin!

    When to Start Considering Professional Treatments

    Because Priscilla has experienced mostly nodular and cystic breakouts (which occur deep within the skin as opposed to on the surface), she was left with deeper redness as well as some indented scarring. This is where professional treatments come in. While skincare products can make a huge difference, they work on the top layers of the skin and may not be enough to solve problems rooted within the deeper layers.

    When I first designed Priscilla’s at-home routine, my goal was to get her breakouts under control and calm her skin so it was less inflamed and irritated. This would allow her to pursue more aggressive professional treatments to tackle redness and scarring.

    The reason I recommend waiting to get breakouts under control before moving on to professional treatments is that these treatments could actually make breakouts worse. Oftentimes, they are just too stimulating and can stir up or reactivate breakouts. Some treatments can also cause slight irritation, which isn’t your friend if you’re blemish-prone. 

    So, wait to seek out most professional treatments until after your breakouts have calmed down. In Priscilla’s case, now that her skin is calmer and clearer, she’s free to pursue micro-needling, laser treatment, or whatever else her dermatologist might recommend (in addition to continuing her at-home routine to keep her breakouts under control).

    The Bottom Line

    You don’t have to be my client to get a personalized skincare routine that will give you results. My skincare line is based on 9 signature skin types. Every single product I formulate solves a specific problem for each. If you don’t know your skin type, take the Skin Type Quiz. At the end of it, you’ll get personalized product recommendations. It takes the guesswork out of building an effective at-home routine, and I can’t recommend it enough.

    One more thing. If you’re starting an entirely new routine like Priscilla was, I can’t stress enough the importance of introducing the products slowly. If your skin has a negative reaction to an ingredient in a product, this will make it easier to pinpoint which one. I recommend adding one new product to your routine every two days. And, as always, you should always patch-test each product before use. 

    Next, here are five mistakes you don’t want to make if you have breakout-prone skin!

  • 10 Festive & Fun Light Christmas Cocktails

    10 Festive & Fun Light Christmas Cocktails

    by Caitlin H,

    Dec 5, 2022

    Festive and Fun Light Christmas Cocktails

    Holiday get-togethers are often synonymous with high-calorie adult beverages like spiked eggnog, mimosas, wine and beer. While it’s okay to indulge occasionally, there are also a ton of fun, lower-calorie beverages you can whip up instead.

    Keep these 10 Christmas-themed cocktail recipes on hand for any upcoming festivities and you can enjoy without going overboard. As always, be sure to drink responsibly!


    Cran-Good Moscow Mule


    1) Cran-Good Moscow Mule


    Moscow Mules are a fun holiday drink that often make their way onto the party menu. The traditional versions tend to have upwards of 200 calories, which makes this 127-calorie version with cranberry juice pretty darn appealing!

    Get the recipe at Hungry Girl.

    Skinny Espresso Martini


    2) Skinny Espresso Martini


    Combine a little alcoholic indulgence with the shot of caffeine you need to stay the course with this delicious, skinny espresso martini recipe. It’s only 145 calories and will surely have you wanting more!

    Get the recipe at Picklee.

    Spiked Skinny Eggnog


    3) Spiked Skinny Eggnog


    No holiday celebration is complete without eggnog! This creamy holiday staple is usually laden with calories, but this skinny spiked eggnog cuts them down to 107 per serving. Add a splash of bourbon or spiced rum for a tasty alcoholic version that will make its way back onto your Christmas Eve table year after year!

    Get the recipe at Skinny Taste.

    Rosemary Gin Fizz


    4) Rosemary Gin Fizz


    This rosemary gin fizz combines earthy and tart flavors with a splash of booze and mint that makes for a light, refreshing cocktail you’ll want to sip over and over again. It’s only 135 calories and has only 1g of net carbs, making it an excellent choice for anyone going the keto route!

    Get the recipe at The Best Keto Recipes.

    Christmas Sangria


    5) Christmas Sangria


    Sangria’s red color makes it a perfect choice for holiday parties. Unfortunately, most sangria recipes have 300+ calories per serving. That’s why you’ll definitely want to try this 70-calorie version that uses sugar-free Sprite to cut down on added sugar without skimping on taste.

    Get the recipe at Living Locurto.

    Cranberry Mojito


    6) Cranberry Mojito


    A cranberry- and mint-leaf-garnished mojito makes for a pretty compelling Christmas drink. A traditional mojito has about 200-250 calories. But using unsweetened cranberry juice, seltzer and Stevia cuts way down on calories — there are just 156 in each serving of this version!

    Get the recipe at Lauren Kelly Nutrition.

    Low-Sugar Mimosa


    7) Low-Sugar Mimosa


    When the in-laws are in town, it may not be a bad idea to have a mimosa pitcher out on the table when everyone wakes up for brunch. A typical mimosa typically has about 200 calories per serving. But this version substitutes the sugar-laden orange juice with La Croix to cut way down on the calories for a guilt-free morning treat!

    Get the recipe at Designing Vibes.

    Pomsettia


    8) Pomsettia


    Pomegranate juice, vodka and club soda are all it takes to make this festive cocktail that will soon become the star of the show. It’s only 139 calories per serving and looks the part as much as it tastes it!

    Get the recipe at Shaw Simple Swaps.

    Winter Sea Breeze


    9) Winter Sea Breeze


    Tangy and crisp meets bright and bubbly for this fun cocktail that combines vodka, grapefruit juice, tonic and soda water. Adding a bunch of pomegranate seeds and a sprig of mint makes it look as Christmas-y as it comes, just the thing for enjoying with the family the night before the big day!

    Get the recipe at Catch My Party.

    Skinny Paloma


    10) Skinny Paloma


    Mix your tequila and grapefruit juice with a bit of zero-calorie, all-natural syrup for a bright, refreshing skinny cocktail with just 117 calories per serving. You can also garnish it with some cucumber or a sprig of rosemary to enhance its festive look!

    Get the recipe at Lose Weight By Eating.


    ————————————————————————————


    Author: Caitlin H
    Diet-to-Go Community Manager

    Caitlin is the Diet-to-Go community manager and an avid runner. She is passionate about engaging with others online and maintaining a healthy, active lifestyle. She believes moderation is key, and people will have the most weight loss success if they engage in common-sense healthy eating and fitness.


    Recipes & Kitchen Tips

  • Instant Pot Butternut Squash Risotto

    Instant Pot Butternut Squash Risotto

    Ready in just 35 minutes, this Instant Pot Butternut Squash Risotto is a set it and forget it meal. Hands-off and way less labor intensive with that creamy, rich texture we all love!butternut squash risotto in a grey speckled bowl with fried sage and butternut squash cubes on top

    Who doesn’t love the rich, creamy texture of risotto?

    What if you could make this beloved dish without hovering over the stove, constantly stirring for 30 minutes until your arm feels like it’s going to fall off?! 

    That’s what the Instant Pot is for! It allows you to make risotto without all the labor.

    You simply add all your ingredients, set it, and let the pressure cooker work its magic. You’re left with creamy risotto, every time.

    Your Instant Pot makes the risotto, and you pour yourself a glass of wine. It’s a win-win.

    With the ease of using the Instant Pot, I don’t think I’d ever feel compelled to make risotto any other way! The end product is just as rich and delicious.

    This version calls for butternut squash and it breaks apart into the rice after cooking, creating a delicious fall / wintery flavor without big chunks of squash.

    Ingredients You’ll Need

    graphic of ingredients for instant pot butternut squash risotto with text overlay on marble board

    Notes on Ingredients

    butter: I used unsalted but salted would be fine too! You’ll just adjust when you add salt at the end, to taste.

    shallot: adds mild oniony flavor

    garlic: adds a flavor punch to the dish

    arborio rice: I like using this rice for risotto because its most widely available and has a higher starch content, which is key for risotto. Other varieties that work well for risotto include Vialone Nano and Carnaroli. 

    dry white wine: I used sauvignon blanc (because it’s what I prefer to drink) but you could use any dry, crisp white wine like a chardonnay or pinot grigio.

    vegetable broth: you could also use chicken broth if you don’t need this to be vegetarian.

    frozen butternut squash: I prefer using frozen for this dish because it’s a big time saver and you can just dump the whole bag in, but if you have fresh on hand you can make that too!

    sage leaves: this is used as a garnish that adds more warmth to the dish.

    parmesan cheese: adds a nice umami flavor boost and lends to the creaminess of the dish.

    Equipment You’ll Need (affiliate links – if you make a purchase I receive a small commission)

    Instant Pot

    How to Make Instant Pot Butternut Squash Risotto

    graphic of step by step how to make butternut squash risotto in instant pot

    Expert Tip

    Don’t rinse the rice! Washing the rice strips away the starch that is key for risotto’s creamy consistency.
    If the risotto is too thick, add more broth, a 1/4 cup at a time, until your desired consistency is reached.

    Recipe FAQs

    What flavors go well with butternut squash?

    Butternut squash is pretty versatile and pairs well with many flavors like sage, thyme, cloves, all spice, nutmeg cinnamon, cardamom, and rosemary. It also goes well with umami and savory flavors like cheese, bacon, and mushrooms, and aromatics like onion, shallot, and garlic.

    What main dish goes well with butternut squash risotto?

    Butternut squash risotto can be served as a main dish with a vegetable on the side like my Brussels sprout salad with pomegranate or it can be paired with a protein like my slow cooked salmon, air fryer salmon, or my air fryer whole chicken.

    What should you add to risotto to make it taste better?

    Risotto is a blank canvas for flavors. You can add parmesan cheese and/or mushrooms for umami flavor and butter, shallots or onion, and garlic go a long way! Always be sure to add salt and pepper for flavor, too! Dry white wine is important too as it adds acidity, which can help balance out the richness of risotto. butternut squash risotto in grey speckled bowl, two spoons, glass of wine, and parmesan cheese

    Storage and Preparation

    Butternut squash risotto leftovers can be stored in an airtight container in the refrigerator for up to 3-5 days. Leftovers can be reheated in the microwave or on the stovetop but I like to add a splash or two of vegetable broth before heating so that it thins out the risotto a bit.

    You can freeze butternut squash risotto in an airtight container in the freezer for up to 3 months. However, the texture of the risotto upon defrosting and reheating might be a bit grainy. It’s best to try to store leftovers in the refrigerator if you can.

    You could also repurpose leftovers and make risotto balls! You would add a few eggs to your risotto, shape the mixture into balls, coat with breadcrumbs and fry in a pan with olive oil.

    butternut squash risotto in grey speckled bowl with butternut squash cubes, sage, and pepper on top

    For more butternut squash inspiration, check out my other recipes below!

    Whole Wheat Butternut Squash Banana Bread

    Instant Pot Butternut Squash Mac N Cheese

    Butternut Squash Hash

    Whole Wheat Butternut Squash Waffles

    Spiced Roasted Butternut Squash Soup

    Butternut Squash and Brussels Sprout Naan Pizza

    Butternut Squash and Kale Slow Cooker Lasagna

    two bowls of risotto with crumbled sage and butternut squash on top with two spoons

    If you like this recipe, please be sure to comment and give it a 5 star rating below. If you make it, share it on Instagram and tag me @karalydonrd and I’ll re-share it with my followers! If you want to save this recipe for later, be sure to pin it on Pinterest!

    This recipe was retested, reshot and revamped to bring you the most delicious (and most beautiful) dish! The original post was published December 2019.

    Print

    clock clock iconcutlery cutlery iconflag flag iconfolder folder iconinstagram instagram iconpinterest pinterest iconfacebook facebook iconprint print iconsquares squares iconheart heart iconheart solid heart solid icon

    Description

    Ready in just 35 minutes, this Instant Pot Butternut Squash Risotto is a set it and forget it meal. Hands-off and way less labor intensive with that creamy, rich texture we all love!

    2 tablespoons butter
    1 shallot, finely chopped (about 2 tablespoons)
    3 cloves garlic, minced (about 1 tablespoon)
    2 cups arborio rice
    1/2 cup dry white wine
    4 1/2 cups vegetable broth
    16 ounces frozen butternut squash (about 4 cups cubed butternut squash)
    2 tablespoons olive oil
    1 bunch sage leaves, about 1620 leaves, stems removed
    1 cup grated parmesan cheese
    Salt and pepper, to taste

    Set the Instant Pot to Sauté function for 7 minutes and add butter. Once melted (about 2-3 minutes), add shallot, and cook until softened and fragrant, about 1-2 minutes. Add garlic and cook until fragrant, about 1 minute.
    Add rice and stir to coat. Cook rice until toasted, about 2 minutes. Turn off Sauté function and add wine to deglaze the pan. Continue to stir until most of wine is evaporated.
    Add broth and squash and stir ingredients before securing lid onto Instant Pot (make sure valve is set to sealing).
    Set Instant Pot to Manual/Pressure Cook (High) for 6 minutes.
    While the risotto is cooking, in a small fry pan add oil over medium high heat. Once oil is hot, add half of the sage leaves to the pan and fry until leaves start to curl at the edges, about 30 seconds. Remove with a slotted spoon. Repeat with the remaining leaves. Place them onto a paper towel. Sprinkle generously with salt.
    Once the 6 minute pressure cook is done, use the quick release valve to release steam.
    Once pressure is released, open lid and stir in parmesan cheese. Season with salt and pepper, to taste.
    Divide risotto evenly into bowls. Sprinkle fried sage over top.

    Notes

    Don’t rinse the rice. Washing the rice strips away the starch that is key for risotto’s creamy consistency.
    If the risotto is too thick, add more broth, a 1/4 cup at a time, until your desired consistency is reached.

    Prep Time: 5 minutesCook Time: 32 minutesCategory: DinnerMethod: Instant PotCuisine: Italian

    Keywords: instant pot butternut squash risotto, butternut squash risotto

  • Mexican Hot Chocolate Cookies (Gluten Free)

    Mexican Hot Chocolate Cookies (Gluten Free)

    Mexican Hot Chocolate Cookies (Gluten Free) – The Real Food Dietitians


    Privacy & Cookies Policy


  • Gooey Toasted-Coconut Chocolate Brownies – Nutrition Stripped®

    Gooey Toasted-Coconut Chocolate Brownies are gluten-free, delicious, and simple to make with calcium-rich tahini.

    This is the chocolate brownie recipe you need for those times when you want something super sweet yet a little savory. Tahini, which is made from ground sesame seeds, is rich in calcium, healthy fats, and plant-based protein. Along with being a nutrient-dense option to add to a brownie recipe, it’s a bit earthy creating a savory-sweet combination.

    Using the Foundational Five to Create These Gooey Toasted-Coconut Chocolate Brownies

    In case you’re new to the NS Community and the Mindful Nutrition Method, the Foundational Five system is part of how we teach you to build balanced meals. It makes it easy for you to give your body the nourishment you need while having the flexibility to enjoy the foods you love without stressing about food.

    The Foundational Five is made up of five elements of nutrition including Protein, Fat, Non-starchy Carbohydrates, Starchy & Sugary Carbohydrates, and the Flavor Factor (which brings vibrancy, deliciousness, and enjoyment to your meals). 

    You can download our free guide that walks you through our Foundational Five system for creating balanced meals that you can use to meal prep or cook fresh this week!

    Tahini Nutrition Benefits 

    Packed with Unsaturated Fats 

    Unsaturated fats help contribute to satiety, satisfaction, and fullness in your meals. Plus, they’re heart-healthy in that they help promote balanced cholesterol and blood sugar levels as well!

    Powerful Antioxidant

    Tahini is filled with antioxidants that help fight free radicals that can cause disease over time. Plus, they’re anti-inflammatory, making them an even stronger disease fighter as well. 

    Ingredients Needed To Make These Gooey Toasted-Coconut Chocolate Brownies

    coconut flakes
    bittersweet chocolate morsels
    unsweetened cocoa powder
    cornstarch
    tahini
    coconut oil
    coconut sugar
    eggs
    maple syrup
    kosher salt
    vanilla extract

    How To Make These Gooey Toasted-Coconut Chocolate Brownies

    After preheating your oven, you’ll whisk together cornstarch and cocoa powder in a medium-sized bowl. Then in a separate bowl, whisk together chocolate morsels, tahini, and coconut oil over low heat. Next, in a blender, you’ll beat the eggs, coconut sugar, maple syrup, kosher salt, and vanilla extract.

    You’ll then slowly add in the chocolate tahini mixture, followed by the cocoa powder and cornstarch mixture. Finally, pour the mixture into a greased baking dish and sprinkle with coconut flakes before baking!

    Tips For Making These Gooey Toasted-Coconut Chocolate Brownies

    There are a couple of tips you should keep in mind that will help you out a bit when baking these brownies. 

    Don’t forget to grease your pan

    Albeit simple, this is most definitely an important step. Coconut oil or butter will work great! 

    Allow the brownies to completely cool before cutting and serving

    In order for the brownies to be served at their best and fully intact, it’s important to let them fully cool prior to cutting. Cutting them too early will mean crumbly, less-than-ideal brownies. 

    FAQ About These Gooey Toasted-Coconut Chocolate Brownies

    What if I don’t like tahini?

    Don’t sweat it! You can always use any nut butter of your choice. Try out peanut butter or cashew butter instead! 

  • Ulta Cyber Monday 2022 Deals: Up to Half Off Makeup, Hair Care and More

    Ulta Cyber Monday 2022 Deals: Up to Half Off Makeup, Hair Care and More

    If you purchase an independently reviewed product or service through a link on our website, STYLECASTER may receive an affiliate commission.

    If you haven’t already spent all your money on Black Friday, Ulta Beauty’s Cyber Monday 2022 deals are worth a second—and third—look. There are so many new sales to be had on makeup, haircare, skincare, body products and fragrance. Chic gift sets are on sale, too, so you can pick up a present for everyone on your list at a major discount.

    There’s so much to choose from, we’re giving you the rundown on the best of the best deals during this Holiday Beauty Blitz. Weekly deals are popping up until December 24 with up to half off Tarte, Revlon, Kristin Ess Hair and so much more. This is actually one of Ulta Beauty‘s biggest sales of the year so mark your iCal for the sales you don’t want to miss.

    Ready to get started? We included some of our favorite deals, below. Check back here for more.

    tarte concealer

    Tarte.

    Tarte

    Shape Tape concealers and best-selling sets are only $20!

    revlon one step plus Ultas Massive Cyber Monday Sale Includes $20 Tarte Shape Tape & 40% Off Blow Dry Brushes

    Ulta.

    Revlon

    The cult-fave, upgraded One-Step Volumizer PLUS 2.0 Hair Dryer and Hot Air Brush is a whopping $30 off.

    lancome mascara

    Ulta.

    Lancôme

    Hypnôse Drama Instant Volumizing Mascara and eyeliner is 50 percent off. (This never happens!)

    kristin ess hair copper penny

    Kristin Ess.

    Kristin Ess Hair

    Grab the TikTok-viral hair gloss, plus more best sellers from the celeb hairstylist, for 30 percent off.

    chi flat iron Ultas Massive Cyber Monday Sale Includes $20 Tarte Shape Tape & 40% Off Blow Dry Brushes

    Ulta Beauty.

    Chi Pink 1” Titanium Flat Iron

    Select BabylissPro and Chi hair tools are 20 percent off. Upgrade your straightener with Chi Pink 1” Titanium Flat Iron.

    morphe brush set Ultas Massive Cyber Monday Sale Includes $20 Tarte Shape Tape & 40% Off Blow Dry Brushes

    Ulta Beauty.

    Morphe Eye Obsessed Brush Collection + Bag

    Select Morphe brush sets are 40 percent off, including this 12-piece set that has everything you need for all eye looks.

    Mario Badescu Drying Lotion

    Photo: Mario Badescu.

    Mario Badescu

    The entire brand is 30 percent off. Stop pimples in their tracks with Drying Lotion on-the-spot solution.

    the body shop cream Ultas Massive Cyber Monday Sale Includes $20 Tarte Shape Tape & 40% Off Blow Dry Brushes

    Ulta Beauty.

    The Body Shop

    Buy one, get one 40 percent off all week. We love the Lavender & Vetiver Sleep Balmy Body Cream for dry, winter skin.


    STYLECASTER | Ashley Benson Interview

  • Oily Skin | Mario Badescu Skin Care Blog

    Oily Skin | Mario Badescu Skin Care Blog

    How to deal with oily skin

    Wondering why your skin is so oily and what you can do to treat it? Whether you’ve been dealing with oily skin for what feels like forever or your skin type has recently changed, it can be maddening to be met with an oil slick when you’re trying to achieve a dewy glow. And while you can’t permanently get rid of oily skin, you can reduce its appearance. 

    Let’s look at what oily skin is and what you can do to control it:

    What is oily skin and what causes it?

    Oily skin appears shiny and slick, with prominent pores that easily become clogged and are prone to acne. This happens because glands produce an excess amount of a substance called sebum. Sebum is made of fats and has a shiny appearance. When it passes from your glands through your pores and to the skin’s surface, it can cause your face to look slick.

    Why do I have oily skin?

    There are a number of factors involved in why skin is oily. Hormonal changes, genetics, the weather, diet, and stress can all kick your oil glands into producing too much sebum. While you may not always know exactly what causes oily skin, (particularly yours!), there are steps you can take to make your skin appear less shiny.

    How can I make my skin less oily?

    Cleanse regularly: Take care of your oily face by cleansing it daily, morning and evening. Try not to overdo it: over-cleansing can strip the skin and actually spur your glands to produce more oil, putting you back to shiny square one.Be gentle: Avoid rubbing your face and be careful not to use overly harsh cleansers. Too much physical pressure and products that dry you out can irritate your skin, once again kicking your glands into overdrive. Mario Badescu Botanical Facial Gel is formulated for oily skin types to wash away grime without stripping skin.Use moisturizer: You may think that with all that oil, your face doesn’t need any more moisture. However, one of the best ways to combat oily skin is to keep your face healthy and moisturized. Look for a lightweight, oil free moisturizer. Mario Badescu offers two oil free moisturizers that won’t clog pores: one even contains SPF 17! Discover our best moisturizers for oily skin here.Try glycolic acid: Glycolic acid is one of the best ingredients for oily skin types, since it encourages cell turnover, exfoliates dead surface skin cells that can clog pores, and minimizes the appearance of pores. Glycolic acid is a powerful ingredient, so start slowly and step up your sunscreen usage. Swap out your regular cleanser 2-3 times a week for Mario Badescu Glycolic Foaming Cleanser for a complexion that’s radiant rather than greasy.Mask mindfully: Kaolin clay and bentonite clay are common in the best clay masks for absorbing oil and pulling impurities out of congested skin. Be mindful of your masking—alternate with your stronger products so you are not overdoing it. Mario Badescu’s Special Mask for Oily Skin contains both kaolin and bentonite clays to control excess oil along with calamine to protect and re-balance skin.

    Mario Badescu offers a variety of specially formulated products that can help control oil, so you can feel like you’re getting rid of oily skin without losing out on oil’s skin-protecting and plumping benefits. You’ll appreciate having a dewy glow instead of a slick shine!

    Categories: Beauty Tips, Lifestyle, MB Staff Favorites, Products, Skin Care, Skincare Routine |
    Tags: oily skin, skin care tips, Skincare Regimen |
    Permalink

  • What Is A Microcurrent Facial?

    What Is A Microcurrent Facial?

    If you have Clients requesting a more lifted, sculpted appearance, then a microcurrent facial may be worth considering. This innovative treatment dubbed the “non-invasive facelift” introduces low-grade electrical currents to stimulate your facial muscles. It’s like a workout for the face. The result? Defined cheekbones, lifted brows and tighter-looking skin, all with zero downtime and no physical damage to the skin. Read on to discover everything there is to know about the microcurrent facial, and why it may be a fit for your spa menu.  

    What Is A Microcurrent Facial? | How Does It Work? | Benefits Of Microcurrent Facials | Aftercare 

    What Is A Microcurrent Facial?

    A typical microcurrent facial begins the same as a regular facial treatment, with cleansing, exfoliation, masking and other optional add-ons like LED light therapy. Before the microcurrent process starts, a water-based conductive gel is applied to the skin to help the currents reach the facial muscles and to prevent any stinging. 

    Celebrity facialist Joanna Vargas, known for her transformative microcurrent facials, explains the microcurrent experience to Byrdie perfectly: “The microcurrent facial uses two handheld prongs that deliver precise dosages of energy to the skin and work simultaneously to repair and produce collagen in the dermis while gently erasing signs of aging in the epidermis, which is the top layer of skin.” 

    How Exactly Does A Microcurrent Facial Work?

    Although microcurrent facials may be a new service in the skin care space, doctors and physiotherapists have been using microcurrent therapy as a muscle stimulator since the 1980s for pain relief and even facial paralysis conditions, like Bell’s palsy. Once the face-lifting effects were noticed by the beauty industry, it wasn’t long before the microcurrent device was adopted as a skin care tool.

    When you think of microcurrent therapy in the same way as physical fitness, the process makes perfect sense. Regular exercise and lifting weights work the muscles in the body to build strength and create a toned appearance, so why not do the same for the face? 

    Microcurrent therapy helps strengthen facial muscles by stimulating the production of (ATP), formally known as adenosine triphosphate. ATP is the energy currency for our bodies, essential for many processes in our cells including muscle contraction. According to a study in Clinical Orthopaedics and Related Research, the low-grade electricity emitted from microcurrent devices stimulates ATP production, which allows for muscle contraction that strengthens facial muscles over time.

    Benefits Of Microcurrent Therapy 

    The coolest thing about microcurrent facials is that most Clients will notice instant results, making it the perfect non-invasive skin care treatment. Microcurrent also doubles as a lymphatic drainage massage given the device hits a lot of pressure points in the face, so a more defined appearance is almost guaranteed. 

    Microcurrent facials tighten and smooth the muscles and connective tissues in the face and have been shown to reduce wrinkles, mostly around the forehead area. Clients will notice enhanced facial features and a more lifted, sculpted and awakened appearance. This treatment can also improve blood circulation and may stimulate collagen production in the dermis, resulting in healthier, more plump-looking skin. 

    Microcurrent therapy also offers a variety of non-cosmetic benefits, including faster wound healing, reduced pain from sinus congestion, and improved functioning of atrophied muscles, according to Medical News Today. 

    What Is The Cost Of Treatment?

    The beauty of microcurrent therapy is that there are both at-home and in-office options, making it attainable for more people. Different devices will have different levels of electrical currents, with in-office devices usually being much more effective. That being said, the at-home options are great for daily maintenance, as consistent microcurrent facials are key to seeing lasting results. 

    The cost of treatment is best determined by spa location and the level of expertise of the technician performing the treatment. According to Medical News Today, microcurrent facials range from $200-$600 per session. At-home devices range from $180-$500 depending on the size and strength of the device.

    Is Microcurrent For Everyone?

    Microcurrent facials are amazing for all skin types, which makes them a great addition to any treatment menu. However, anyone with a pacemaker, metal implants, or who is pregnant should avoid this treatment. Clients with severe acne should also avoid using microcurrents, which could aggravate inflammation.

    You may also want to avoid this treatment for at least two weeks after botox or fillers, as you don’t want to move anything around. After two weeks, this treatment can actually enhance botox and filler results and extend procedure results. 

    Microcurrent Aftercare Tips

    As microcurrent facials are a non-invasive treatment with zero downtime, the aftercare is very minimal. It’s best to be gentle with your skin after treatment and avoid any harsh scrubs or active ingredients like retinol, especially if your treatment includes exfoliation. That aside, Clients can resume all regular activities right away and no redness/irritation should be expected.  

    Have you incorporated this treatment into your spa? Share your experiences with us in the comments below and join the conversation on social media. You can also find out how to become an Eminence Organics Spa Partner here.

  • Jojoba Beads Are the Most Skin-Friendly Ingredient for Facial Scrubs

    Jojoba Beads Are the Most Skin-Friendly Ingredient for Facial Scrubs

    Of all the products I consistently recommend, physical exfoliants like face scrubs give people the most pause these days. I think the first reason is that many people don’t understand how face scrubs can be beneficial, especially if they’re already using exfoliating acids. But after more than 30 years as an esthetician, I firmly believe in the benefits of a facial scrub, especially when used in tandem with exfoliating acids. You see, while exfoliating acids loosen dead cells that are still stuck to the skin’s surface, a gentle scrub completes the process by actually lifting those loosened cells away. This leads to instantly brighter, smoother-looking skin (instant gratification, anyone?). 

    The second reason many people are hesitant about face scrubs is that they developed a reputation for being harsh, or even damaging. Scrubs all work in the same way—a granule of some sort is massaged over the skin to mechanically slough off dead cells. And it’s exactly these granules that have created so much controversy over the years (hello, walnut shells). Whether it was a growing awareness of how particles with jagged edges were causing micro-tears in our skin or the realization that plastic microbeads were wreaking havoc on the environment, scrubs haven’t enjoyed the best reputation lately.

    Enter, jojoba beads. In this post, I’ll give you all the details you need about why these beads are such an awesome ingredient for exfoliation. You’ll learn what they are, how they’re made, and how they can give you instantly smoother, brighter skin without causing damage.

    What Are Jojoba Beads?

    Before answering this question, it’s important to note that jojoba oil (a popular skincare ingredient loved for its ability to soften and moisturize skin) isn’t actually an oil at all—it’s a wax. Jojoba “oil” is made up of esters, which technically makes it a liquid wax. Oils, on the other hand, are made up of triglycerides and fatty acids. Jojoba beads are simply a hardened form of the same wax used to make jojoba oil. 

    The Advantages of Jojoba Beads in Facial Scrubs

    1. They’re Customizable—and Predictable

    The greatest benefit of formulating with jojoba beads is that you can control the manufacturing process from start to finish, customizing them to your needs. Since you’re basically creating the particles from scratch, you get a leg up compared to other types of granules. You can control the size, shape, and firmness of the particles, molding them to the parameters of your choosing. When creating Triple Berry Smoothing Scrub, for example, I opted for very firm beads to provide a nice physical exfoliation.

    Other granules— whether derived from seeds, shells, oats, sugar, rice, or anything in between—have to be broken down from something that already exists. This makes their shape unpredictable and hard to control, often resulting in shards rather than beads. 

    2. They Never Scratch or Damage Your Skin

    Thanks to our ability to mold the granules, jojoba beads are consistently rounded with no sharp edges. A big reason facial scrubs fell by the wayside was that some of them contained jagged particles. People realized this could cause microtears in the skin, with repeated use leading to irritation and barrier damage. In fact, having a “damaged” moisture barrier actually means developing tiny, invisible cracks through which moisture can escape and irritants can enter. As you can imagine, using something that scratches your skin only makes matters worse!

    Check out these microscopic images of jojoba beads compared to other exfoliating granules. While the jojoba beads are perfectly round, the others have sharp, jagged edges. You’d never be able to tell just by looking at them with the naked eye!

    Jojoba beads and other physical exfoliants in microscopic view  

    3. Jojoba Beads are Biodegradable 

    Finally, jojoba beads are completely biodegradable. Until fairly recently, many popular face and body scrubs used plastic microbeads made of polyethylene. These beads were officially banned in 2015 after it was discovered they were making their way into lakes and oceans, disrupting wildlife and potentially contaminating the water supply. 

    After plastic microbeads were banned, many companies turned to natural granules such as shells, seeds, or sugar. But, as demonstrated above, these can be harmful to the skin. Jojoba beads are truly the best of both worlds in this sense. They offer the smooth texture that made plastic microbeads perfect exfoliators, without any of the environmental ramifications. 

    How to Use Products With Jojoba Beads

    Like most physical exfoliators, products with jojoba beads are fairly straightforward to use. Jojoba beads can be found in dedicated face scrubs or included in other products, such as cleansers, for an added benefit. Simply apply the product to slightly damp skin and massage gently in circular motions, focusing on areas of pigmentation or nooks and crannies where flaky skin tends to accumulate.

    While jojoba beads are gentle on the skin thanks to their shape, they may not grab onto dead skin cells as quickly as other, more jagged granules. Because of this, I recommend spending a full minute massaging your skin with jojoba beads and applying medium pressure.

    Next up, learn how to successfully use both a face scrub and exfoliating acids in your routine.

  • Dont JUST Diet. Create a Healthy Lifestyle

    Dont JUST Diet. Create a Healthy Lifestyle

    by Caitlin H,

    Nov 28, 2022

    Healthy Lifestyle

    Anyone who’s ever struggled with weight knows how challenging it can be to find a diet that works, especially with so many options. Should you try calorie restriction or low-carb? Mediterranean or time-restricted eating? Low-fat or detox? It’s nearly impossible to know what to do!

    Well, here’s the thing. While selecting a healthy, well-rounded diet that works for you is essential, changing your mindset is even more critical to focus on changing your overall lifestyle. By approaching your weight loss plan to improve your health and overall wellness, you’re much more likely to find success.

    With that in mind, we compared several key points related to diet culture versus lifestyle changes. Below, we look at how positively framing your mind to focus on your daily habits—rather than your diet alone—can affect the change you’re looking for.


    1) Restriction vs. Inclusion


    Dieting is often about restriction, with many diets focusing on what you can’t have. While that is important when it comes to following something like, say, the keto diet, correctly, how you look at it is also vital. Instead of focusing on what you can’t have, focus on what you can.

    For example, suppose you’re following a keto diet. In that case, while you can’t have cereals with refined sugars or high-carb items like white bread or bagels for breakfast, you can have a poached egg with some avocado on the side. And suppose you’re trying a healthy, calorie-controlled diet. In that case, you may not be able to have a giant piece of chocolate cake every night. Still, you can have a brownie once or twice a week, as long as you have enough calories in your calorie bank.

    See what we did there? Changing your mindset towards one of inclusion and positivity will make it easier and more enjoyable to stick with your new eating habits.


    2) Heavy Sweat Sessions vs. Fitness You Love


    Incorporating exercise into your lifestyle can seem scary. After all, you’ve likely seen commercials showing chiseled men and women pouring sweat at the gym or while using at-home equipment. Or perhaps you’ve dared to walk into a local gym or rec center, only to witness what looked like utterly miserable people gasping it out on various pieces of equipment. Seeing these scenarios firsthand can quickly have you asking yourself if it’s really worth all that misery.

    Thankfully, that’s not the only way to approach fitness. Fitness doesn’t have to be about being miserable for an hour a day, a few days a week. The key is finding something you love, whether light walks through a park or a group class at a local fitness center. Making it a part of your lifestyle comes down to commitment. And you’re much more likely to commit to fitness if you’re doing something you enjoy.


    3) What You’re Eating vs. Your Overall Daily Habits


    Dieting culture often zeroes in on the food you eat at each meal. That hyperfocus on what you can and can’t eat can make meals feel like a chore. In addition, it also deviates from what really matters to achieve a lifestyle change: the daily habits you’re repeating.

    Yes, you should be aware and focused on what you’re eating, but you should also approach it as just one piece of the puzzle you need to put together each day to create an overall healthy lifestyle. That means you should also be doing what you can to get enough sleep each night, trying to get in moderate to light exercise 3-5 days a week, managing stress from the start and incorporating relaxation into your evening routine. Focusing on all the elements necessary for a healthy lifestyle makes you more likely to enjoy it and succeed.


    4) Pounds Lost vs. Body’s Performance


    It can be fun and definitely prideful to weigh yourself and see the pounds decrease week after week. And while there’s absolutely no shame in enjoying that, you should also focus on what your body can do that it couldn’t do prior to changing your eating habits and lifestyle.

    For example, can you sit down comfortably in a chair you barely fit into before? Can you walk for longer or put on smaller-sized pants? Did you go on a hike without feeling winded and miserable the whole time? Celebrate each and every new thing you do instead of only focusing on the number on the scale.


    5) A Sprint vs. a Marathon


    Many diets promise record results in minimal time. And while it’s true that eating nothing but cabbage soup for a week may generate a significant reduction in the number on the scale for that week, it’s also impossible to sustain. More than likely, you would find yourself losing a massive amount of weight at the beginning, then seeing things level out, and then getting frustrated and giving up altogether, only to see the number on the scale climb back up to a higher level than it was before.

    In contrast, a lifestyle approach involves eating a wholesome, nutritious diet accompanied by fitness you enjoy, getting decent sleep and prioritizing de-stressing. In fact, following a quality, healthy diet will generally result in a 1- to 2-pound loss each week. But it is also more likely to create longtime, sustainable results that will last a lifetime.

    Ultimately, success is about creating something that will last. And that means creating a new life for yourself that involves consistent, healthy habits you build on over time.


    ————————————————————————————


    Author: Caitlin H
    Diet-to-Go Community Manager

    Caitlin is the Diet-to-Go community manager and an avid runner. She is passionate about engaging with others online and maintaining a healthy, active lifestyle. She believes moderation is key, and people will have the most weight loss success if they engage in common-sense healthy eating and fitness.


    Lifestyle/Wellness

Padişahbet
Crypto Casino
new online casino
Padişahbet Giriş
Padişahbet Güncel Giriş